
Showing posts with label baby shower gifts. Show all posts
Showing posts with label baby shower gifts. Show all posts
Tuesday, October 9, 2012
Angela's Gifts
My friend Angela ordered a hat and booties for each of her nieces as a Christmas gift last year. I wanted to share these cute sets with you.
Tuesday, April 24, 2012
Gage's Blanket
Back in the fall I made a baby blanket for my husband's cousin's child, Gage (did you follow that?). This family loves all things camouflage that is why I went with a hunter green. I used my favorite yarn, I Love this Yarn from Hobby Lobby.
I used one of my favorite patterns. It is from RAKJ Patterns. It is called the Triple Stitch Blanket. I love it as you can use just about any yarn and any size hook. This blanket works up really quickly. You can see another picture of one that I worked up in a bulky weight yarn here.
Sunday, January 22, 2012
Star Ripple Blanket, Hat & Slippers for a Baby Gift
In the midst of making all my Christmas gifts and opening up my shop, I made some baby gifts for my husband's cousin Shannon who was pregnant. She has since had an adorable little girl Abby. Abby came into this world a bit early but is doing great now.
I tried out a few new patterns for this baby gift. I did a theme of Hot Rose, White and Gray (all I love this Yarn). Let me show you all the cute items.
I tried out a few new patterns for this baby gift. I did a theme of Hot Rose, White and Gray (all I love this Yarn). Let me show you all the cute items.
Friday, August 26, 2011
Baby Cocoon & Hat
I just love it when I am in the right place at the right time. That is exactly what happened the other day. I was on Facebook, like I am most evenings and Betsy of The Dainty Daisy was looking for a few crochet pattern testers. I completely lucked out and was one of the first people to comment.
I didn't know what I would be making but I had the supplies that she requested. I was beyond excited when I got an email with the pattern to test after about an hour. I didn't have any patterns for a baby cocoon and here I got one for free to test! Yippee for me! To make it even better, the cocoon was rippled. I just love ripples!
I didn't know what I would be making but I had the supplies that she requested. I was beyond excited when I got an email with the pattern to test after about an hour. I didn't have any patterns for a baby cocoon and here I got one for free to test! Yippee for me! To make it even better, the cocoon was rippled. I just love ripples!
Sunday, August 21, 2011
Freezer Paper Stenciled Onesies-A Great Baby Gift
The baby boom continues. I have five sweet girls, that have just had babies, or are about to have babies. I've been very busy making baby gifts for them. I had every intention of making a bundle of five gifts. These five gifts would include the adorable Fancy Burp Cloths and Dressed Up Wipe Cases, but I just never got that far and I thought the moms could use the gifts before their babies are high school graduates. I did make them each a Birth Announcement Sign, a Please Knock Sign, and a Freezer Paper Stenciled Onesie.

Here are the gifts I made for sweet Lindsey and her son, Micah.
Saturday, July 23, 2011
A Baby Gift-An Announcement Sign

Friday, July 22, 2011
Crocheted Ballerina Slippers
I had to make my sweet Anna a pair of ballet slippers. Every girl needs a pair! What I like about these slippers is I can change the ribbon to suit the outfit.


Friday, July 15, 2011
Baby Strawberry Slippers
After making my Strawberry Slippers, I realized my sweet Anna deserved a pair as well. She had a super cute dress with strawberries on it and I knew the slippers would be precious with it.

 The slipper pattern I used for these is from Little Birdie Secrets. The flower pattern is from Sarahndipities. I stopped after the second row for the small flower. Both are great patterns.
Here is my sweet Anna in her strawberry dress. I also made her a pretty flower for her hair as well. You can see the flower better in the second picture.


I plan to have my flower clips and slippers in my Etsy shop when it opens soon. Be on the lookout! I am taking the big leap and giving it a try. Wish me luck!
Saturday, July 9, 2011
A Baby Gift-A Please Knock Door Sign
I have 5, very special people, I'm making baby presents for. I have 5 separate gifts in mind. This is the first of the gifts. I got this idea from HowDoesShe. Here's the link to their original project. http://www.howdoesshe.com/please-knock-baby-is-sleeping-sign

Here's one of the five signs I made.

I had five pieces of scrap wood cut into 12"x7" boards. I stained the back, the sides, and the edges of the front of each board.

After the stain dried, I applied a coat of Mod Podge to the entire front of the board.

I cut 5 different pieces of scrapbooking paper to 12"x7" and Mod Podged each to the boards.

I used a scraper to smooth the paper down and get all the bubbles and creases out.
I let the Mod Podge dry for about 30 mins. before applying a heavy layer of Mod Podge to the top of the paper (oops no picture!). I let it dry for a few hours.

After the Mod Podge dried, I used my sander to distress the boards. I concentrated on blending the edges.

I used the same stain, I used on the board, to further distress the board. I just rubbed the stain in with a cloth.

I cut vinyl on my Silhouette. "Please" and "Baby is" are Pea Bonnie Script. "Knock" and "Sleeping" are Pea Lacy Chunky. The font size will depend on the size of the board you're making. I just made the document, on my Silhouette, a 12x7 and adjusted the words to "fit".
After cutting the vinyl, I peeled the negative away leaving only the print, I wanted on my sign, on the page.

Using a piece of transfer paper, I covered the vinyl and brought it over to the signs. I used my scraper and rubbed the words on to the sign.

I peeled the transfer tape off and this is what I had left.

I drilled holes in the top corners of the sign to add the wire for hanging the sign.

I put the wire through the hole and twisted it.
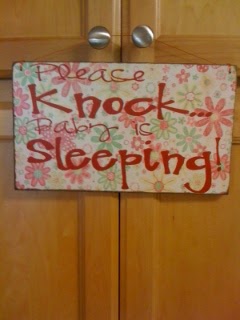
And the signs are finished.

The third sign is a light blue and green background with navy vinyl.

This sign has a great geometric patterned paper.

I like the snazzy stripes of the last sign!
Stay tuned to see what the other gifts will be. I have a feeling you may have already seen two of them. Shhh.... I want to keep them a secret until the gifts are revealed to the new mothers.

Friday, July 8, 2011
Baby Sling Tutorial
When I had Evan, I found it increasingly hard to carry him, tend to Ryan and do anything else. A friend of mine (who also showed me the nursing cover) was carrying her son in a sling. I loved the idea of the sling as it was much easier to get your child in and out of versus one of those fancier contraptions.
The only thing I didn't like about the sling was the cost. When I looked on the internet, most slings were at least $30-50. That was way out of my price range. After examining her sling, I knew I could figure out how to make one especially with a bit of google research.
Now that I've had another child, the sling is an essential and I have perfected how I make them. This is a very simple tutorial and will get you a sling for the cost of 2 yards of fabric and some matching thread!
I made this one for my friend, Henri and her precious baby girl, McCall. Here she is modeling it for me. Thanks for the picture, Henri!

Baby Sling Tutorial
Supplies Needed:
2. Unfold your fabric and cut it lengthwise. It will measure 2 yards by 22 inches. Put one piece aside for future use or another sling.

3. Fold your fabric lengthwise once. Then fold it in half widthwise. Make sure the open sides are facing up and to the right. See picture below.

4. On the top, open side, measure from the fold to your hip to shoulder measurement. Henri is a petite little lady so her measurement 22 inches. You want to add a 1/2 inch to this measurement. Therefore, this top measurement is 22.5 inches. Mark this with a pen.
Now measure along the bottom from the fold to the next measurement (keep reading) and mark. Take the original measurement and adding three inches to it. In Henri's case that is 25 inches (22 plus 3). See picture below.

5. After marking both measurements, you will want to cut from the bottom to the top with a curve. See picture below.

6. Unfold your fabric and heat up your iron. It time to use that dreaded iron and do some finishing details. Measure a 1/4 of an inch fold using your measuring gauge on the length of your fabric. Iron this fold down on both sides.

7. Fold this over again and iron down an additional 1/4 of an inch on both sides.

8. Sew down the fold on top and bottom.

9. With the sides sewn and finished, fold the fabric in half widthwise with the right side of the fabric facing up. Make sure your adjust your stitch width to a tight stitch. This will increase the strength of the seam. Sew along the curve a 1/4 of inch in.

10. Turn the sling inside out. You are going to sew along the curve above the seam you just made. This will encase the previous seam. Make sure you sew above the previous raw fabric or it will stick out the bottom of the sling (learn from my oops). This is double protection from the seams opening up.
 11. Open up the sling and sew down this encased seam to the front or back of the fabric. This makes a nice finish and you don't have the encased seam sticking out.
That's it. A simple sew for an awesome sling! Here is my finished sling.

I hope this tutorial helped you. If you are new to baby-wearing and need help utilizing a sling. Here is an excellent guide to the different wearing positions.
This is also an excellent gift to make for a little girl. It is equally as fun to carry your baby dolls around in a sling. I am sure I will be making one for my sweet Anna one day.
I hope you or a friend enjoys a new sling!
Happy Crafting!
The only thing I didn't like about the sling was the cost. When I looked on the internet, most slings were at least $30-50. That was way out of my price range. After examining her sling, I knew I could figure out how to make one especially with a bit of google research.
Now that I've had another child, the sling is an essential and I have perfected how I make them. This is a very simple tutorial and will get you a sling for the cost of 2 yards of fabric and some matching thread!
I made this one for my friend, Henri and her precious baby girl, McCall. Here she is modeling it for me. Thanks for the picture, Henri!

Baby Sling Tutorial
Supplies Needed:
- 2 yards of fabric of choice (width should be at least 44 inches)
- Matching thread
- Sewing machine
- Measuring tape and/or measurement gauge
- Fabric Marking pen (or light pen to mark small measurements)
- Iron
- Scissors
2. Unfold your fabric and cut it lengthwise. It will measure 2 yards by 22 inches. Put one piece aside for future use or another sling.

3. Fold your fabric lengthwise once. Then fold it in half widthwise. Make sure the open sides are facing up and to the right. See picture below.

4. On the top, open side, measure from the fold to your hip to shoulder measurement. Henri is a petite little lady so her measurement 22 inches. You want to add a 1/2 inch to this measurement. Therefore, this top measurement is 22.5 inches. Mark this with a pen.
Now measure along the bottom from the fold to the next measurement (keep reading) and mark. Take the original measurement and adding three inches to it. In Henri's case that is 25 inches (22 plus 3). See picture below.


6. Unfold your fabric and heat up your iron. It time to use that dreaded iron and do some finishing details. Measure a 1/4 of an inch fold using your measuring gauge on the length of your fabric. Iron this fold down on both sides.

7. Fold this over again and iron down an additional 1/4 of an inch on both sides.

8. Sew down the fold on top and bottom.

9. With the sides sewn and finished, fold the fabric in half widthwise with the right side of the fabric facing up. Make sure your adjust your stitch width to a tight stitch. This will increase the strength of the seam. Sew along the curve a 1/4 of inch in.

10. Turn the sling inside out. You are going to sew along the curve above the seam you just made. This will encase the previous seam. Make sure you sew above the previous raw fabric or it will stick out the bottom of the sling (learn from my oops). This is double protection from the seams opening up.

That's it. A simple sew for an awesome sling! Here is my finished sling.

I hope this tutorial helped you. If you are new to baby-wearing and need help utilizing a sling. Here is an excellent guide to the different wearing positions.
This is also an excellent gift to make for a little girl. It is equally as fun to carry your baby dolls around in a sling. I am sure I will be making one for my sweet Anna one day.
I hope you or a friend enjoys a new sling!
Happy Crafting!
Tuesday, July 5, 2011
My first Tutu & Tutorial
Well, I did it! I made my first tutu! My friend Henri, sent me an easy tutu tutorial video (see below) awhile back, so I thought it would perfect for a birthday gift. Check it out!

I made this for sweet Antonia's Princess Birthday party. Here are some pictures of beautiful Antonia in her tutu. Thanks for the pictures, Karla!


 Isn't she just precious? I hug and squeeze her every time I see her!
I was very happy with how my first tut turned out! It was very simple to make.
Here is what you will need:
I did the slip knot technique and I used at least 60 strips for this 4T/5T tutu. I used every bit of the two rolls of tulle. I like how full the tutu turned out. Once I put on all the tulle, I tied on a ribbon and made a pretty bow.
I think my first tutu was a success!
Be on the lookout for my next tutu. I am making a ladybug tutu for my sweet Anna's first birthday!
Happy Crafting!

I made this for sweet Antonia's Princess Birthday party. Here are some pictures of beautiful Antonia in her tutu. Thanks for the pictures, Karla!


I was very happy with how my first tut turned out! It was very simple to make.
Here is what you will need:
- 2 rolls of 6 inch by 25" tulle of either one or two colors
- 3/4 inch Elastic for waist band
- Scissor or rotary cutter/cutting mat
- ruler or measuring tape
- needle and thread or a sewing machine to make it super fast
- coordinating ribbon to the colors of the tulle
- roll of paper towels and pins (this is to hold the elastic as you tie on the tulle
I did the slip knot technique and I used at least 60 strips for this 4T/5T tutu. I used every bit of the two rolls of tulle. I like how full the tutu turned out. Once I put on all the tulle, I tied on a ribbon and made a pretty bow.
I think my first tutu was a success!
Be on the lookout for my next tutu. I am making a ladybug tutu for my sweet Anna's first birthday!
Happy Crafting!
Thursday, June 30, 2011
Pacifier Clip Tutorial
Whether you approve of pacifiers or not, this isn't the issue. The issue is saving yourself or another parent from picking up a pacifier continually or having to go on the great pacifier hunt.
I have three kids and of those three, two loved having a pacifier. My sweet little Anna loves her pacifier. Since I am getting used to a girl and all the needs to accessorize, I had to make Anna some pretty pacifier clips to go with her outfits. I also made a few boy's clips for a friend.
Without further ado...
Pacifier Clip Tutorial
Supplies Needed:
Suspender/Mitten clips: You can purchase just the clips at a craft store, but they can be expensive ($4 for two). If you are lucky to hit the winter items before they are gone, purchase some regular mitten clips. Typically, you get 4 in a set. I bought some at regular price for $2 and caught them a few weeks later for $0.50! That is quite the savings. These are colored, but you could always spray paint or even paint them with fingernail polish.


Ribbon: Measure your mitten clip opening to insure that your ribbon will fit well. Most of these are 3/4 of an inch or an inch.
Thread: Pick your thread to match your ribbon
Sewable Velcro
Sewing machine or by hand if you so choose
Scissors
Directions:
1. Cut your ribbon to the size that you would like for the child. Typically 6 to 8 inches. You don't want it too loose as it could become a danger for the child.
2. Put both sides of the velcro together and cut it to fit your ribbon. It doesn't need to be a large piece, just enough to catch and keep the ribbon attached.

3. Fold over one in the ribbon. String the ribbon through the mitten clip with the fold on the backside. Fold over the clip and sew together.


4. Fold over the other end of the ribbon. Place one side of the velcro over the fold. Sew around the velcro to secure. Space the second piece of velcro about an inch down from the ribbon and sew it to the ribbon as well.


There you have it. A simple pacifier clip that you can whip up very quickly as a gift or for one of your little ones. Here the ones that I have made recently.

Happy Crafting!
PS. Happy Third Birthday to my little man Evan! Thanks for always making us laugh and for your sweet platypus type kisses! Stop growing up on Mommy!
Subscribe to:
Posts (Atom)


