Welcome!
Thanks for visiting! Please leave us a comment as we love your feedback.
See where we are partying at the bottom and on the sidebar.
Showing posts with label signs. Show all posts

Tuesday, December 20, 2011

My Favorite Sign!

This is a sign I made for our friend Samy's 5th birthday. I varied the fonts and colors to really make a statement.  Samy's mom calls Samy, "Samy Sunshine".  (Samy's middle name is Rae, so she's a ray of sunshine, get it?)

When we reflect on things we create, we usually would make changes. The only thing I would change about this sign is using a much lighter stain when I distressed it.  The stain really took away some of the brightness, in the colors, I would have liked to keep.  Honestly though, I still love the sign and hope to make many more.

Related Posts Plugin for WordPress, Blogger...

Sunday, December 4, 2011

Personalized Signs Made with Vinyl

I really enjoy making personalized gifts. I think it's extra special to give someone something made just for them. Here are a few of the signs I've made recently.
Related Posts Plugin for WordPress, Blogger...

Wednesday, November 2, 2011

Give Them Roots Give Them Wings

I love the quote, "Give them roots and give them wings." My mom says it all the time.

I needed something to go about the bulletin board in our craft room. I took a 54"x6" piece of 1/4" birch plywood and painted it with black chalkboard paint. I planned on painting words on with white paint to make it look like a chalkboard but changed my mind and decided to use vinyl.

I used white vinyl for "give them"  and chose the font: Tiranti Solid LET.
I used tan vinyl for "roots" and used the font: Oh Photo Shoot.
I used light blue vinyl for "wings" and used the font: Waterfalls.

I really like how it turned out and think it finishes of the bulletin board space nicely.
Related Posts Plugin for WordPress, Blogger...

Sunday, August 21, 2011

Freezer Paper Stenciled Onesies-A Great Baby Gift

The baby boom continues.  I have five sweet girls, that have just had babies, or are about to have babies.  I've been very busy making baby gifts for them. I had every intention of making a bundle of five gifts.  These five gifts would include the adorable Fancy Burp Cloths and Dressed Up Wipe Cases, but I just never got that far and I thought the moms could use the gifts before their babies are high school graduates.  I did make them each a Birth Announcement Sign, a Please Knock Sign, and a Freezer Paper Stenciled Onesie.

Here are the gifts I made for sweet Lindsey and her son, Micah.
Related Posts Plugin for WordPress, Blogger...

Saturday, July 23, 2011

A Baby Gift-An Announcement Sign

Here's the 2nd of five personalized baby gifts, I plan to make, for my friends that have recently had or are having babies soon.  This is just one of the five I'm making!
Related Posts Plugin for WordPress, Blogger...

Saturday, July 9, 2011

A Baby Gift-A Please Knock Door Sign

I have 5, very special people, I'm making baby presents for.  I have 5 separate gifts in mind. This is the first of the gifts. I got this idea from HowDoesShe.  Here's the link to their original project. http://www.howdoesshe.com/please-knock-baby-is-sleeping-sign
Here's one of the five signs I made.

I had five pieces of scrap wood cut into 12"x7" boards. I stained the back, the sides, and the edges of the front of each board.

After the stain dried, I applied a coat of Mod Podge to the entire front of the board.

I cut 5 different pieces of scrapbooking paper to 12"x7" and Mod Podged each to the boards.

I used a scraper to smooth the paper down and get all the bubbles and creases out.
I let the Mod Podge dry for about 30 mins. before applying a heavy layer of Mod Podge to the top of the paper (oops no picture!).  I let it dry for a few hours.

After the Mod Podge dried, I used my sander to distress the boards.  I concentrated on blending the edges.

I used the same stain, I used on the board, to further distress the board. I just rubbed the stain in with a cloth.

I cut vinyl on my Silhouette. "Please" and "Baby is" are Pea Bonnie Script.  "Knock" and "Sleeping" are Pea Lacy Chunky.  The font size will depend on the size of the board you're making. I just made the document, on my Silhouette, a 12x7 and adjusted the words to "fit".

After cutting the vinyl, I peeled the negative away leaving only the print, I wanted on my sign, on the page.

Using a piece of transfer paper, I covered the vinyl and brought it over to the signs. I used my scraper and rubbed the words on to the sign.

I peeled the transfer tape off and this is what I had left.


I drilled holes in the top corners of the sign to add the wire for hanging the sign.

I put the wire through the hole and twisted it.

And the signs are finished.

The third sign is a light blue and green background with navy vinyl.

This sign has a great geometric patterned paper.

I like the snazzy stripes of the last sign!

Stay tuned to see what the other gifts will be.  I have a feeling you may have already seen two of them.  Shhh.... I want to keep them a secret until the gifts are revealed to the new mothers.
Related Posts Plugin for WordPress, Blogger...

Friday, June 3, 2011

Recycling At It's Best

I used to throw away the negative part of the vinyl.  Not anymore!  I've learned it makes a great stencil.  In my earlier "Peace, Love, and Happiness" post, I showed you how I cut vinyl to put on the poles.  Well, I saved the stencil part of the vinyl, added some symbols and voila... I made more signs using scrap 1x4 wood.  All these materials are left over from other projects.  With just a little time, I was able to create a great gift.


Related Posts Plugin for WordPress, Blogger...

Monday, May 30, 2011

A Memorial Sign


My sweet Uncle Jim died on April 6th.  He suffered with cancer the last eight months of his life. 
During his 63 years on Earth, Uncle Jim was many things.  I wanted to create something, that represented his life.  With my Aunt Esther's help, I came up with a list of words that were important to Jim's life. This was my memorial to him.

First, I chose to do the names of the most important people in his life: Jim, Esther, and William. Then, the relationships he had: husband, father, friend, brother, uncle, cousin, and son. Next, I wanted to represent the roles he had in his life:  a veteran, missionary, writer, believer, friend, and counselor. Finally, I wanted to choose the adjectives I felt described him best: gentle, caring, and kind.

Using a variety of fonts, I cut these out of vinyl, on my Silhouette. I used the negative part of the vinyl to create a stencil.  I carefully arranged the words to the board I'd prepainted navy blue.

After attaching all the vinyl to the board and rubbing it down well, I painted the words cream.  I let the paint dry completely and then removed most of the vinyl.  I decided to add a pop of color, and emphasize the red, white, and blue Memorial theme by painting some of the words red.  So, over the cream paint, I painted red.  I wanted some cream to peek out, and it did.


Here's what I had when I removed all the vinyl.

I distressed the sign with an orbital sander. This was a mistake.  The sand paper was fresh and the sander fast.  There are a couple of places that show the circular marks. I was so disappointed since this was a time consuming project and I didn't have time to redo it.  I decided it just added character (or I hoped). I then drilled holes in the top and added wire to make it easy to hang.
Here's the sign I presented to my aunt and cousin.  I think remembering all the special people we've lost in life is a special way to spend Memorial Day. I will miss my Uncle Jim. He will not be forgotten.
Related Posts Plugin for WordPress, Blogger...

Tuesday, May 17, 2011

A Son's Sign

Before being a Stay at Home Mom, I was one of those teachers that gave 100%.  I worked from sunup to sundown (or pretty close) on teaching.  During this time, I made wonderful friendships with parents of many of my students. This has enabled me to follow the students through many life changes.

One of the greatest families I had in teaching was the Rebusmen family.  I taught 2 of their 3 children and they were just wonderful: the children and the parents!  Their son, the second child I taught, Connor, left for basic training.  He is going to be an Airman!  His mom, Robin, is so proud of him; but, is understandably having a rough time with him leaving. One of her friends posted, "His feet may go, but his heart will always be at home." on her facebook wall.  I thought that was the perfect sentinment and decided to make a sign for her.

Robin told me that she's into "patriotic" colors right now, so that was how I chose the colors for this project. 

Here's how I made it:
1. I took a piece of plywood and painted it creme.  After it dried, I painted it navy blue and let it completely dry.
2.  I cut out the words and symbols, on vinyl, on my Silhouette.  I used the vinyl as a stencil.
3.  I painted the words and symbols creme.
4.  After the paint dried, I painted the symbols red to add a punch of color.
5.  I peeled off all the vinyl.
6.  Using my mouse sander I distressed the sign.
7.  I drilled holes and added wire for hanging.

Unfortunately, I forgot to take a finished picture.  Oh well, this is close! This is definitely a personalized gift I was proud to give a great friend!
Do you want a personalized sign for your house? We can make them!  Just let us know!
Related Posts Plugin for WordPress, Blogger...

Thursday, May 12, 2011

Personalized Name Signs

These signs were made as birthday gifts for very special friends of ours.  I based the color and theme on their bedrooms.

1. First I took 22"x9" birch, cabinet grade 3/4" plywood and painted it white.  I painted two coats.
2. I cut the names and symbols, from vinyl, out on my Silhouette. "Jayce" is in Rockwell font.  "Griffin" is in Tan Patty font.  Both symbols are from my Silhouette library.
3. I used the vinyl as the stencil.  I rubbed it to the board, completely and then painted with a very light coat of paint. After the paint was dry, I sanded with my mouse sander to blend in and lightly distress the board.
4. I dusted the board completely and painted it with a satin finish polyurethane.
5. After the polyurethane dried completely, I drilled holes at the top of the boards and added matching ribbon to hang the board with.


Personalized name signs will be available through our etsy shop, if you don't want to make your own.
Related Posts Plugin for WordPress, Blogger...

Wednesday, May 11, 2011

"Teachers Inspire"-A Sign created for our teachers for Teacher Appreciation Week

I racked my brain for over a week, to come up with a simple saying to put on a sign for my daughters' teachers. I wanted something truthful and meaningful.  I thought about many things.  I finally came up with "Teachers Inspire" which is what my daughters' teachers do.  I'd also like to think this is what I did as a teacher.

I really enjoyed making these and was very happy with how they turned out.  There are a lot of steps, but it's worth it. I'm sorry I don't have pictures of the project as I created it.  I'm going to do my best to give you clear directions.  If you have questions, feel free to ask.

1.  I began with birch, cabinet grade 3/4" plywood.  The wood was 10"x24".  I sanded the wood smooth.
2.  I painted a base coat on the wood.  I did the edges as well.  One sign I painted purple.  The other dark green.  These are GraciAnn's teachers' favorite colors.
3.  After the base coat dried, I painted two coats of semi gloss cream paint on top.  I let the paint dry completely between each coat.
4.  When the paint was dry, I applied a stencil of vinyl, I made on my Silhouette, to the board.  "Inspire" is in Copperplate Gothic Bold Font.  It is 3"x9".  "Teachers" is in Cataneo BT font. It is 5"x18".
5. After the stencil was smoothed down, I painted in. I  used very little paint and made sure not to glob it on. I chose to use two different shades of each color.  When the paint was dry, I removed the stencil.
6.  I let the paint dry a little more and used my mouse sander to distress the sign. I removed paint from the edges, some of the words, and the blank spaces.  My goal was to get some of the original base color to peek through. It worked.
7.  After sanding, I wiped the board clear of any dust particles.  I rubbed stain all over the sign.  I let the stain dry completely.
8.  When the stain was dry, I applied polyurethane to the sign. I chose a clear satin finish.
9.  After the polyurethane was completely dry, I drilled holes in the top of the sign, and added wire, for hanging.

This sign will definitely be available in our etsy shop!
Related Posts Plugin for WordPress, Blogger...

Saturday, May 7, 2011

Our Children's Teachers Are Truly Appreciated

This week was Teachers' Appreciation Week. Our children mean everything to us, so those who spend the days with them, guiding, inspiring, and nurturing them, are wonderful, in our minds.

Jill and I did a lot of the same things for our children's teachers this week.  We also did a few things differently.  We wanted to share our week with gifts.  (If you can find someone to craft share on weeks like this, it makes life much easier and the teachers, get double the benefits!)

Monday: GraciAnn and I made chocolate chip cookies for her teachers. We put them in cellophane bags and added some cute ribbon.  She made each of them cards too.  We started the week out small, but they knew we were thinking of them! Here's an awesome chocolate chip cookie recipe that was shared on HowDoesShe: http://www.howdoesshe.com/perfect-chocolate-chip-cookies
Jill makes these cookies regularly, usually a double batch!  She doesn't put the dough in the refrigerator though as it makes the cookies thick and she likes them flat and gooey!

Tuesday: I (Shannon) made lunch for the teachers at GraciAnn's school.  Lucky for me, it's a small Montessori school so I only cooked for 12.  I made pulled pork, potato salad, three bean salad, baked beans, and brownies.  I also brought in King's Hawaiin Rolls.

Pulled Pork Recipe: First, I preheat the oven to 350 degrees.  Then I heavily salt and pepper a Boston Butt and put it in my Pampered Chef roaster.  I put it in the oven and turn the temperature down to 225 degrees.  I cook the pork for at least 8 hours but up to ten.  It literally falls apart.  I use Sonny's Sweet BBQ sauce on my pulled pork. It is so good.  Jill does the crock pot version.

Potato Salad: I cut up red potatoes (leave the skin on) and boil them in salted water. I am careful not to overcook the potatoes.  They should still be firm.  I drain the potatoes and put them in the refrigerator to let them completely cool.  I chop up celery and put it back in the refrigerator.  I cook bacon, on the roasting rack, in the oven at 350 degrees. The grease gets away from the bacon and it is crisp.  I let it cool and then chop it up.  You can add chopped onions.  I don't always.  I mix all the ingredients with low fat mayo and freshly ground pepper to taste. (This is Jill's favorite potato salad!)

Three Bean Salad: 1 can each of  drained wax beans, green beans, and kidney beans. Add chopped onions and green peppers.  Add 1/4 cup each oil, vinegar, and sugar.  Mix all ingredients together and refrigerate overnight.

Baked Beans: I use Bush's Country Style baked beans. I add a pound of maple bacon that I've cooked in a 350 degree oven, on a roasting pan, until the bacon is completely crispy. I use a small amount of the bacon grease to cook a cup of sweet chopped onions in.  I add a half cup of brown sugar, a little mustard, and a little Worcestershire sauce. I mix all ingredients together and cook the beans, in a 350 degree oven, for an hour.


Brownies:  This is my first secret.... Betty Crocker Triple Chunk brownies.  They are so good.  They are even better with my second secret...The brownie edge pan. Brownie edges are the best and with this pan, every brownie has an edge.  It takes 1 1/2 boxes of the Triple Chunk brownies to properly fill the pan.

Wednesday: GraciAnn brought her teachers 2 bookmarks each (made by Jill), 3 post it note holders (also made by Jill), and a dinner certificate for Texas Roadhouse which is an absolutely fantastic restaurant in our area.  Ryan took the bookmarks and post it note holders on separate days as Jill didn't have them both ready on the same day!


Thursday: GraciAnn brought her teachers jars filled with M&Ms.  I bought every kind of M&M on the shelf and mixed them altogether.  I put them in a mason jar and decorated it with vinyl, cut on my Silhouette.  Yum! (A tutorial will be coming soon!)  Ryan's teachers said these were the perfect gift as everyone could use a jar of chocolate!  Many of the fellow parents made comments that these were super cute and thoughtful!  Shannon did such a nice job!

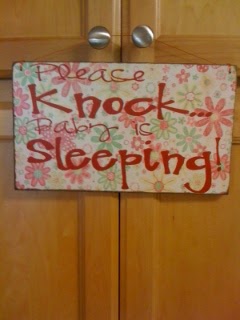
Friday:  GraciAnn brought her teachers hand painted signs I designed and made.  I love how  they turned out!  Ryan's teacher's loved these as well.  The teachers felt very special receiving these! Shannon is very talented with all her signs!


Teacher Appreciation Week is over.  We will never stop appreciating all the teachers have done for our children. We will continue to send in random gifts and notes to let them know they are always appreciated.

Related Posts Plugin for WordPress, Blogger...
Ebates Coupons and Cash Back