
I'm sorry that it has been awhile since I last posted, but I have been incredibly busy. It just seems that the busyness of life all hits at once. Thankfully, I have been one busy woman making all kinds of gifts and taking orders from Jilly's Boutique. I really wouldn't know what to do if I wasn't going 100 miles per hour most days. On to something fun...
Over Labor Day weekend, I put in over 6 hours in cake baking and decorating. The Wednesday before, I got a call to make a special first birthday cake for a little girl in our church. I was very apprehensive as this is the first time I had made a cake for purchase and one of this size!
The theme for the birthday party was a sock monkey. I sent some picture options for the cake to the Mom. She choose a tiered cake with polkadots and a fondant monkey. I had never worked with fondant. I knew this would test my limits and see what I was truly capable. If you know me at all, I am always up for a challenge! Just tell me I can't do something and you have sparked a burning fire within me.
Showing posts with label tips. Show all posts
Showing posts with label tips. Show all posts
Tuesday, September 25, 2012
Friday, September 2, 2011
All about Pinterest & Mini-tutorial
I am completely addicted to Pinterest. I know that some of you might not know much about Pinterest, so let me share some details with you.

Pinterest is a pictorial bookmarking system. Instead of having many bookmarks on your web browser, you can "pin" (or bookmark) pictures onto your pinterest board. You can have limitless boards, which allow you to organize all your pins in a place that is easy to find.
Pinterest is a pictorial bookmarking system. Instead of having many bookmarks on your web browser, you can "pin" (or bookmark) pictures onto your pinterest board. You can have limitless boards, which allow you to organize all your pins in a place that is easy to find.

Wednesday, August 24, 2011
Vinegar: Its many uses!
The other day I needed to stock up on some vinegar and my favorite place to shop these days is Sams Club. Therefore, I have a huge amount of vinegar! On the box of my two gallons of vinegar were twenty tips for using vinegar. I thought I would share these new tips with you as some of them are fantastic.


Tuesday, August 23, 2011
DIY Light Box
Back in April I found a very easy tutorial on how to make a light box from Cheri Quite Contrary. I've had it on my to do list ever since. It was a pretty high priority item, but I just never got around to it. Well, my husband threatened to throw out all the cardboard boxes that I have cluttering the garage so I knew I must conquer this item before it was too late.
This is a super easy project that costs next to nothing and it makes a huge difference!
This is a super easy project that costs next to nothing and it makes a huge difference!
Thursday, April 21, 2011
Basket Liner Revamp
Shannon asked me to make a new liner for one of Mariella's baskets. Thankfully, Shannon knows that I am a self-taught sewer. I don't always sew exactly as I should or have a perfectly straight line, but I try. I struggle to follow patterns as I would just prefer to figure it out on my own. I am sure that has to do with my impatience and need to get things accomplished as quickly as possible.
This was my last project of a two week stint of sewing every evening. I went to bed with a headache every night as I had a long sewing to do list and not enough time to complete it. Finding time to sew with three little ones is a struggle. My sewing machine also decided to be on the fritz. Thankfully, Shannon stepped in and let me borrow hers! I was ecstatic when I finished this last project as it meant I could have a break from sewing and get back to some other crafting. (I will be showing my other sewing projects in the coming days).
On to the basket. Here is the finished basket with the new liner.
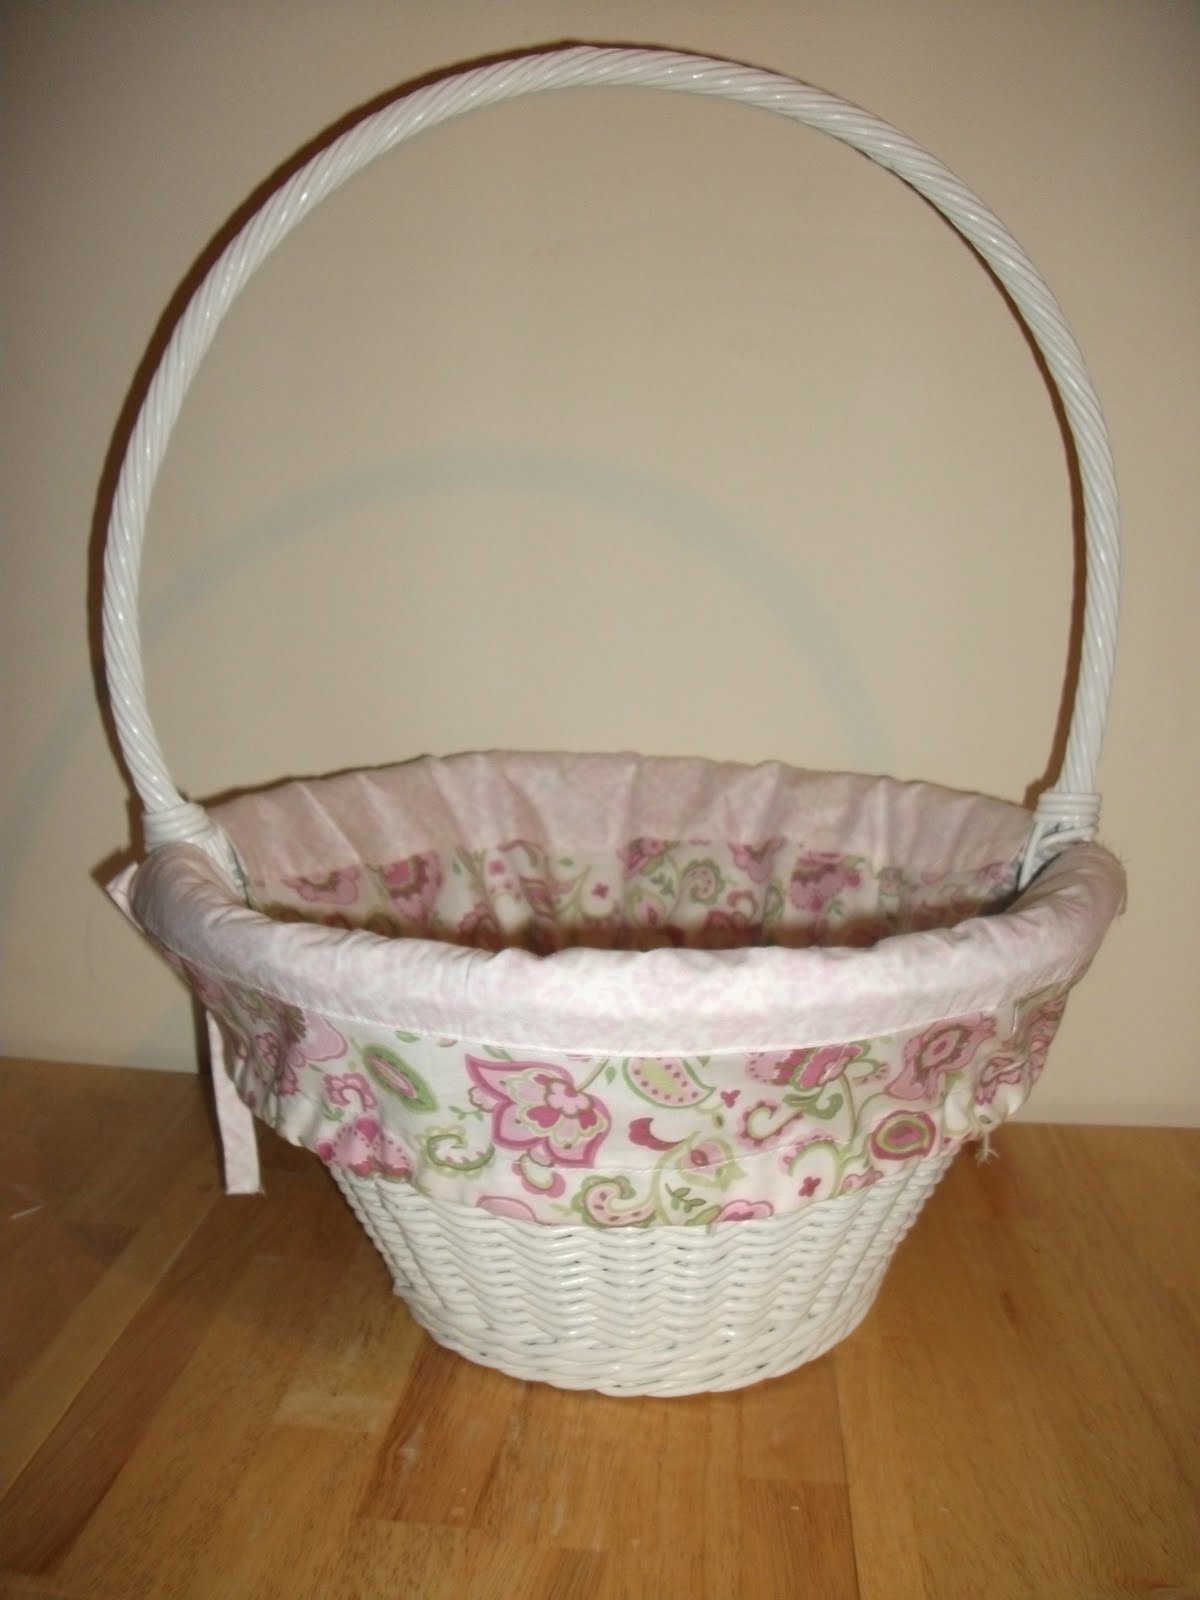
Let me tell you how I went about making a new liner without a pattern. It isn't a full tutorial as I got busy making it and forgot to take pictures along the way. I do have some basic steps and tips to share with you though.
First, I took the liner that was previously in the basket (see below) and measured it from every angle.

The basket had a circular bottom which, of course, seemed way beyond my skill set. Pulling from my Math teacher days, I knew I could figure this out! I measured across the center of the circle (diameter) which was 8. Half of 8 is 4 which is the radius. (Sorry for the little math lesson). I took my fabric and drew an 8 inch line with a disappearing marker. I made a dot at 4 inches. Then I made a line 8 inches long vertically with that dot in the center (4 inches on each side of dot). I continued this with two more lines (see pictures below).


Then I cut out around to each of the lines (the circumference, aren't you feeling like you are learning something?) to get my circle. Without making a separate template, I had a perfect 8 inch circle for the base of the basket. Sorry, I forgot to take a picture of the cut out circle!
Next, I took the old liner and folded it in half and laid it flat. I measured the width (across the top) and length and cut out my new basket material to those measurements. I did not trim it down for the middle of the basket. Instead I pleated the material when I sewed it on to the bottom circle.
I also measured the width of the ties. These were 1/2 inch width by 22 inch length ties. I cut out material 2 inches by 22 inches. Now, many people like to do the sewing method of folding over the material and sewing down the length of the strip. Then they turn it inside out. I despise this method! It only leave me frustrated and takes too much time. I prefer an easier and faster (surprising) method. Let me teach you.
Now, this is where I wonder why I like to sew. It requires using an iron. I try to stay away from an iron as much as possible. I love wrinkle free clothes and Wrinkle Releaser is my best friend. Back to sewing. . .
Fold your strip in half with fabric right side up. Press with iron. Unfold the strip.

Now fold each side (in half) into your newly created line and press with the iron again. (My pictures were fuzzy and useless, sorry!) Once you have both sides folded in you will fold them back together along that original crease you made. This gives you nice finished edges on both sides. Now top stitch (sew) up both sides of your long ties. To me that is much easier and no frustration, well other than having to use the dreaded iron.
I folded over the sides of my main pieces of fabric with the ties underneath the fabric. Then sewed up the pocket. This way, I didn't have to string the ties through and give myself a headache.
Then I sewed the two pieces of fabric together at the sides. I took the circle piece and randomly pinned it around pleating it as I went. Then I just sewed on the wrong side around the circle. That was it. It was surprisingly an easy project to sew.
Here is the finished product with a picture of the inside as well.

I hope Shannon is pleased with it and that Mariella likes the new cover as well. Now, she has a basket that matches the decor of her room!
Happy Crafting!

Saturday, April 9, 2011
Never peel a potato again!
I love to cook, but peeling things such as potatoes is quite the chore. Anyone else feel that way?
Well, I have a video to share with you that will change how you work with potatoes from now on. Check it out!
Thanks to Brenda for sharing this video with me! I really appreciate it!
Off to make potatoes without the hassle!
Well, I have a video to share with you that will change how you work with potatoes from now on. Check it out!
Thanks to Brenda for sharing this video with me! I really appreciate it!
Off to make potatoes without the hassle!
Tuesday, February 1, 2011
A few money saving tips
I have a few money saving tips that I wanted to share with you! These are things I have learned recently that have really helped me and I hope they will help you as well.
Tip #1: Don't buy shaving cream!
Did you know that conditioner works just as well if not better than shaving cream? I always have leftover conditioner. When I run out of conditioner I make sure to purchase moisturizing conditioner. It doesn't need to be expensive conditioner, just moisturizing! I have found that my legs are softer and don't need lotion since I have substituted conditioner for shaving cream.
Tip #2: Grow Green onions from the ones you used in tonight's dinner!
Green onions are expensive. I recently learned that green onions will grow back when put in water. When I use green onions in a meal, I cut off all the green portion for my meal and then I put the white part in a wide vase of water. In a matter of days you will have long fresh green onion again. This is also fun for the kids to watch! Change the water every couple of days so it doesn't get funky smelling.
Tip #3: Where to buy replacement glass
I have two boys, enough said, right? I bought a beautiful large picture frame for our living room. Evan got interested in the frame and decided to hit it with one of his plastic golf clubs. Ugh! The glass was shattered to smithereens! I was then on the hunt for replacement glass. I called every glass shop in a half hour radius. The replacement glass would cost me just a few dollars less than the cost of the frame. Then I thought about those huge home improvement stores, you know the names, I don't need to advertise for them. I got a sheet of glass cut for my frame (with leftover glass to keep) for $10! That was a fourth of the cost of the glass shops! Now, I even have extra glass for future breaks and also for some crafts!
Those are my favorite tips from the last month or two. I'll have more and I promise I will share them with you!

Tip #1: Don't buy shaving cream!
Did you know that conditioner works just as well if not better than shaving cream? I always have leftover conditioner. When I run out of conditioner I make sure to purchase moisturizing conditioner. It doesn't need to be expensive conditioner, just moisturizing! I have found that my legs are softer and don't need lotion since I have substituted conditioner for shaving cream.
Tip #2: Grow Green onions from the ones you used in tonight's dinner!
Green onions are expensive. I recently learned that green onions will grow back when put in water. When I use green onions in a meal, I cut off all the green portion for my meal and then I put the white part in a wide vase of water. In a matter of days you will have long fresh green onion again. This is also fun for the kids to watch! Change the water every couple of days so it doesn't get funky smelling.
Tip #3: Where to buy replacement glass
I have two boys, enough said, right? I bought a beautiful large picture frame for our living room. Evan got interested in the frame and decided to hit it with one of his plastic golf clubs. Ugh! The glass was shattered to smithereens! I was then on the hunt for replacement glass. I called every glass shop in a half hour radius. The replacement glass would cost me just a few dollars less than the cost of the frame. Then I thought about those huge home improvement stores, you know the names, I don't need to advertise for them. I got a sheet of glass cut for my frame (with leftover glass to keep) for $10! That was a fourth of the cost of the glass shops! Now, I even have extra glass for future breaks and also for some crafts!
Those are my favorite tips from the last month or two. I'll have more and I promise I will share them with you!
Subscribe to:
Posts (Atom)




























