Welcome!
Thanks for visiting! Please leave us a comment as we love your feedback.
See where we are partying at the bottom and on the sidebar.
Showing posts with label mod podge. Show all posts

Thursday, March 1, 2012

St. Patrick's Day-Shamrock Tree-Copy Craft

I found this great project here: http://lindseyscraftlist.blogspot.com/2010/03/shamrock-tree-with-tutorial.html


This was my inspirational piece.

I didn't have a picture frame and didn't want to go buy anything. I hit John's wood scrap pile and found this piece of poplar.

I painted the edges brown.

I cut a piece of cardstock to fit the board and distressed it.  I mod podged the paper to the wood and let it dry, completely.  I then used a belt sander to blend the edges.
I drew a tree trunk on the back of a piece of wood grained, brown cardstock.  I cut it out. 
I painted the entire cardstock with Mod Podge and added the tree trunk, shamrocks (that I cut using my Silhouette), and letters that spell "LUCK" also cut on my Silhouette.  I added a piece of brown ric rac.

After the mod podge was completely dry, I added a heavy layer of mod podge over the entire project.

I glued a button to the end of the ric rack.

Here's the finished project.  Thank you, Lindsey at Inspiring Creations. You inspired me!
Related Posts Plugin for WordPress, Blogger...

St. Patrick's Day "Lucky Sign" -Copy Crafting

I saw this Lucky sign:  http://lindseyscraftlist.blogspot.com/2010/02/lucky-wood-board.html I wanted to make one of my own.
My husband is a wood worker.  In his home remodeling projects, I get lots of scrap wood.  GraciAnn and I found a piece we liked, and she went to work sanding it. This particular piece was oak.

We got green paint.  The color was "XMas Green".
We painted the entire board.

On my Silhouette, I cut the word Lucky and some stripey Shamrocks. I used a distressing ink pad and distressed the letters and the shamrock.

I put Mod Podge on the entire board.
I placed the letters and shamrock on the board and rubbed it down. I let it dry for about thirty minutes.


I mod podged over the top of the entire thing.

It dried.  I added embellishments-ribbons and buttons. I feel Lucky to have such a wonderful sign!
Related Posts Plugin for WordPress, Blogger...

Wednesday, November 30, 2011

Making a Photo Board-A Tutorial

Do you want a super, easy, inexpensive way to display your pictures?
This makes a great holiday decoration too!
My Santa Photo Board

You will need:
A wooden board... whatever size you'd like.  Mine is about 11x18". 
Background Paper
Vinyl (I cut mine on my Silhouette)
Mod Podge
Paint
2 foam brushes (one for painting and one for Mod Podge)
Ribbon (I used two sizes. One for the main bow and a smaller one for the bows on top.)
Wire
A Drill
You favorite picture or pictures to post
Double Sided Tape for Posting
Sandpaper or a belt sander

Step 1-Sand the edges of your board smooth.


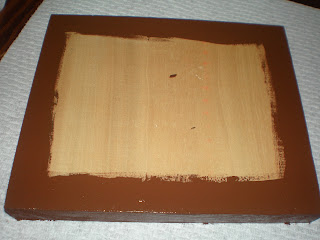
Step 2-Paint the edges and the border of the front of your board.  Let it dry completely.  There's no need to paint the entire board since it will be covered with your background paper.

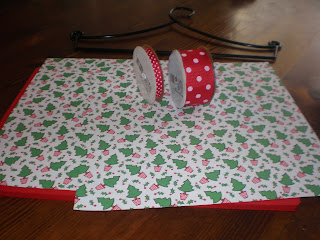
Step 3-Choose your background papers and cut them to size.  Most papers are 12x12.  Since my board was longer than one piece, I neatly tore the second sheet to overlap the first sheet.  I really like the way this looks.
Step 4-Spread a heavy layer of Mod Podge onto your wooden board. It should be thick enough where it looks white but not clumpy.

Step 5-Carefully place your background paper on the board.  Using your hands, smooth the paper down as much as possible.  When you are done, you may want to use a roller, (I use my Pampered Chef one) to get out as many wrinkles and bubbles as possible.

Step 6-You may want to place a book or piece of wood on top of the board to minimize lifting and bubbles.  Let it dry about 30 minutes.  Going onto the next step before letting it dry will cause more wrinkling in the paper.

Step 7-Apply a thick coat of Mod Podge over the entire surface of the background paper.  Let it dry thoroughly.

Step 8-Sand the edges, where the board and paper meet, with an electric sander, sanding block, or piece of sand paper.  This helps the edges blend in.


Step 9-Drill holes on either side of the board, large enough to slip your wire through.

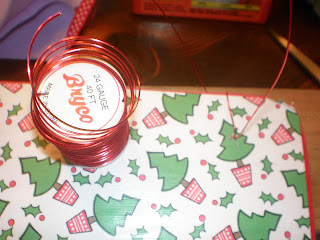
Step 10-Insert your wire through either side, having the excess come through to the front of the board.  I wrapped mine around the top of the board, to attach a ribbon later. Leave about 3 or 4 inches of excess on either side.  Wrap the excess around a pencil or glue stick to make a spiral shape.


Step 11-Tie your small bows around the top wires.  Tie your large bow around the middle of the board.  I did it about 2/3rds down.

Step 12-Remove all the vinyl around your words until all you have left is what you actually want on the board.  Take a piece of transfer tape and put it on the vinyl.  Rub the transfer tape with a too.  I have one that came with my Silhouette.  You can also use your Pampered Chef stoneware scraper, like Jill did, or a popsicle stick would work too.  Place the words, on the board, where you want them. I chose the bottom right corner. Rub the transfer tape again. Gently peel away the transfer tape.  Sometimes, I've had to use the tool to hold the vinyl letters away from the transfer tape, so they go on smoothly.  The more you do this, the better you get.

Step 13-This is your lucky step. You're almost done!  Using double sided tape, attach your favorite picture or pictures to the board.  I plan to add more in a random pattern.


Congratulations!  You're done!  In an earlier post, I showed how I made a similar board for Thanksgiving.  I plan on making one of these for every holiday.  They are easy to make, fun, and inexpensive.

Related Posts Plugin for WordPress, Blogger...

Saturday, November 19, 2011

One of My Favorite Thanksgiving Decorations

Another repost from last year....It's too good not to share again!

....and yet another copycat turkey craft!  While visiting http://undermypolkadotumbrella.blogspot.com/ I saw she had a guest post of another fabulous little turkeyhttp://www.u-createcrafts.com/2010/11/creative-guest-2x4-turkey-by-craft.html  Here's my version:

Related Posts Plugin for WordPress, Blogger...

Friday, November 18, 2011

Thanksgiving Subway Art-Tutorial

What do you think of this Thanksgiving decoration? It was another one I was glad to see, after having it in storage almost a year!

Making Subway Art-A Tutorial
Related Posts Plugin for WordPress, Blogger...

Monday, November 14, 2011

A Simple Thanksgiving Decoration

I made this and shared it on the blog last year.  I was excited to get it back out with my Thanksgiving decorations. It was easy to make and is a classic decoration.
I saw this sign http://thecraftingchicks.com/2010/10/be-thankful-board.html and put my own twist on it.  I LOVE it!  Simple and personalized.  What could be better?

Related Posts Plugin for WordPress, Blogger...

Friday, November 11, 2011

A Couple More Fantastic Thanksgiving Decorations

This is another repost from last year.  From what I understand, makia creations no longer exists; however, you can still easily create these great projects!  I hope you are as inspired as I was!

One of my favorite crafty blogs is http://howdoesshe.com/ I must admit, I am a follower of this one.  I have been inspired by their ideas, so many times! Two of the girls that created the blog have started a business, selling craft kits for their projects.  This is a fabulous idea!

For one of their projects, I ran to a dozen stores looking for the necessary materials.  It was at the beginning of my crafting frenzy and I didn't realize that it was okay to substitute.  Save yourself the trouble.  Substitute when necessary! Anyway, their site was my inspiration for the "Turkey Feather Photo Stand" and "Truly Thankful" board I copycatted.  http://www.makiacreations.com/thanksgiving_kits Because they are selling the kits, they don't offer tutorials.  Because it's a copycat craft, I didn't set up a tutorial either; however, it's pretty simple.


    I free handed the turkey body and turkey head on mdf.  My lovely husband cut them out with his jigsaw.  He also made little triangles for the waddle part.  I used his belt sander to smooth all the edges. (Have I mentioned how wonderful it is having a supportive husband with all the right tools?) I picked out the perfect papers (this is a time consuming task for me).  I mod podged them on.  When they were dry, I re-sanded to blend in the edges.  I stained the edges to better blend. I wood glued them all together with that wonderful Elmer's wood glue. After it was dry, I drilled 9 holes to the top of each turkey.  I cut 9 pieces of six inch wire for each turkey.  I bent the top of each wire with pliers so they would act as photo holders.  I then wood glued the tips into the holes I drilled. I probably didn't need to wood glue them because they fit pretty tightly; but, decided to anyway to keep from losing them when I pack the Thanksgiving stuff away each year.  I made two different turkeys.  One for me, and one for my mom.  Now, I just need to take some pictures to put in these little guys.


  Now for the "Truly Thankful" boards.  I made two different ones that are very much alike! That darling husband of mine cut scrap wood into 11x16 pieces for me.  The wood was already eleven inches wide, so we went with that. I chose 16 inches because I like the torn paper look on the edge of the board and I think it makes a great wall hanging size.  I sanded the wood and rounded the corners, using that belt sander. I selected my paper (another tedious task!). I had to use two sheets since the paper comes in 12 inch squares and I needed 16 inches.  I tore the second piece to give it that rugged finish. I mod podged it and let it dry.  I re-sanded it and stained it to blend in the edges. (Do you see the mod podging pattern?) I drilled the holes on top for hanging.  I decided on cranberry vinyl to give it a punch of color.  I spent forever picking out what I thought were the perfect fonts.  I cut the words on my Silhouette SD.  Jill and I both have a Silhouette so you'll notice we use them on many of our projects.  They are HUGE time savers!  I applied the vinyl using transfer tape.  I added the ribbon around the wood and through the holes to add a little girly touch.  I then attached handles for hanging.  You will notice that each frame hangs differently.  Lesli got a steal of a deal on the hanger style one and picked it up for me.  I only had one.  So, I improvised on the second hanging (again for my mom) and used a piece of the wire I used for the photo feathers.  I twisted the edges around a pencil to give it the spiral look and worked the ribbon around it. I think it turned out nicely too. Voila!  Two more copycat crafts completed!


Related Posts Plugin for WordPress, Blogger...

Thursday, November 10, 2011

Thanksgiving Advent Calendar

This is a project we shared last year. It's up again in our house. Some things are too good not to share (or share again)!
Advent calendars are great teaching tools for our children.  Santa leaves notes to my daughters, in our Pottery Barn advent calendar. http://www.potterybarnkids.com/products/telluride-advent-calendar-new/ My older daughter really got the concept of "Counting down to Christmas" using this calendar.  I've decided it's important to do this with other holidays too.  We found an Thanksgiving advent calendar that reminds us to be grateful for the things in our life.  Another wonderful lesson for our children. http://jellybeanjunkyard.wordpress.com/2010/10/12/tuesday-tutorial-give-thanks-gratitude-board/ This is adorable, reusable, and not accomplished in two and a half hours like she says.  At least not for me.  I'm thinking it's more of a four hour project.  Of course, maybe I was hung up too much on the font and paper choices.  Could be!  A couple of hints.  I used vinyl for the title and the numbers.  It works wonderfully and you get to skip the gluing on step.  I recommend putting the numbers on last.  I mod podged mine.  When you mod podge paper, it tends to warp a bit.  Because the vinyl was on, it shriveled in some places.  It still turned out well, but would have been better if I applied the vinyl at the end.  I also decided to make bows on mine instead of just the ribbon ties.  Something that helps, keep all the bows in the same place, is making a template.  I just decided where the holes worked best, punched them in the template, and used the template 30 times to punch the holes in all the cards.  Since I am not good at eyeballing, it kept everything in the same place and was easy! You could use this idea for every holiday.
Related Posts Plugin for WordPress, Blogger...

Monday, November 7, 2011

Breaking Out the Thanksgiving Turkey

This is a repost from last year.  I was so excited to get my Thanksgiving decorations unpacked.  This gal is one of the main reasons why.  She is so stinking cute! What do you think?

I admit it.  I LOVE other peoples' ideas.  What's more perfect than seeing what someone else made and adapting it to fit your needs?  I am so lucky to have Jill and Lesli, my blog following gals, to send me great ideas.  From time to time, I do a little craft seeking too, but I usually let them do all the research!

I want to share some of the Thanksgiving crafts I've been working on.  Most of these are inspired by others and adapted by me.  I'll definitely let you learn from my mistakes by making suggestions.  Since these are not my originals, I don't plan on including tutorials; however, if you have any questions, I will be happy to help.

Thanksgiving Turkey
This was my inspiration piece... http://undermypolkadotumbrella.blogspot.com/search/label/Thanksgiving

Here is my final project:

I did a few things differently. First, my little gal is a lot bigger I think.  I did look at her pattern, but freehanded the turkey body and feet on mdf.  So, it turned out big, but so cute!  I also blushed her cheeks with a red stamp pad. I just used a stencil brush to dab into the ink and then put it above her beak.  I painted a white stripe on the top of her beak for a little more dimension.  I also added little white dimples and white dots in the eyes, with my white paint.  I love how this turned out!

Related Posts Plugin for WordPress, Blogger...

Wednesday, October 12, 2011

BOO

Are you ready for more great decorations? Here's a really easy and inexpensive one!

You know those wooden letters you can buy at craft stores? It's so easy to transform them!
Related Posts Plugin for WordPress, Blogger...

Saturday, October 1, 2011

Halloween Countdown

Happy October!  We promise to share great seasonal crafts and recipes with you this month!  Stay tuned...

Great Halloween decorations, part 1:

Last year I made about a dozen, "Countdown to Treats" sets for friends and family.  I got the idea from the HowDoesShe girls and their great tutorial. As you can see, I changed the "Countdown to Candy" to "Countdown to Treats". Otherwise, I used their ideas and created a great decoration that can be used every year!
My daughters love to countdown to special days and are able to count backwards with this!
Related Posts Plugin for WordPress, Blogger...

Sunday, August 21, 2011

Freezer Paper Stenciled Onesies-A Great Baby Gift

The baby boom continues.  I have five sweet girls, that have just had babies, or are about to have babies.  I've been very busy making baby gifts for them. I had every intention of making a bundle of five gifts.  These five gifts would include the adorable Fancy Burp Cloths and Dressed Up Wipe Cases, but I just never got that far and I thought the moms could use the gifts before their babies are high school graduates.  I did make them each a Birth Announcement Sign, a Please Knock Sign, and a Freezer Paper Stenciled Onesie.

Here are the gifts I made for sweet Lindsey and her son, Micah.
Related Posts Plugin for WordPress, Blogger...

Saturday, July 9, 2011

A Baby Gift-A Please Knock Door Sign

I have 5, very special people, I'm making baby presents for.  I have 5 separate gifts in mind. This is the first of the gifts. I got this idea from HowDoesShe.  Here's the link to their original project. http://www.howdoesshe.com/please-knock-baby-is-sleeping-sign
Here's one of the five signs I made.

I had five pieces of scrap wood cut into 12"x7" boards. I stained the back, the sides, and the edges of the front of each board.

After the stain dried, I applied a coat of Mod Podge to the entire front of the board.

I cut 5 different pieces of scrapbooking paper to 12"x7" and Mod Podged each to the boards.

I used a scraper to smooth the paper down and get all the bubbles and creases out.
I let the Mod Podge dry for about 30 mins. before applying a heavy layer of Mod Podge to the top of the paper (oops no picture!).  I let it dry for a few hours.

After the Mod Podge dried, I used my sander to distress the boards.  I concentrated on blending the edges.

I used the same stain, I used on the board, to further distress the board. I just rubbed the stain in with a cloth.

I cut vinyl on my Silhouette. "Please" and "Baby is" are Pea Bonnie Script.  "Knock" and "Sleeping" are Pea Lacy Chunky.  The font size will depend on the size of the board you're making. I just made the document, on my Silhouette, a 12x7 and adjusted the words to "fit".

After cutting the vinyl, I peeled the negative away leaving only the print, I wanted on my sign, on the page.

Using a piece of transfer paper, I covered the vinyl and brought it over to the signs. I used my scraper and rubbed the words on to the sign.

I peeled the transfer tape off and this is what I had left.


I drilled holes in the top corners of the sign to add the wire for hanging the sign.

I put the wire through the hole and twisted it.

And the signs are finished.

The third sign is a light blue and green background with navy vinyl.

This sign has a great geometric patterned paper.

I like the snazzy stripes of the last sign!

Stay tuned to see what the other gifts will be.  I have a feeling you may have already seen two of them.  Shhh.... I want to keep them a secret until the gifts are revealed to the new mothers.
Related Posts Plugin for WordPress, Blogger...
Ebates Coupons and Cash Back