Welcome!
Thanks for visiting! Please leave us a comment as we love your feedback.
See where we are partying at the bottom and on the sidebar.
Showing posts with label shamrocks. Show all posts

Thursday, March 1, 2012

Shamrock Clippies-A Tutorial

Here's another last year repost!

Happy St. Patrick's Day.  I hope you're enjoying the green around you.  I finally made the hair clips to go with my daughters' St. Patrick's Day shirts.  They were relatively easy to make. Here's a picture of one of the six clips I made.
This one has pink dots on the green ribbon.  I kind of like it.

All you need to make these clips are: a lighter, scissors, grosgrain ribbon, alligator clips, and a glue gun.

First, I cut 6 pieces of ribbon into approx. 2.5" lengths.

Using a lighter, I "melted" each edge of the ribbon, to keep it from fraying. This just takes a second and you can see the ribbon edge get a little shiny, letting you know it's done.

I hot glued 2 pieces of ribbon together making 3 "Ls".

I took the ribbon that was the over piece, and made put it under the other piece of ribbon.

I hot glued it in place.  Now it looks like a lowercase b or a foot.

I took the other piece of ribbon and wove it under, then over the first piece of ribbon.  I hot glued it on top.  It makes a heart shape. Each clippie needs three hearts.  So, repeat.  Repeat.

I then cut a piece of ribbon about 4.5 inches long. I "heated" the edges of the ribbon with the lighter.

I hot glued the ribbon to the back of the clip starting at the top.

I then hot glued the ribbon to the "mouth" of the clip.

I continued to hot glue the ribbon to the top of the clip.

I hot glued the rest of the ribbon to the inside of the clip. Only a back section is left exposed.
So, now I have three hearts, a covered clip, and a little pink bow.  It's almost ready for final assembly.

With the "mouth" of the clip down, I hot glued the first heart to the top part of the clip.

I then hot glued the other two hearts to either side.

Then I attached the bow in the middle.  I think this turned out super cute.  Now I know why my daughter calls shamrocks, "hearts". They do look like they have hearts in them!

Related Posts Plugin for WordPress, Blogger...

A Lucky Branch-Tutorial

Here's a quick St. Patrick's Day decoration!
The finished product.

What I needed to get there:  a drill with a small bit, a pack of gold coins, Shamrocks I cut from my Silhouette in a varitey of sizes and colors, a small hole punch, a needle, thread, a vase, a branch, something in the vase to hold the branch in place, and ribbon.

I drilled a hole in the top of gold coins.  (I ended up using 14)

I put thread through the hole and hung them on the branch.

I punched holes through the Shamrocks and threaded them to hang them on the tree too.

I added the ribbon and I was done!

I used the same branch/vase combination that I used for my Valentine's Day tree: http://www.oursevendwarfs.com/2011/01/i-bought-greatest-felt-hearts-and-i.html.

Here's the branch I made for a fall tree that I put in the same vase: http://www.oursevendwarfs.com/2010/11/easy-and-cheap-decorating-with-branches.html
Related Posts Plugin for WordPress, Blogger...

Our St. Patrick's Day Wreath-A Tutorial

I'm going to share some of our St. Patrick's Day projects from last year and then I'll start posting the new ones I've made this year.  This wreath was fun to make and can be used over and over again. It's a good thing!

I have to admit, I was VERY sad to put my Valentine's Day wreath away.  It was just so cute! I headed to JoAnn's in search of supplies to make a St. Patrick's Day wreath.  Jill and I got together with our now crafty, breastfriend, Amy.  This is what we came up with.


Our Shamrock wreath!

Amy's wreath wrapping!


Amy was our wreath wrapper.  She wrapped all three wreaths with the light yellow ribbon. I chose yellow because I wanted something that would contrast nicely with the green of St. Patrick's Day.  I also chose fabric that had a rainbow of colors and I thought the yellow would tie in nicely with that. I have to admit that I wasn't thrilled with the yellow when it was all done.  It's a little buttery.


We then made rosettes out of green fleece. Here's directions on how to make the rosettes. http://www.oursevendwarfs.com/2011/02/valentines-day-celebrated-with-burlap.html We then hot glued three rosettes together and added a stem to make shamrocks. We made 3 shamrocks for each wreath (9 rosettes total per wreath.)


I found this fabric that I really liked. The backdrop is rainbow and Shamrocks cover the rest of the glittery fabric.  We made another kind of fabric rosette out of this, for our wreath. First, you snip fabric about an inch wide and then rip it the rest of the way. This gives it a thready look.


Then, we tied a knot in the center of the fabric.


We folded the fabric together, at the knot, so we had the positive side of the fabric facing out on both sides.


Starting at the knot, twist and roll the fabric.


Stop every now and then to hot glue the rosette.


Stopping to glue again.


We made a pattern: rosette, shamrock, rosette, shamrock, rosette.


We also added a rosette to the bow (that we made out of the same fabric). So, we had 5 rosettes per wreath.

Here's the finished wreath.


Related Posts Plugin for WordPress, Blogger...

Thursday, March 3, 2011

Two Shamrock Patterns!

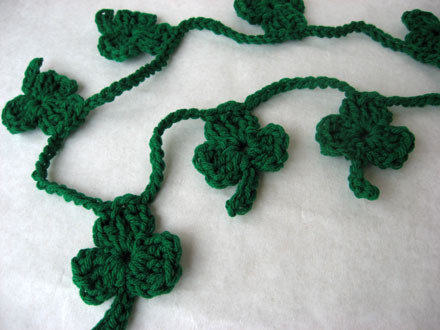
Look what I created!
A few weeks ago, I scoured the internet for shamrock patterns, but I didn't find exactly what I wanted.  I love the small shamrock that Skip to My Lou has made (seen below).
When I made this pattern, the shamrocks were adorable, but a bit small as garland for my mantle.  I wanted something larger, like I did for my heart garland or candy corn garland.  Well, I couldn't find anything, so I had to come up with something on my own!  I even have a new technique (a magic ring) to share with you too!
Here are my shamrocks!
Above is a four leaf shamrock.  Below is a three leaf shamrock.  Both measure about 5 inches wide and about 6 inches in height.
Now for the patterns!
Large Shamrock (4 leaf) pattern
Red Heart Super Saver in Paddy Green
I-9/5.5mm Hook
crochet terms
ch- chain
sc- single crochet
st- stitch
sl st- slip stitch
dc- double crochet
hdc- half double crochet
Make a magic ring with 10 Sc.  Directions can be found here.  This makes a tight ring.  (If this doesn’t interest you then, Chain 3.  Sl st in third chain from the hook.  Make 10 Sc in the loop.  Sl st to first sc.)
Row 1: Ch 1. Sc in same st.  sc in next st.  (2 sc)
Row 2: Ch 1 turn. 2 sc in each sc st. (4 sc)
Row 3: Ch 1 turn, 2 sc in first st. Sc in next 2 sts.  2 sc in last st (6 sc)
Row 4: ch 1 turn, sc in each sc across (6 sc)
Row 5: ch 1 turn, 2 sc in first st, sc in next 4 st, 2 sc in last st (8 sc)
Row 6: ch 1 turn, sc in each st across (8 sc)
Row 7: ch 1 turn, skip 1 st, (sc, hdc, dc) in next st, (dc, hdc, sc) in next st, sl st in next st, ch 1, skip 1 st, (sc, hdc, dc) in next st, (dc, hdc, sc) in next st, sl st in last st. 
Sl st down the side to the beginning circle.  Sc in next 2 sts.
Follow above directions starting at Row 2.  (repeat until you have 4 leaves).
Sl st into next Sc.  Ch 14.  2 Dc in the third chain from the hook. Hdc in the next 4 sts. Make 3 hdc in fifth st. Hdc in the next 6 sts.  Sl st into remaining st on circle.  Fasten off.
Large Shamrock (3 leaf) pattern
Red Heart Super Saver in Paddy Green
I-9/5.5mm Hook
Make a magic ring with 8 Sc.  Directions can be found here.  This makes a really nice tight ring.  (If this doesn’t interest you then, Chain 3.  Sl st in third chain from the hook.  Make 8 Sc in the loop.  Sl st to first sc.)
Row 1: Ch 1. Sc in same st.  sc in next st.  (2 sc)
Row 2: Ch 1 turn. 2 sc in each sc st. (4 sc)
Row 3: Ch 1 turn, 2 sc in first st. Sc in next 2 sts.  2 sc in last st (6 sc)
Row 4: ch 1 turn, sc in each sc across (6 sc)
Row 5: ch 1 turn, 2 sc in first st, sc in next 4 st, 2 sc in last st (8 sc)
Row 6: ch 1 turn, sc in each st across (8 sc)
Row 7: ch 1 turn, skip 1 st, (sc, hdc, dc) in next st, (dc, hdc, sc) in next st, sl st in next st, ch 1, skip 1 st, (sc, hdc, dc) in next st, (dc, hdc, sc) in next st, sl st in last st. 
Sl st down the side to the beginning circle.  Sc in next 2 sts.
Follow above directions starting at Row 2.  (repeat until you have 3 leaves).
Sl st into next Sc.  Ch 14.  2 Dc in the third chain from the hook. Hdc in the next 4 sts. Make 3 hdc in fifth st. Hdc in the next 6 sts.  Sl st into remaining st on circle.  Fasten off.
For garland:
Depending on the size of your mantle, chain 80 to 100.  For a thin chain, sc in every stitch.  For a slightly thicker chain, hdc in the second stitch from the end and in every remaining stitch.  You can also dc in every stitch but this will cause some holes in chain.  Attach your shamrocks from either the top or stitch them through the center, whichever style you prefer.

I hope you enjoy these patterns.  I would love to see your creations if you try out these patterns!
Happy Crocheting!
Related Posts Plugin for WordPress, Blogger...
Ebates Coupons and Cash Back