Welcome!
Thanks for visiting! Please leave us a comment as we love your feedback.
See where we are partying at the bottom and on the sidebar.

Tuesday, April 12, 2011

The Bunny Stops Here Sign-A Mini Tutorial

Here's my latest sign:

I am so happy with the way it turned out.
Here's the board I started with.  I painted it green running cream paint through it to give it a dimensional look.
My friend Lesli designed the sign and saying.  She used her Cricut.  She cut it on vinyl.  I pulled the vinyl off and used it as a stencil.  I carefully positioned everything and rubbed it down well, so paint wouldn't "leak" under the stencil.  I decided to paint the bunny brown.  I ran some tan paint through the brown to try to give the effect of fur.  I wanted the words to be lavender but thought the hot pink was close to the typical red used for stopping.  I really like my color choices.  Sorry I didn't take pictures of the process.  I simply forgot. After the paint dried, I used my mouse sander and distressed it well.

I drilled holes in the top of the sign to thread a ribbon through.  I knotted the ribbon in the front and cut off the excess. I then hot glued bows on top of the knots.  The bows really helped balance the overall look.
Here's the finished product.  It hangs on our house, by the front door.  It's another sign I LOVE!

Related Posts Plugin for WordPress, Blogger...

Monday, April 11, 2011

Spring Sign-A Tutorial

I am really getting into this sign making thing.  Making signs is versatile, fun, cheap, quick and easy. The end results are amazing!
Here's my latest creation: A "Spring" sign.

First I painted a piece of 1/4" Birch plywood, yellow.
Then, I cut out letters on cardstock. I used the font, "Waterfalls".  Now, I admit I used my Silhouette to cut this; however, you could EASILY print the word on cardstock, using a word program, and cut it out.

Because I wanted to show the possibility of doing this project without a cutter, I traced my cardstock letters, on scrapbooking paper and cut them by hand.  Just remember to trace the letter, backward, on the back of the scrapbooking paper so that pencil lines don't show.

The "stencil" is on the left, the useable letter is on the right.

After cutting all the letters, on different patterned scrapbooking paper, I distressed the edges to make them stand out on the board.

I positioned the letters on the board.

I used Mod Podge to glue them to the board.

I Mod Podged and top of the entire board and let it dry well.

I decided to "whitewash" the project.  I put a few drops of white paint in water and painted it over the project.

It was whiter than I wanted so I took a clean foam brush and wiped off any extra paint.

I let it dry.

I got out my mouse sander and started distressing.  I didn't want the board to look old, just well blended.  So, I distressed lightly. I mainly distressed the edges of the board and corners.
I drilled holes in the top.  I threaded a thick satin ribbon through the holes (I chose turquoise).  I tied a knot to keep the ribbon in and give a decorative look.  I also cut the ribbon ends to "finish" them.

Can you see the dot on the "i"? I used the turquoise ribbon, folded it in half, sewed it, gathered it, and made it a ribbon rosette.  I then sewed a button in the middle of it to give it a spring flower look.  I hot glued it onto the board.  It really gives an extra pop.

This little guy is happily hanging in front of the fireplace.

Here's the fireplace now. There are still some changes to come but we're certainly making progress!
Related Posts Plugin for WordPress, Blogger...

Sunday, April 10, 2011

A Great Thing!-Big Organic Garden-A Great Giveaway Too!


BIG ORGANIC GARDEN-A Great Thing!

For over a month now, my family has been enjoying organic fruits, vegetables, honey, and cheese.  We've subscribed to a program called Big Organic Garden. It has absolutely changed the way we eat.  Not only do we have fabulous fresh fruits and vegetables, we have a fantastic variety, they are affordable, and they are conveniently delivered to our house.

Here's some information about eating organic from the Environmental Working Group website:
“The growing consensus among scientists is that small doses of pesticides and other chemicals can cause lasting damage to human health, especially during fetal development and early childhood. Scientists now know enough about the long-term consequences of ingesting these powerful chemicals to advise that we minimize our consumption of pesticides.”

World-renown physician, Dr. Andrew Weil, and “America’s Pediatrician”, Dr. William Sears, also advise eating organic.

There are suggestions for fruits and vegetables that are most important to eat organically because of the high levels of pesticides used when they are grown nonorganically.  They are called the "dirty dozen". They include: grapes (imported), cherries, apples, strawberries, spinach, bell peppers, potatoes, celery, peaches, nectarines, kale/collard greens, and blueberries.


So why don’t more families eat organic? For many, it’s about cost. Big Organic Garden makes organics affordable. Each week, people across the Northeast Atlanta Suburbs enjoy certified organic produce, grown without synthetic chemicals and pesticides, as Mother Nature intended. Their program is flexible enough to fit any family’s needs, and their list of available products includes things like pastured chicken, pork and grass-fed beef, plus milk, yogurt, honey and more – all from local Georgia grown producers.

Big Organic Garden: Affordable. Convenient. Guaranteed

Big Organic Garden delivers to the following areas for $4.50:
Auburn, Buford, Dacula, Grayson, Lilburn, Lawrenceville, Loganville, Snellville, and some areas in Suwanee.  You can also pick up your order from Dacula, less than 15 minutes from downtown Lawrenceville.

So, do you want to give Big Organic Garden a try?  You can!  They are offering a giveaway for our followers.  2 of our followers will win a small box delivered to their home. That's a $24.50 value for each winner.  If you do not live in the delivery area and would like to pick up your box, you can and you will be credited an additional $4.50 to spend on "extras" Big Organic Garden has available that week.  Okay, so what about those of you that live WAY outside the delivery area... do you have a friend or family member that lives in the area?  You can win it for them!  Will you be visiting our area? You can get your box when you're here.  If none of these work for you, we're sorry; but, please, educate yourself about the importance of eating organic and consider giving it a try yourself.

The giveaway:
Here's how you enter:
1. Like Big Organic Garden on Facebook (mandatory) and tell us you do!
2. Like Our Seven Dwarfs on Facebook (mandatory) and tell us you do!
Bonus entries:
3. Follow Our Seven Dwarfs on Blogger and tell us you do! (see sidebar)
4. Subscribe to Our Seven Dwarfs on Email and tell us you do! (see sidebar)
5. Share this giveaway as your facebook status, and tell us you did!

Make sure you enter a separate comment for each.  Each comment is another chance to win!

Good Luck!  We will pick a winner on Saturday, April 16th at 11:59 pm EST.  You have until then to enter.

 
Related Posts Plugin for WordPress, Blogger...

A "Lighter" Meal-Dandelion Greens with Sausage and New Potatoes & Pear, Strawberry, Basil, and Mozerella Salad

A friend of mine, owns a business called Big Organic Garden. We've started getting a box of organic fruits and vegetables from her each week.  Often, there are "unusual" things in the box that I wouldn't even think of trying on my own. This week, dandelion greens were in our box. Well, Mel also shares recipes to help us use things we may be reluctant to try otherwise.  So, I tried this recipe she shared.


Dandelion Greens with Sausage and New Potatoes
http://indianapublicmedia.org/eartheats/the-many-uses-of-dandelions/
I used very little oil.  Maybe 2 TBSPs max.  I also used chicken stock so there was no need to add any salt. I used Johnsonville Sweet Basil sausage.  This sausage is raw when you buy it.

Honestly, this was really good.  I served it in a bowl, like soup and didn't add pasta or rice.

I served it with a pear salad concotion I created with basil, pears, and fresh mozerella cheese, also purchased from Big Organic Garden.  We had the strawberries and Italian dressing.


Pear Salad

A bunch of fresh basil
2-3 ripe pears cut in bite sized pieces
1 pint sliced strawberries
Fresh Mozerella Cheese-diced in small cubes
A small amount of Zesty Italian salad dressing.

This turned out amazingly well. I'm so glad I signed up for the weekly box of fruits and vegetables. Cooking with new ingredients is fun!
Related Posts Plugin for WordPress, Blogger...

Eggs Sign-A Tutorial

I've had a lot of fun making signs recently.  My husband brings home great wood scraps, from the remodeling projects he does.  I go through them and snag  pieces seeing the potential for a phenomenal craft.
Here's the finished sign.
I started with a 5x12" 3/4" piece of Red Oak. I painted it Liberty Blue, an Apple Barrel paint. While the blue paint was still wet, I painted a Beachcomber Biege, an Apple Barrel color, through the blue. This gave the board great dimension.  I really like the way the background looks.

Using my Silhouette, I cut out the word "eggs" and "5c" in Segoe Print, 210 pt font size.  I cut it on vinyl.

Because I didn't have an actual cent sign, I used my exacto knife to create one out of the lowercase letter c. As you can see, I used the vinyl as a stencil.  I wanted painted words instead of vinyl.

I wanted to paint the words with the Beachcomber Beige color.

I painted, one direction, with a very light coat of paint.  I wanted the sign to look aged, not freshly painted.

After removing the vinyl, this is what I had.  My husband recommended changing the color of the "5c" to make it stand out from the "eggs".  I replaced the stencil (very easy to do) and painted over with a light green (Village Green by Ceramcoat) and then speckled it with brown (Brown Iron Oxide by Ceramcoat).

I found an egg clip art, cut it out in three different sizes, as a pattern, and traced it on the back of patterned paper. I cut out the three eggs.

I distressed the edges.  This one shows a picture of an egg I decided not to use. After arranging and rearranging I chose to keep all the eggs in the same paper.

Using Mod Podge, I glued the eggs down.  I let the Mod Podge dry for about thirty minutes.

I didn't want it to be obvious where the Mod Podge started and stopped.  In order to get the same look, I thought it was best to just Mod Podge the whole board.  It worked well.

Here's what the sign looked like after the Mod Podge dried and before I distressed it.

I got my handy mouse sander out and distressed away.

Here's a close up of the sign.  I think the distressing works so well!

It's done and I LOVE it! 
Related Posts Plugin for WordPress, Blogger...

Sweet Pea Patterns Winner!

We would like to thank Cheri of Sweet Pea Patterns for sponsoring our giveaway this week!  We love all her wonderful shoe patterns!  There will be many cute babies with some fancy shoes! We really appreciate her generosity!  Thank you for making Great Things!

If you're not our winner, make sure to head over to Cheri's shop for something special for your little one or to make for the little ones in your life. Cheri is offers some great deals in her shop.  You can get 3 patterns for $12 or 5 patterns for $20.  You should check them out!

Now for our winner...

# 4 said...
4. LibertyMom said...
I visited Sweet Pea Patterns! Love the retro sneakers!!!
Congratulations to LibertyMom!  Please email us at oursevendwarfs@gmail.com to claim your prize.

Monday is another Great Things Day!  Make sure to come back and check out what we are highlighting and giveaway!

Have a great week!

Related Posts Plugin for WordPress, Blogger...

Saturday, April 9, 2011

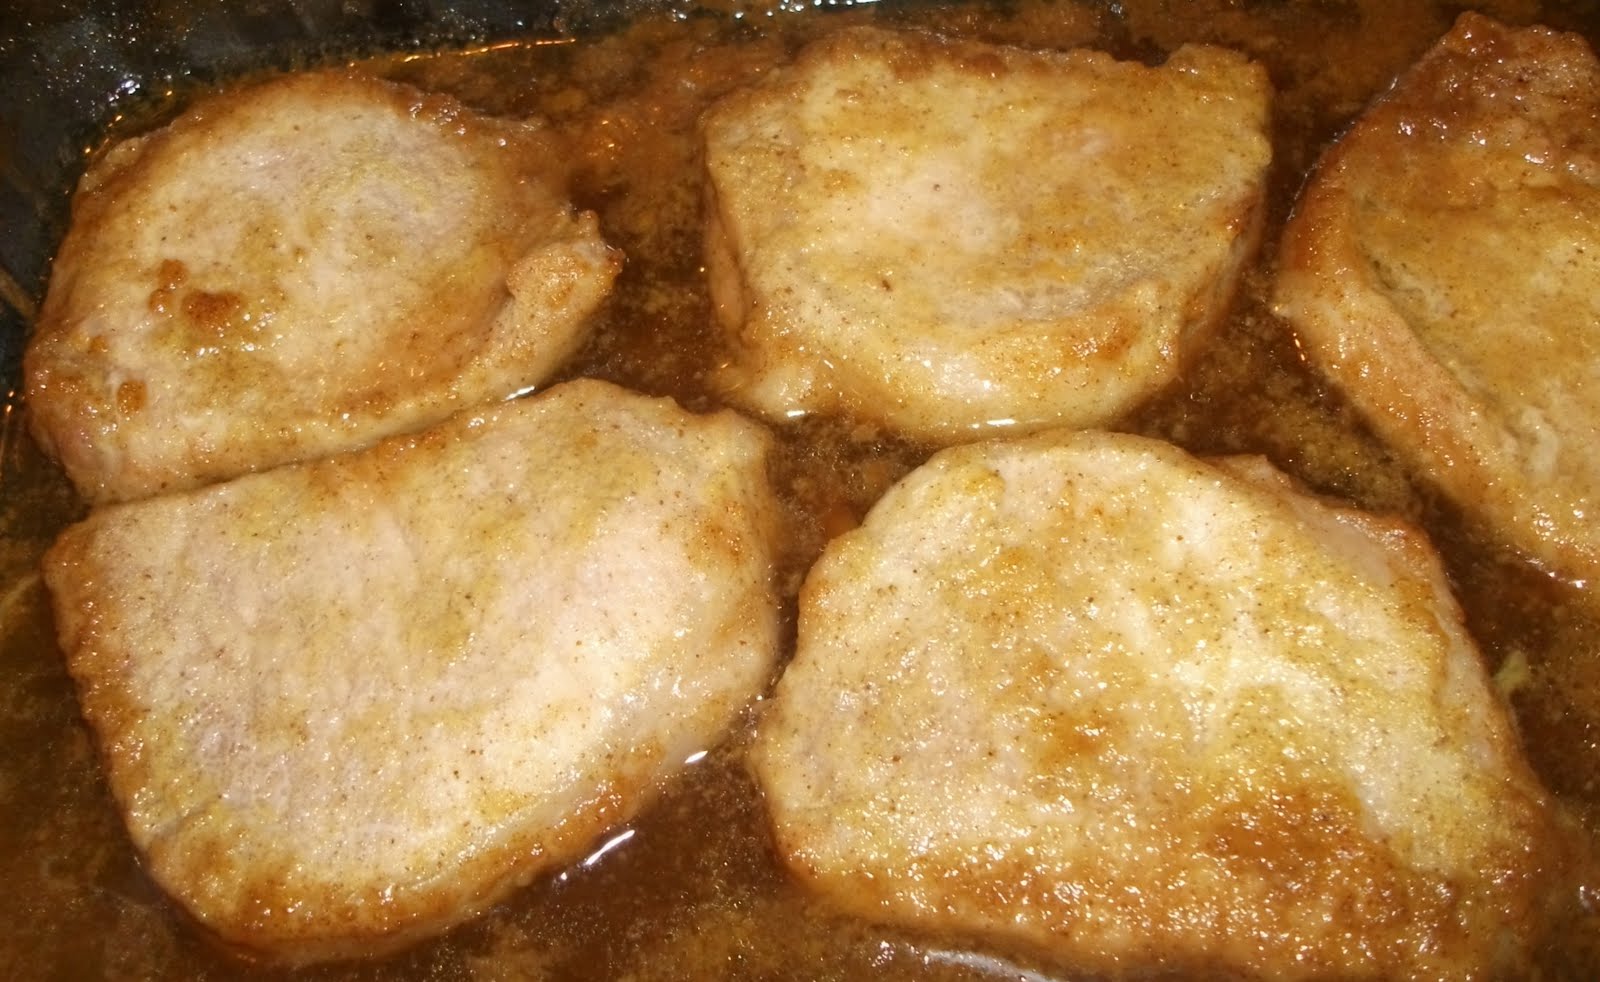
Spicy Mustard Pork


My Mom passed on this dish idea to me a few years back.  It is super simple and delicious.  To make it even easier, you can bake it, if you don't have much time or put it in the Crock Pot for an effortless type of meal.

Now for all you who refuse to cook unless you have exact measurements, this won't be your favorite recipe from me.  I promise you though it is full proof.  You just can't mess it up!

Here is what you need:

Pork Chops, cut up Pork Loin or Pork Roast (bone in or boneless, doesn't matter)
Spicy Mustard (generic brands work great, save yourself some money)
Brown Sugar

Generously rub spicy mustard on all sides of your Pork (no matter which type).  Place in casserole dish. Sprinkle brown sugar over all the meat.  I probably used a bit more than half a cup for my pictured pork chops.  Bake at 350 until pork is fully cooked (approximately 30 minutes).

If you choose to put it in the crock pot follow the same instructions above, but add extra mustard and brown sugar to give a sauce and added moisture.  Cook on low for 8 hours or high for about 4 hours.  The pork will shred easily apart.

Both cooking preparations create a great sauce for the pork.  You can serve this over rice, noodles, mashed potatoes, whatever you prefer.

My kids love this meal.  Ryan who loves to say how much he doesn't like food prior to eating it lately, gobbled this up and asked for it the next night too.

I hope you'll give it a try!  Happy Cooking!


Related Posts Plugin for WordPress, Blogger...

Never peel a potato again!

I love to cook, but peeling things such as potatoes is quite the chore.  Anyone else feel that way?

Well, I have a video to share with you that will change how you work with potatoes from now on.  Check it out!


Thanks to Brenda for sharing this video with me!  I really appreciate it!

Off to make potatoes without the hassle!

Related Posts Plugin for WordPress, Blogger...
Ebates Coupons and Cash Back












