Welcome!
Thanks for visiting! Please leave us a comment as we love your feedback.
See where we are partying at the bottom and on the sidebar.

Monday, May 16, 2011

Great Things-Grace, Sugar Momma's

These were the fabulous cookies we were sent!

Do you love cookies?  What about art?  Do you think it would be fabulous to find a place that wonderfully combines the two?  We've found it!

Somehow, when I was cruising through facebook, I came upon Grace, Sugar Momma.  I saw amazingly, beautifully, decorated cookies.  I scanned through her pictures and her wall. She said she sometimes sent out samples for people to try her cookies.  Well, Jill and I were in.  We wanted to try them.  I sent her my information and within days received a box of four beautifully decorated cookies.

Four cookies divided by two families (Jill's and mine) meant sharing two cookies per family.  They were like gold.  The girls and I divied the first cookie up between the three of us. It was so beautiful, I was reluctant to eat it.  Well, GraciAnn and Mariella dove right in.  Mariella proclaimed, "Yummy!" and GraciAnn asked for more. I explained that one of the three remaining cookies was for Daddy to try and the other two were Mrs. Jill's.  GraciAnn was POSITIVE Mrs. Jill wouldn't mind sharing her cookies with her.  I was positive Mrs. Jill would mind. John and I shared the last cookie when the girls were in bed (smart, I know!) and I gave Jill the other two to try.

This is what we all agreed on: the cookies were beautiful and the almond flavored icing was amazing!  I approached Grace about being featured as a "Great Thing" on our blog. She agreed and even offered to do a giveaway!  She will be giving the lucky winner 4-6 beautifully decorated butterfly cookies iced with her signature almond flavored icing. 
You could win beautiful butterfly cookies, like these!

Here's what Grace wants to share with you about herself and her new business:


** I am a professionally trained fine artist who put her training to good use in the kitchen.  I am a self taught cake-cookie decorator.  The baking talents comes from many generations of amazing cooks. 
Just a couple weeks ago I "officially" opened an Etsy store.  It took me WEEKS to figure out what I was doing and I was scared too because it's unknown territory for me but I realized if I ever plan on taking off as a mail-order business THIS was the place to start.
I haven't sold anything yet but I have faith in the quality of my products.  I take great pride in what I do, as an artist.  Every thing I make is a piece of me so quality control is through the roof!!  LOL
My ultimate goal is to do this full time so I can be with my family (I have 1 son, Jaymes 12y).  I currently have a full time "day" job and bake full time at "night" as well as do all my "Mom Jobs" at home too.  I am truly blessed, in so many ways Praise God, and thankful of the friends I have made on my little journey.  The opportunity you and Jill have offered me is an answered prayer to help get me closer to my ultimate goal of staying home with my family :)
Most of my orders come from word of mouth and free samples I offer periodically via FB.  Because I take great pride in my products and believe "Customer Service" is a lost art form the clients I do have are loyal and repeat for every family occasion that comes up - cookies, cakes, cupcakes and just because they have a craving.  I am not expensive and go out of my way to provide them with the best I can and it has paid me back in return.  Every penny I make goes right back in to sending out more samples and getting my name out there.


These are perfect for wedding favors!
Okay, now it's up to you!  Let's get this contest started! You will have 5 chances to comment in an effort to win cookies, delivered to your door!
Comment 1: Visit Grace, Sugar Momma's at etsy and tell us what you like best. (mandatory entry) 
Comment 2:  Follow Our Seven Dwarfs via email or RSS feed. (mandatory entry-see sidebar)
Comment 3: Become a facebook fan of Grace, Sugar Momma's and tell us you are.
Comment 4: Like us on facebook and tell us you do!
Comment 5: Follow us on blogger and tell us you do! (see sidebar)
Make sure you have separate entries for each comment! You can enter until Saturday, May 21st at 11:59 pm. We will announce the winner on Sunday, May 22nd.
Grace is offering our followers an exclusive 15% off discount.  Use the code OSD15 at checkout.  Her cookies make great gifts!
Once you are a facebook fan of Grace, Sugar Momma's, you will be automatically registered for ongoing milestone raffles.  The latest one is at 285 fans.  She will give away a Father's Day Cookie Set in their choice of Golf, BBQ, Football or Tools.
What a great gift for golfers!
We're pretty sure our followers will help Grace reach this 285 fan milestone, this week! Well Grace, we are so glad we are able to give you this opportunity.  We can't wait for our readers to visit your etsy store and see what they'd like to try!

 

Related Posts Plugin for WordPress, Blogger...

Sunday, May 15, 2011

A Freezer Paper Stenciled Princess Shirt Bedazzled!


We had a princess party to go to and nothing to wear!  I grabbed a white onesie and white tshirt and went to town to make shirts to go with tutus we borrowed from friends.  This project took less than an hour and turned out wonderfully!

First, using my Silhouette, I cut 2 tiaras out on freezer paper. I put a piece of freezer paper, shiny side up, on the inside of the shirts and positioned the tiara, shiny side down, on the outside of the shirts.  I ironed it in place.

2.  Then, using a pink sparkly fabric paint, I painted in the stencils.  I allowed the paint to dry thoroughly, double checking to make sure there weren't any spots missing paint.


Here's the shirt waiting for the paint to dry.

3.  After the paint dried, I removed all the freezer paper.  I then stitched a bow on each sleeve. My husband helped figure out my new Bedazzler and he bedazzled the shirts.  


Seriously, it took less than an hour and things I had around the house to create the perfect princess shirts!
Related Posts Plugin for WordPress, Blogger...

Friday, May 13, 2011

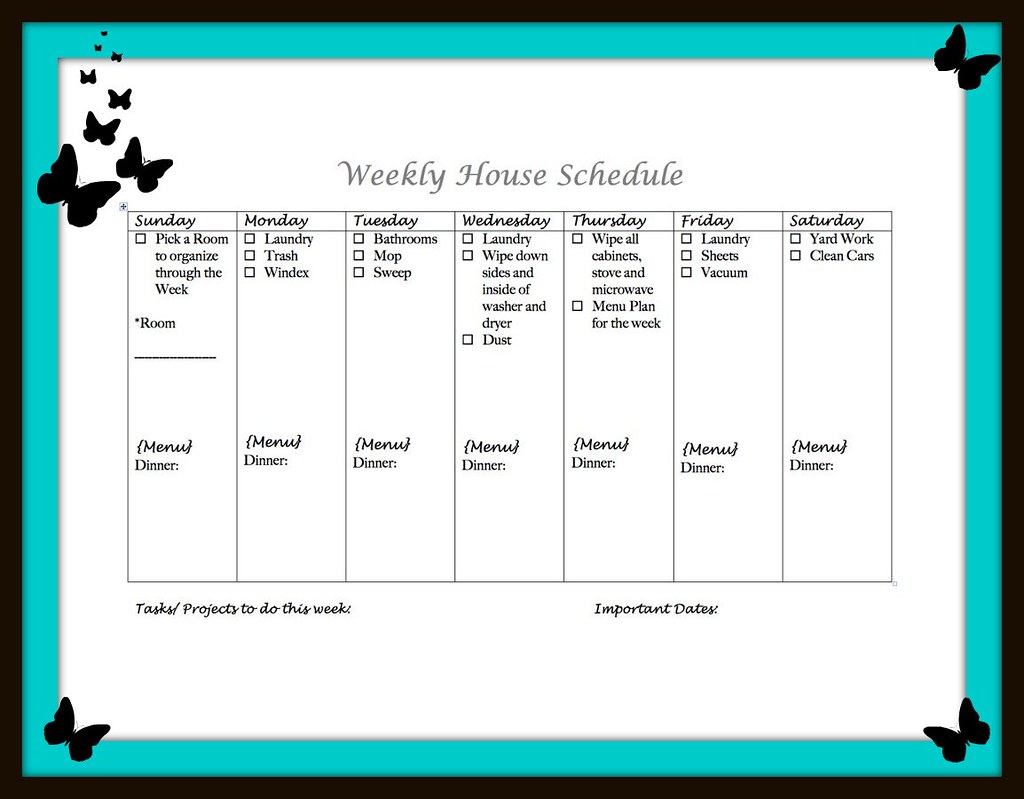
My Weekly House Schedule

Long ago I diagnosed myself with ADHD.  I've never had a doctor confirm it, but anyone who knows me would agree with my diagnosis.  Just watch me clean the house and you will wonder how I get anything accomplished.  My mom calls me the human tornado.  I zoom from room to room with zero order and structure!
I say all that to explain my need for order and structure!  I have wanted to develop a weekly house/life schedule for awhile now.  The other day, while blog browsing, I came across a great Weekly House Schedule over at Running with Glitter.  I am all for not re-creating the wheel if you don't have to.  Kelly created this schedule that would include a daily menu plan.
She also has a few chore charts as well.  If you like her schedule you can print it as is or email her for the document to tweak as you like.  Make sure to thank her for creating this awesome document!

I got the document from Kelly so that I could personalize it to my needs.  Thank you so much Kelly for sharing your file!

I have a menu board, therefore I didn't need that on my schedule.  I did need a checklist for occasional projects that I do around the house.  Once I had the schedule personalized, I printed it off and placed it in a sheet protector.  Now my weekly house schedule is on my refrigerator with a dry erase marker beside it.  Each week I check off what I got accomplished and put the date by any of my completed occasional projects.  Here is what my schedule looks like:

This is my first full week following the schedule.  I am still tweaking it to fully meet my needs. I am more than willing to share my file with you as well, if you like having the occasional projects.  Just email me and I will be glad to send it to you: oursevendwarfs@gmail.com

Here's to me focusing and accomplishing what I need to each day!

Related Posts Plugin for WordPress, Blogger...

Grilled Pork Souvlaki

A couple of years ago we took our entire family to the Atlanta Greek Festival.  We had heard great things about this festival and we knew we would have a fun family day.  Well, the festival wasn't all it was cracked up to be.  Other than some rides, there wasn't much for kids.

What I did enjoy was trying some new Greek foods.  I was introduced to Pork Souvlaki.  I was sold immediately.  I went home and searched high and low for recipes.  Don't be intimidated by the name!

After trying a few recipes, this is my combination of what I found to be a delicious marinade.  If you don't eat pork, this would be great for chicken as well.  The lemon juice makes this marinade fantastic for tenderizing meat.  I love this recipe and only want grilled pork this way anymore!  I hope you enjoy this recipe as much as I do!


Grilled Pork (or chicken) Souvlaki

  • Boneless pork loin or tenderloin, sliced for pork steaks or cut into 1-inch cubes for kabobs.
  • 1/3 cup lemon juice (fresh is best, but you can use the bottled kind as well)
  • 1/4 cup olive oil
  • 2 cloves garlic, minced
  • 2 Tbsp chopped fresh parsley (1 Tbsp if using dried parsley)
  • 1 tsp dried oregano
  • 1 tsp salt
  • 1/4 tsp black pepper

Place pork steaks or cubed pork into a zip-lock plastic bag.  In a small bowl, mix together lemon juice, olive oil, garlic, parsley, oregano,  salt and pepper.  Pour marinade into the bag with the meat, press out as much air as possible and seal the bag shut.  Refrigerate for at least 2 hours or overnight.

Drain marinade form the meat and discard it.  Place pork steaks onto the grill and cook appropriately or place pork on skewers, thread marinated pork cubes alternately with onion, green pepper or zucchini.

Preheat grill to medium-high.  Place skewers or pork steaks on the grill and cook, turning once.  Grill until meat is fully cooked.

Enjoy a new favorite marinade!  I hope it becomes a family favorite for you as well!

Related Posts Plugin for WordPress, Blogger...

Thursday, May 12, 2011

Personalized Name Signs

These signs were made as birthday gifts for very special friends of ours.  I based the color and theme on their bedrooms.

1. First I took 22"x9" birch, cabinet grade 3/4" plywood and painted it white.  I painted two coats.
2. I cut the names and symbols, from vinyl, out on my Silhouette. "Jayce" is in Rockwell font.  "Griffin" is in Tan Patty font.  Both symbols are from my Silhouette library.
3. I used the vinyl as the stencil.  I rubbed it to the board, completely and then painted with a very light coat of paint. After the paint was dry, I sanded with my mouse sander to blend in and lightly distress the board.
4. I dusted the board completely and painted it with a satin finish polyurethane.
5. After the polyurethane dried completely, I drilled holes at the top of the boards and added matching ribbon to hang the board with.


Personalized name signs will be available through our etsy shop, if you don't want to make your own.
Related Posts Plugin for WordPress, Blogger...

Wednesday, May 11, 2011

"Teachers Inspire"-A Sign created for our teachers for Teacher Appreciation Week

I racked my brain for over a week, to come up with a simple saying to put on a sign for my daughters' teachers. I wanted something truthful and meaningful.  I thought about many things.  I finally came up with "Teachers Inspire" which is what my daughters' teachers do.  I'd also like to think this is what I did as a teacher.

I really enjoyed making these and was very happy with how they turned out.  There are a lot of steps, but it's worth it. I'm sorry I don't have pictures of the project as I created it.  I'm going to do my best to give you clear directions.  If you have questions, feel free to ask.

1.  I began with birch, cabinet grade 3/4" plywood.  The wood was 10"x24".  I sanded the wood smooth.
2.  I painted a base coat on the wood.  I did the edges as well.  One sign I painted purple.  The other dark green.  These are GraciAnn's teachers' favorite colors.
3.  After the base coat dried, I painted two coats of semi gloss cream paint on top.  I let the paint dry completely between each coat.
4.  When the paint was dry, I applied a stencil of vinyl, I made on my Silhouette, to the board.  "Inspire" is in Copperplate Gothic Bold Font.  It is 3"x9".  "Teachers" is in Cataneo BT font. It is 5"x18".
5. After the stencil was smoothed down, I painted in. I  used very little paint and made sure not to glob it on. I chose to use two different shades of each color.  When the paint was dry, I removed the stencil.
6.  I let the paint dry a little more and used my mouse sander to distress the sign. I removed paint from the edges, some of the words, and the blank spaces.  My goal was to get some of the original base color to peek through. It worked.
7.  After sanding, I wiped the board clear of any dust particles.  I rubbed stain all over the sign.  I let the stain dry completely.
8.  When the stain was dry, I applied polyurethane to the sign. I chose a clear satin finish.
9.  After the polyurethane was completely dry, I drilled holes in the top of the sign, and added wire, for hanging.

This sign will definitely be available in our etsy shop!
Related Posts Plugin for WordPress, Blogger...

Tuesday, May 10, 2011

Teacher Treat Jars

These were the adorable jars I made for Teacher Appreciation Week.  They were so easy!  I took Mason Jars (quart sized) and filled them with M & Ms.  I bought every kind of M & M I could find: dark chocolate, milk chocolate, pretzel, peanut, dark chocolate peanut, and peanut butter.  I have to say those peanut butter ones are scrumptious!  I mixed them all together and funneled them in the jars.  I bought 8 large bags of M & Ms for 4 quart sized jars and I had maybe a bag left (I can't be sure exactly how many since I'd mixed all the bags).  I would say, to be safe, plan on 2 large bags per jar. If there's any left over, it's just a bonus!

Using my Silhouette, I cut "Treats for the Teacher".  I used the Arial font and made the total image 3 inches square.  I cut them on a pretty bright green vinyl.  I affixed it to the jar using transfer tape.  I used a square of fabric cut with pinking sheers for the top of the jar.  I hot glued an orange ribbon around the top.  I tied a sunflower in the ribbon that had a yellow ribbon around it.  I was done!

This was an easy, yet thoughtful gift. Teachers are always giving our kids treats. Now here's a chance for them to have their own treats.  So far, I've never met anyone that didn't like M & Ms either!
Related Posts Plugin for WordPress, Blogger...

Sunday, May 8, 2011

This Week's Great Things

This weekend was a family weekend for us! Family weekends are "Great Things"!  We hope all the Mothers out there had great weekends too.  We both spent Mother's Day away from our Moms, (physically) but with them in so many ways. Mothers are "Great Things" and we certainly appreciate ours.

Our husbands are "Great Things" in our lives too.  Without our husbands, we wouldn't have the privilege of being Mothers ourselves.  This Mother's Day, we celebrate the "Greatest Thing of All": being a mom.  There's just nothing greater in life.

So, this week, the great thing we want you to celebrate is your family.  We are!
Related Posts Plugin for WordPress, Blogger...
Ebates Coupons and Cash Back