Welcome!
Thanks for visiting! Please leave us a comment as we love your feedback.
See where we are partying at the bottom and on the sidebar.
Showing posts with label Birthday. Show all posts

Wednesday, January 25, 2012

More Valentine's Day Ideas

Here's another repost!

I've been busy!  Anyone who knows me knows I am ALWAYS busy.  My children and husband are a full time job!  My crafting is another job that's pretty much fulltime.  Luckily, I love my jobs. I  just wish I had more time for all of them.
I got this idea from the Idea Room.  I used an ancient frame I found in my husband's stuff.  It was an antique gold color. I  dry brushed it with white paint.  It toned down the gold.  I used a darker pink cardstock for the lettering.  I found that hot gluing the actual letters and then placing them on the scrapbook paper was the easiest way to go. It was a challenge to use the cardstock to make letters but the three dimensional effect is great!  Instead of crepe paper rosettes (oh, that's a story for another entry), I used a soft pink fleece to make a rosette (here's a tutorial for that: http://www.oursevendwarfs.com/2011/02/valentines-day-celebrated-with-burlap.html?utm_source=BP_recent). It was so easy and so sweet.  I really like the way this turned out and appreciate the Idea Room's idea!

Jill and I are getting into making hair clippies.  You may remember the Christmas tree clippies I made for one of our giveaways.  Then we gave away some Valentine's Day clippies.  http://www.oursevendwarfs.com/2011/01/weve-reached-over-100-facebook-friends.html 
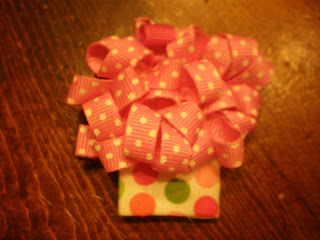
I've also started making cupcake clippies.  Here's one I made for my friend Aubrey.  She turned 2.
Here's the one I made for my daughter's second birthday. It matches her birthday shirt. I've got lots of clippie ideas! Stay tuned for some neat ones!
My friend Lesli made these treat bags, for her daughter's second birthday party.  They were filled with Hershey's kisses. The kids (and parents) loved them!  What a great idea!

Believe it or not, we still have many projects in the works. Stay tuned!

Related Posts Plugin for WordPress, Blogger...

Tuesday, October 18, 2011

Samy's Tutu

I have been making many tutus lately.  Many of Ryan's little girlfriends (that he has known since birth) had birthdays recently.  I have found that making tutus is a great way to personalize a gift and not something you can buy at the store.

Related Posts Plugin for WordPress, Blogger...

Friday, August 12, 2011

Ladybug Tutu

Yesterday was my sweet Anna's first birthday.  I can't believe she is 1!  Where did time go?

We are so very blessed to have Anna in our family.  She brings added sweetness and joy to all our lives.  All my boys (husband included) adore Anna.  How could you not love a little girl who smiles all the time?

I've had quite a few people tell me lately with amazement, "She is such a happy baby!"  I am confused by this as I would think all babies are happy, but I guess that isn't the case.  Thankfully, God has blessed us with three very happy and friendly kids.

Enough about how much I love my kids, on to what I made Anna!

Anna has a ladybug room, ladybug slippers, the nickname Anna bug, a ladybug birthday cake and now, a ladybug tutu!

Related Posts Plugin for WordPress, Blogger...

Tuesday, July 5, 2011

My first Tutu & Tutorial

Well, I did it!  I made my first tutu!  My friend Henri, sent me an easy tutu tutorial video (see below) awhile back, so I thought it would perfect for a birthday gift.  Check it out!

I made this for sweet Antonia's Princess Birthday party.  Here are some pictures of beautiful Antonia in her tutu.  Thanks for the pictures, Karla!


Isn't she just precious?  I hug and squeeze her every time I see her!

I was very happy with how my first tut turned out!  It was very simple to make.

Here is what you will need:
  • 2 rolls of 6 inch by 25" tulle of either one or two colors
  • 3/4 inch Elastic for waist band
  • Scissor or rotary cutter/cutting mat
  • ruler or measuring tape
  • needle and thread or a sewing machine to make it super fast
  • coordinating ribbon to the colors of the tulle
  • roll of paper towels and pins (this is to hold the elastic as you tie on the tulle
Here is the fantastic video I followed to make the tutu:


I did the slip knot technique and I used at least 60 strips for this 4T/5T tutu.  I used every bit of the two rolls of tulle. I like how full the tutu turned out.  Once I put on all the tulle, I tied on a ribbon and made a pretty bow.

I think my first tutu was a success!

Be on the lookout for my next tutu.  I am making a ladybug tutu for my sweet Anna's first birthday!

Happy Crafting!

Related Posts Plugin for WordPress, Blogger...

Friday, July 1, 2011

Freezer Paper Stenciled Birthday Shirts

A few weeks ago, I sent this feature on Freezer Paper Stencil T-shirts to my friend over at Sarahndipities.  Sarah just had her fifth child and needed some guest posts while she was recovering.  I was more than happy to help her out and hopefully make some new friends for our blog.  Welcome to any new followers from Sarahndipities.  Our followers should check out her blog as well.  She has super cute crafts and crochet items!

Today, I will be sharing a tutorial for a Freezer Paper Stencil T-shirts.

Two of my children are having birthdays coming up.  Since I learned how to do freezer paper stenciling, I love to make personalized shirts for my kids.  They love showing off their age and/or their name and it is much cheaper than embroidery! Here is a picture of what I will be teaching you to make.


Needed Supplies:
  • A T-shirt
  • Fabric paint
  • Foam paint brushes
  • Freezer paper (found in the plastic wrap/foil aisle of any grocery store)
  • Exacto knife
  • Self-healing cutting mat
  • Iron
  • Pencil to trace number and circle
  • Printed number and circle in your choice of font (I made a circle with the draw feature in Word).
Shannon and I both have a Silhouette and we love it!  Unfortunately, not everyone has a Silhouette, so I want to give you the tutorial for either way.  You can easily cut your letters on freezer paper using the Silhouette as well.  Shannon has done this many times and suggests selecting "Vellum" speed 3, thickness 25.  Make sure to use a mat that has plenty of stickiness left to it.  Rub the freezer paper down well to avoid any bubbles, which could cause the paper to tear.

If you don't have a Silhouette, here is the tutorial for you!

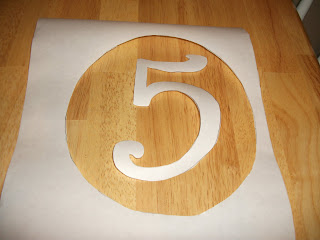
1.  Print off your number and circle or any design that you want to use.  Cut a piece of freezer paper larger than the size of your design.  With the waxy side down, trace your number or design.  

 2.  Here are all my designs ready to be cut out.  If you make the freezer paper too small don't worry, you can add more freezer paper to the shirt so that you don't get paint where it shouldn't go.    Also, don't stress if your tracing isn't perfect.  You can fix that when you cut it out.


3.  Now take your exacto knife and cut out the number and the circle.  Notice that I will need to add more paper to the five as I didn't center my 5 appropriately.


Here are the two designs I was working on.


I won't need the interior of the circle.  I am keeping this though as you never know what you might want to put a 5 on, right?


4.  Heat up your iron to the cotton setting.  Turn off any steam settings. Iron your t-shirt.  Then cut out a large piece of freezer paper that will fit the inside of your t-shirt. You want this piece to cover the entire inside so that you don't have paint bleed through.  Place the freezer paper waxy side up and iron your t-shirt again.  This will help the freezer paper to adhere to the inside.


5. Grab your circle.  Center the circle in the middle of the t-shirt.  Iron it down making sure it is flat and without any bubbles.  Then center the freezer paper with your number and iron it down too.
 I cut another strip of freezer paper as my one side was thin and I didn't want paint to bleed off the edge.

 Here is the shirt ready to add paint.

This is how your circle should look if you gave yourself plenty of space on both sides.  I did it right for the #3 shirt.

6.  Use a foam brush and fabric paint to paint your design.  Make sure not to use too much paint as it might cause the freezer paper to bubble and paint to bleed underneath.  Try to go with the lines of the shirt as well, not against the lines.  White paint is takes more than one coat to show up properly.  Most other colors can get away with one or two light coats. I did three coats for this design.  You can use a hair dryer to speed up the process if you get impatient between coats.  Just make sure that the first coat is completely dry before painting the second coat.
 After first coat of paint.

After second coat of paint.

After third coat of paint.  Notice the number has almost disappeared.

7. Again, allow the paint to fully dry.  Learn from my mistake on a previous project and let the paint dry for at least 24 hours before you machine wash.

8.  Peel off the freezer paper.  If you have any difficulty, use your exacto knife to get under the freezer paper.  You won't hurt the paint that is attached to the shirt.  Here are the finished shirts.

My little man Ryan loved his shirt and wore it proudly the day of his birthday.  He will wear it many more times throughout the year.  You can machine wash and dry without any problems.  Here is Ryan showing off his #5 shirt.  The second picture is of my little man Evan who turned 3 yesterday.  This was perfect timing to share the tutorial with everyone!


Shannon and I have made many gifts and other projects using freezer paper.  If you would like to see more, click here. Freezer paper stencils are fantastic and let you make inexpensive personalized gifts.  If you have any questions, please let me know!

Happy Crafting!

Related Posts Plugin for WordPress, Blogger...

Tuesday, June 28, 2011

Birthday Decorations

It's birthday week at our house!  My husband's big day is right around the corner.  I get our birthday decorations out a week before each birthday. Here are the decorations I have, so far... I'm always on the lookout for more to add to my collection!
This is a photoboard I created. I'll stick birthday pictures, of the birthday person, on the board the week of their birthday.
Here's a tutorial for making a photoboard:

Here's the balloon wreath I created last year, thanks to HowDoesShe! I have no idea how they made their beautiful wreath with only 144 balloons. I used more than twice that.
Here's the tutorial for the birthday wreath:


This is another HowDoesShe birthday decoration. It's a countdown to the birthday board. You simply pop a balloon for each day before the birthday.  As a bonus, you add a slip of paper to each balloon, with a special treat for the day. For example: a stop at the ice cream shop.
Here's the tutorial for the birthday board:

Yet another great HowDoesShe birthday decoration. This is a fantastic way to celebrate your birthday all week!
Here's their tutorial:

Here's a door mat I made with a 99 cent IKEA door mat.
This is the simple tutorial:

Birthdays are BIG deals that should be celebrated as such.  If you have any fabulous birthday ideas, please share them with us!
Related Posts Plugin for WordPress, Blogger...

Wednesday, June 1, 2011

Birthday Balloon Wreath

I've had a balloon wreath on my to do list for over a year now.  I spotted it on How Does She way back when and haven't wanted to make one for all our family's birthdays.  My oldest turned five last week, so I felt it was the perfect time to accomplish something on my list!


I followed the tutorial on How Does She, but I used a ton more balloons.  I probably doubled the amount and could probably use more to make it fuller.    I am not in love with all the different colors, I think I like the colors from the tutorial better.  I got balloons from the Dollar Tree.  Next time I would probably get multiple bags of balloons from Walmart, but they cost significantly more.  Oh well, when you craft, you sometimes have big successes and other times craft fails!  The important thing is to keep trying and experimenting!

Happy Crafting!


Related Posts Plugin for WordPress, Blogger...

Saturday, May 21, 2011

A "Daddy" Gift

I've found buying presents for men challenging! With Father's Day right around the corner, I wanted to share something that would work well for the Daddy in your life.

My friend, Jessica, was looking for a special birthday present, from her sons, to her husband.  Together, we came up with this.


I took a canvas and painted it white.  I dry brushed it with navy blue. We traced the kids hands and cut them out of scrapbooking paper.  I Mod Podged the hands to the canvas.  I cut the words (navy) and key (gold) from vinyl and transferred it on to the canvas. To make the canvas look framed, I hot glued navy blue ribbon, trimmed in gold, to the edge of the canvas. I was really happy with how it turned out and I think he liked it too.
Related Posts Plugin for WordPress, Blogger...

Saturday, April 30, 2011

Antonia's Birthday Gift

Our sweet friend, Antonia, celebrated her fifth birthday with a princess birthday party.  Since she obviously loves princesses, and her bedroom is green and turquoise, I created a sign for her room.


I started with a scrap piece of plywood.  I painted it a lime green.

I created a stencil, on my Silhouette, using a tiara image, from the Silhouette store.  The stencil was created simply by cutting the image on the Silhouette vinyl.  It works very well.
I painted the tiara gold.

I was ready to add her name. I relied on a stencil created on my Silhouette.  This font is Waterfall.

I painted it blue.
I painted the tiara's heart pink.

I distressed the sign with my mouse sander.

I drilled holes on the top to create a hanger.

I wanted to add bling to the sign.  I used, "Glossy Acrylic" to give the heart a three dimensional, shiny appearance.  It took HOURS to dry but looked so nice when it finally did.
I added all kinds of self stick "diamonds" to the tiara. I outlined the heart with them.

I added some more here...

...and there...

It's blinging!
And the princess sign is complete.  I just wish I would have painted a couple of more coats on the gold to make the tiara more "golden".  From what I hear, Antonia likes it just the way it is.  I really do too.
Related Posts Plugin for WordPress, Blogger...
Ebates Coupons and Cash Back