Welcome!
Thanks for visiting! Please leave us a comment as we love your feedback.
See where we are partying at the bottom and on the sidebar.
Showing posts with label fabric flowers. Show all posts

Thursday, March 1, 2012

Our St. Patrick's Day Wreath-A Tutorial

I'm going to share some of our St. Patrick's Day projects from last year and then I'll start posting the new ones I've made this year.  This wreath was fun to make and can be used over and over again. It's a good thing!

I have to admit, I was VERY sad to put my Valentine's Day wreath away.  It was just so cute! I headed to JoAnn's in search of supplies to make a St. Patrick's Day wreath.  Jill and I got together with our now crafty, breastfriend, Amy.  This is what we came up with.


Our Shamrock wreath!

Amy's wreath wrapping!


Amy was our wreath wrapper.  She wrapped all three wreaths with the light yellow ribbon. I chose yellow because I wanted something that would contrast nicely with the green of St. Patrick's Day.  I also chose fabric that had a rainbow of colors and I thought the yellow would tie in nicely with that. I have to admit that I wasn't thrilled with the yellow when it was all done.  It's a little buttery.


We then made rosettes out of green fleece. Here's directions on how to make the rosettes. http://www.oursevendwarfs.com/2011/02/valentines-day-celebrated-with-burlap.html We then hot glued three rosettes together and added a stem to make shamrocks. We made 3 shamrocks for each wreath (9 rosettes total per wreath.)


I found this fabric that I really liked. The backdrop is rainbow and Shamrocks cover the rest of the glittery fabric.  We made another kind of fabric rosette out of this, for our wreath. First, you snip fabric about an inch wide and then rip it the rest of the way. This gives it a thready look.


Then, we tied a knot in the center of the fabric.


We folded the fabric together, at the knot, so we had the positive side of the fabric facing out on both sides.


Starting at the knot, twist and roll the fabric.


Stop every now and then to hot glue the rosette.


Stopping to glue again.


We made a pattern: rosette, shamrock, rosette, shamrock, rosette.


We also added a rosette to the bow (that we made out of the same fabric). So, we had 5 rosettes per wreath.

Here's the finished wreath.


Related Posts Plugin for WordPress, Blogger...

Sunday, January 29, 2012

Last Year's Valentine's Day Post is Full of Great Ideas

It's Valentine's Day! I hope you all are having a wonderful one.  What does this mean to us?  Well, we're almost done with pink, red, and hearts and we'll be moving on to rainbows, leprechauns, and pots of gold.

I LOVE traditions.  I have many.  I really don't have any Valentine's Day traditions though.  Any suggestions?

I definitely try to spend the day letting others know how grateful I am for them. So, let me start with our followers.  I am so grateful for you.  You give our crafting addictions a purpose.

Speaking of crafting and cooking... I have a few more Valentine's Day things to share with you before we move on to the next holiday.


Do you remember the birthday door mat tutorial I did? http://www.oursevendwarfs.com/2011/01/happy-birthday-welcome-mat-tutorial.html Here's my Valentine's Day version.  We're conversation hearts.  I used regular acrylic paint on the mat and fabric paint to paint on our names.  I just free handed the hearts. Super easy and even cheaper.  This is one of those thirty minute crafts.  I LOVE quick crafting!
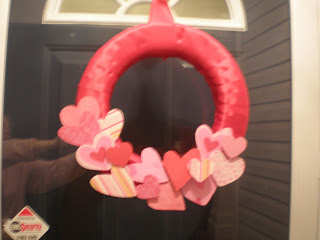
My friend Amy and I saw a great wreath on Oopsey Daisy http://oopsey-daisy.blogspot.com/2011/02/3-dimensional-heart-wreath.html.  We were inspired.  As always, when we copy craft, we take their thing and do our own thing to it.  So, instead of copying the entire wreath with the hearts, we did a partial cover. I'll be honest, there were three reasons we did this. First, we bought two stores out of hearts.  Secondly, that would have taken a lot more time.  Finally, we really liked the look of the satin ribbon on the wreath so we wanted ot show some of it.  This is my wreath above.

This is Amy's wreath.  Amy claims to be noncrafty.  She's a crafty chick in denial.  Her wreath is gorgeous.  Also, if I'm going to be completely honest.  She made all of my wreath too.  The only thing I did was arrange the hearts, hot glue them on, and get a huge blister to prove I used a hot glue gun! Thanks, Amy!


Here's my entry way with the wreath and doormat.


After crafting, I did some cooking. I made these amazing meringue cookies.  I got the recipe from http://www.thestoriesofa2z.com/2010/02/meringue-ice-cream-cone-valentines.html she made them into adorable ice cream cones.  I decided not to do that.  First, my kids don't eat the cones. Secondly, my kids don't eat cake, just icing, and thirdly, meringue cookies, even with M & Ms are pretty low fat.  I'm thinking that's a great dessert to make.  These are delicious.  I used 1T of freshly squeezed lemon juice.  The chocolate and lemon combination are surprisingly amazing.  I will make this recipe again and again.  YUM!

I also made these Martha Stewart cookies.  http://www.marthastewart.com/recipe/chocolate-cookie-cutouts-love-bug-cookies The first time I made these cookies was for my daughter's first birthday party.  It was ladybug themed and I made the cute ladybug cookies.  Well, this cookie base is simply delicious... cocoa and cinnamon...so good.  So, I've made them a couple of times since.  These aren't decorated yet but pretty soon they'll have Royal Icing and a varitey of sprinkles. 
...GraciAnn decorated these!  Cute, huh?

Then there's the homemade card I made my husband.  I used red felt to make the rosettes. http://www.oursevendwarfs.com/2011/02/valentines-day-celebrated-with-burlap.html Here's a tutorial for the rosettes I did on an earlier project.  It's simple, sweet, and special. I like it much better than any of the cards I looked at to buy.

Here's wishing you a lovely day on this Valentine's Day!
Related Posts Plugin for WordPress, Blogger...

Friday, January 27, 2012

Valentine's Day Celebrated with Burlap and Fleece-A Tutorial

I'm almost done reposting and can't wait to share some new things with you. Here's another one of my favorites from last Valentine's Day.

This was an inspired craft.  Somewhere, on some blog, I saw a heart wreath made of red felt rosettes. The wreath was on a burlap background and it was in a frame. I have looked and looked for that inspiration piece but cannot find it. So, if you created it, or if you've seen it, please let me know.  I want to give credit where credit is due.

Here's my finished piece.  It's very different from the inspiration piece.

I wanted to make something similar to my inspiration piece, but didn't have a frame big enough. I didn't want to buy anything for this project... so, I went through my husband's stuff in the garage. I found this piece of wood and some foam. I added my cream burlap, some batting, got my staple gun and started working.

First I covered the board with the thin foam. I stapled the foam to the back of the board.
 I wanted to give this project a "girly, plush" look.

I covered the foam with a layer of quilting batting to give it that extra fluff.
I stapled the batting to the back of the board.
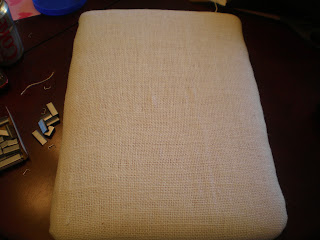
I covered the foam and batting with the burlap. I stapled the burlap to the back of the board.
 It gave it a bit of a rugged look. 
I made a heart template and positioned it on the board.
I traced the heart onto the burlap so I had a guide to work with.
I made a ton of circles.  Seriously, there were a lot of them.  I made them from a pretty pink fleece. 
I didn't use a template.  I just cut them freehand.

I cut each circle into a spiral. I left a circle at the end of each spriral. 
It becomes the base of the rosette.

I took the slim end and rolled.  I used hot glue every now and then to secure the rosette.
A little hot glue and a little more rolling.
Here's what the rosette looks like at the end.  See the base?
I plopped a lot of hot glue on the base.
I then pressed the flower to the base. This is how they turned out.  Cute, huh?
I glued a zillion of these on to the burlap base. I used the heart I traced as my guide.

I then hot glued trim around the entire project and put a bow in each corner. 
The bow adds a little femininity and hides the awkward turn on each corner.

...and it's done.
I love it!  I didn't buy anything for this project.  YEAH!
GraciAnn used a rosette and a white satin ribbon to make a necklace.  It was really cute!

Related Posts Plugin for WordPress, Blogger...

Wednesday, February 9, 2011

A New, Easy Way to Make Decorative Shirts-A Tutorial

Do you want to create a personalized tshirt in less than thirty minutes?  It's possible! My friend Lesli shared this form of tshirt making with me.  Thanks, Lesli!

This is what I used:
shirts
fabric (for the design)
a heart stencil
scissors
Heatbond-iron on adhesive-LITE-purchased in the fabric department of JoAnns
an iron
a needle
thread
a sewing machine is optional

First, I traced the heart onto the paper side of the heatbond.

Then I ironed the fabric on to the rough side of the heatbond. I turned the steam off on my iron and made sure it adhered well.

I then cut the heart out.

Tada.  (Sorry about the ugly ironing board cover background)

This is what the back of the heart looks like.

I peeled the paper coating away and was left with a smooth material on the back of my heart.

I positioned the heart on my shirt and ironed it on. I had my iron on the hottest setting possible, no steam. 
The heart attached easily. You could stop here, but I wanted to do a little decorative stitching.

The fabric had a "dotted" black line running throughout it.  I decided to continue that around the edges.  I used a piece of embroidery floss and hand stitched around the heart.  I've seen others use their sewing machines and fancy stitches but... I'm not a great seamstress and I really thought with this particular fabric, this looked cute.

In less than an hour I had two shirts done for my two girls.  I like quick crafting!
Related Posts Plugin for WordPress, Blogger...
Ebates Coupons and Cash Back