A couple of weeks ago Shannon had a bunch of people over for a craft night. It was a ton of fun to work on some teacher appreciation crafts with a group of ladies. I think I might start that in the fall after my move to Ohio.
One of the items that we made was a personalized hand sanitizer. I've had this on my list to make for a long time, but just never got around to do it. Thanks to Shannon, I got it made.
Showing posts with label Silhouette. Show all posts
Showing posts with label Silhouette. Show all posts
Thursday, May 10, 2012
Saturday, April 21, 2012
Name Blocks
Let's face it, most kids today have way more toys than they can play with. So, when invited to birthday parties, I try to ask parents if there's something their child could use, that I can create.
Recently, one of our friends, celebrated her fourth birthday. I knew her room was being transformed from Winnie the Pooh to Disney Princesses, for her big day.
I asked her mom if there was anything special she'd like for her new room. Her mom suggested name blocks. I got my husband to cut a 4x4 post, in squares. I painted the squares, mod podged the sides, sanded to slightly distress, and applied vinyl letters I cut on my Silhouette. They made a wonderful, personalized gift and look great with her princess themed room.
Thursday, March 1, 2012
Shamrock TShirts-A Tutorial
These Shamrock shirts are very similar to the Valentine's Day shirts I made. http://www.oursevendwarfs.com/2011/02/new-easy-way-to-make-decorative-shirts.html

For the Shamrock design, I used my Silhouette to cut a Shamrock from cardstock. I then used the negative for the pattern. I traced the Shamrock onto the paper side of Lite heat bond.
I ironed the paper to the fabric. Notice, the paper side with the tracing is what you iron and you iron the back of the fabric to the back of the paper.
I then cut out the Shamrock.
I peeled off the paper backing.
I was left with a shiny material on the back of the fabric. When heated, this shiny material becomes the glue that bonds the fabrics together.
I ironed the Shamrock to a tshirt.
It's attached!
To give it that finished look I zig zagged stitched around the Shamrock, with my sewing machine. This is kind of comical because I don't sew. It actually turned out pretty well though. It does take time but I think it looks nice and it's an inexpensive way of making a holiday shirt.
The girls' finished shirts! Now to make the bows to go with them.
St. Patrick's Day-Shamrock Tree-Copy Craft
I found this great project here: http://lindseyscraftlist.blogspot.com/2010/03/shamrock-tree-with-tutorial.html


This was my inspirational piece.
I didn't have a picture frame and didn't want to go buy anything. I hit John's wood scrap pile and found this piece of poplar.
I painted the edges brown.
I cut a piece of cardstock to fit the board and distressed it. I mod podged the paper to the wood and let it dry, completely. I then used a belt sander to blend the edges.
I drew a tree trunk on the back of a piece of wood grained, brown cardstock. I cut it out.
I painted the entire cardstock with Mod Podge and added the tree trunk, shamrocks (that I cut using my Silhouette), and letters that spell "LUCK" also cut on my Silhouette. I added a piece of brown ric rac.
After the mod podge was completely dry, I added a heavy layer of mod podge over the entire project.
I glued a button to the end of the ric rack.
Here's the finished project. Thank you, Lindsey at Inspiring Creations. You inspired me!
St. Patrick's Day "Lucky Sign" -Copy Crafting
I saw this Lucky sign: http://lindseyscraftlist.blogspot.com/2010/02/lucky-wood-board.html I wanted to make one of my own.
My husband is a wood worker. In his home remodeling projects, I get lots of scrap wood. GraciAnn and I found a piece we liked, and she went to work sanding it. This particular piece was oak.
We got green paint. The color was "XMas Green".
We painted the entire board.
On my Silhouette, I cut the word Lucky and some stripey Shamrocks. I used a distressing ink pad and distressed the letters and the shamrock.
I put Mod Podge on the entire board.
I placed the letters and shamrock on the board and rubbed it down. I let it dry for about thirty minutes.
I mod podged over the top of the entire thing.
It dried. I added embellishments-ribbons and buttons. I feel Lucky to have such a wonderful sign!
Monday, January 23, 2012
A "Love" Sign-A Tutorial
This is something I created last year. I just love it! It's a perfect post for today because today's my youngest daughter's third birthday. Happy birthday, Sweet Mariella!
I needed a craft fix. I wanted to do something that I could finish in a reasonable amount of time (Something I could finish in a night!). I wanted to do something I hadn't seen before. Finally, I wanted another Valentine's Day decoration. I love what I came up with!

I needed a craft fix. I wanted to do something that I could finish in a reasonable amount of time (Something I could finish in a night!). I wanted to do something I hadn't seen before. Finally, I wanted another Valentine's Day decoration. I love what I came up with!
I got a black from at WalMart for $3. It was for 2-4x6" photos. I used a piece of red scrapbooking paper. It says LOVE on it. I got some flowers from a scrapbook store that look like they were made from pages out of a book. I used distressing ink and a blender stamp. I had black fuzzy vinyl and transfer tape. My tools were my paper cutter, a glue gun, and my Silhouette.
First, I cut the scrapbook paper to fit the entire frame.
Then I cut, "Daughters" out of my black fuzzy vinyl. I used the font, "Waterfalls" 170pt. I pulled away the excess vinyl so I was left only with the word I needed.
I used transfer tape to lift the vinyl. This does not work as well with fuzzy vinyl.
I placed the transfer tape, in position, on the scrapbook paper and peeled it away. The letters were attached to the scrapbook paper.
Here's a close up of the print on the scrapbook paper.
I went around the edges of the paper with the distress ink. I put the ink on with the blender pad and lightly distressed it.
I put the paper in the frame. I just discarded the mat that was included with the frame. I hot glued 2 flowers directly on the frame.
It's done! My daughters make me think of love so it's all relevant to me! I love it!
Sunday, December 4, 2011
Personalized Signs Made with Vinyl
I really enjoy making personalized gifts. I think it's extra special to give someone something made just for them. Here are a few of the signs I've made recently.
Wednesday, November 30, 2011
Making a Photo Board-A Tutorial
Do you want a super, easy, inexpensive way to display your pictures?
This makes a great holiday decoration too!
My Santa Photo Board
You will need:
A wooden board... whatever size you'd like. Mine is about 11x18".
Background Paper
Vinyl (I cut mine on my Silhouette)
Mod Podge
Paint
2 foam brushes (one for painting and one for Mod Podge)
Ribbon (I used two sizes. One for the main bow and a smaller one for the bows on top.)
Wire
A Drill
You favorite picture or pictures to post
Double Sided Tape for Posting
Sandpaper or a belt sander
Step 1-Sand the edges of your board smooth.
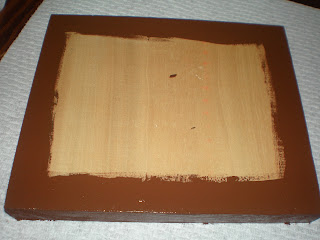
Step 2-Paint the edges and the border of the front of your board. Let it dry completely. There's no need to paint the entire board since it will be covered with your background paper.
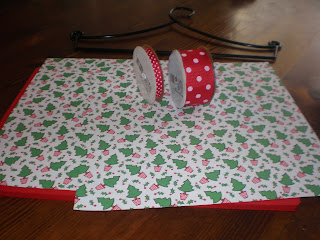
Step 3-Choose your background papers and cut them to size. Most papers are 12x12. Since my board was longer than one piece, I neatly tore the second sheet to overlap the first sheet. I really like the way this looks.
Step 4-Spread a heavy layer of Mod Podge onto your wooden board. It should be thick enough where it looks white but not clumpy.
Step 5-Carefully place your background paper on the board. Using your hands, smooth the paper down as much as possible. When you are done, you may want to use a roller, (I use my Pampered Chef one) to get out as many wrinkles and bubbles as possible.
Step 6-You may want to place a book or piece of wood on top of the board to minimize lifting and bubbles. Let it dry about 30 minutes. Going onto the next step before letting it dry will cause more wrinkling in the paper.
Step 7-Apply a thick coat of Mod Podge over the entire surface of the background paper. Let it dry thoroughly.
Step 8-Sand the edges, where the board and paper meet, with an electric sander, sanding block, or piece of sand paper. This helps the edges blend in.
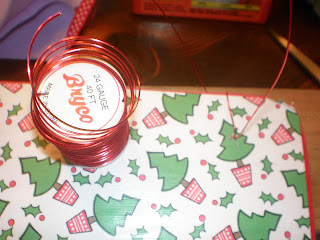
Step 9-Drill holes on either side of the board, large enough to slip your wire through.
Step 10-Insert your wire through either side, having the excess come through to the front of the board. I wrapped mine around the top of the board, to attach a ribbon later. Leave about 3 or 4 inches of excess on either side. Wrap the excess around a pencil or glue stick to make a spiral shape.
Step 11-Tie your small bows around the top wires. Tie your large bow around the middle of the board. I did it about 2/3rds down.
Step 12-Remove all the vinyl around your words until all you have left is what you actually want on the board. Take a piece of transfer tape and put it on the vinyl. Rub the transfer tape with a too. I have one that came with my Silhouette. You can also use your Pampered Chef stoneware scraper, like Jill did, or a popsicle stick would work too. Place the words, on the board, where you want them. I chose the bottom right corner. Rub the transfer tape again. Gently peel away the transfer tape. Sometimes, I've had to use the tool to hold the vinyl letters away from the transfer tape, so they go on smoothly. The more you do this, the better you get.
Step 13-This is your lucky step. You're almost done! Using double sided tape, attach your favorite picture or pictures to the board. I plan to add more in a random pattern.
Congratulations! You're done! In an earlier post, I showed how I made a similar board for Thanksgiving. I plan on making one of these for every holiday. They are easy to make, fun, and inexpensive.
Subscribe to:
Posts (Atom)


