Welcome!
Thanks for visiting! Please leave us a comment as we love your feedback.
See where we are partying at the bottom and on the sidebar.
Showing posts with label Organization. Show all posts

Saturday, June 4, 2011

Decorated Clipboard Tutorial

If you saw the Monogrammed Totes I made for Ryan's teachers, then you got a sneak peak at the clipboards that I made for them as well.  Here are the clipboards:

These are super simple to create and personalized for anyone.

Supplies needed:
  • A wooden clipboard (under a dollar at Walmart or a dollar at the Dollar Tree).
  • Various scrapbook papers
  • Scissors or a paper cutter
  • Small amount of paint to match scrapbook papers (for edge of clipboard)
  • Foam brush
  • Mod Podge (matte or gloss, your preference)
1.  Pick out the papers that you would like to decorate your clipboard with.  I used three different ones.
2.  Measure the clipboard and cut your papers to fit how you would like them to appear on the clipboard.
3.  Paint the edges of the clipboard in a matching paint color.  Allow to dry fully before moving on.
4.  Apply Mod Podge to the clipboard.  Take your paper that goes closest to the clip and apply it to the board.  Scrape it down to get rid of any bubbles.  Apply remaining pieces to the board and allow to dry.
 5.  Apply vinyl name to front if you choose to.
6.  Finish the clipboard with a layer of Mod Podge to the top of the papers and vinyl.  Allow to completely dry.
7.  Repeat this process for the back as well.

Here are the two boards that I made for Ryan's teachers.  Learn from my mistake and allow the papers to dry before applying the top coat of Mod Podge.  That is why I had a few bubbles show up.


There are so many nice personalized gifts you can make with clipboards.  You could make your to-do lists look exceptionally pretty, or your weekly house schedule, shopping list or menu plan.

Happy Crafting!

Related Posts Plugin for WordPress, Blogger...

Friday, May 13, 2011

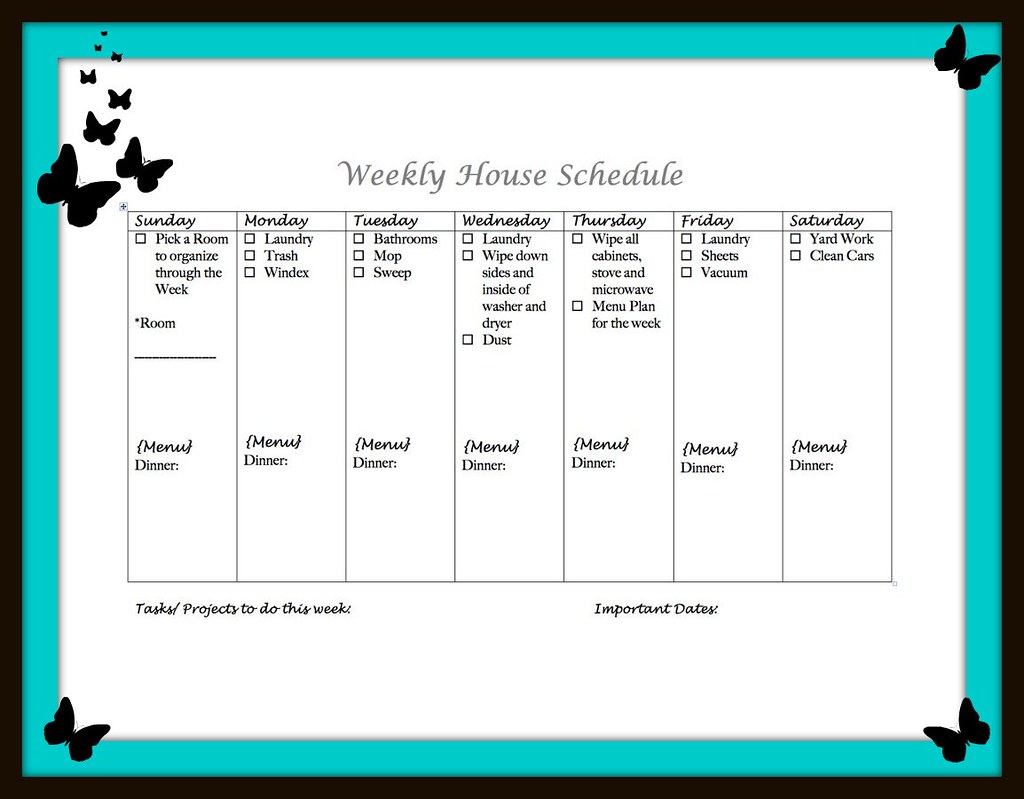
My Weekly House Schedule

Long ago I diagnosed myself with ADHD.  I've never had a doctor confirm it, but anyone who knows me would agree with my diagnosis.  Just watch me clean the house and you will wonder how I get anything accomplished.  My mom calls me the human tornado.  I zoom from room to room with zero order and structure!
I say all that to explain my need for order and structure!  I have wanted to develop a weekly house/life schedule for awhile now.  The other day, while blog browsing, I came across a great Weekly House Schedule over at Running with Glitter.  I am all for not re-creating the wheel if you don't have to.  Kelly created this schedule that would include a daily menu plan.
She also has a few chore charts as well.  If you like her schedule you can print it as is or email her for the document to tweak as you like.  Make sure to thank her for creating this awesome document!

I got the document from Kelly so that I could personalize it to my needs.  Thank you so much Kelly for sharing your file!

I have a menu board, therefore I didn't need that on my schedule.  I did need a checklist for occasional projects that I do around the house.  Once I had the schedule personalized, I printed it off and placed it in a sheet protector.  Now my weekly house schedule is on my refrigerator with a dry erase marker beside it.  Each week I check off what I got accomplished and put the date by any of my completed occasional projects.  Here is what my schedule looks like:

This is my first full week following the schedule.  I am still tweaking it to fully meet my needs. I am more than willing to share my file with you as well, if you like having the occasional projects.  Just email me and I will be glad to send it to you: oursevendwarfs@gmail.com

Here's to me focusing and accomplishing what I need to each day!

Related Posts Plugin for WordPress, Blogger...

Tuesday, January 4, 2011

Menu Planning: Determining your Menu

Hopefully, you have followed my steps so far on Menu Planning (Setting up a Food Inventory, Making the most of your cookbooks,  and organizing your menu).  Now you are ready to determine your menu and then go shopping!

Using your basic food list, organized cookbooks, budget, grocery ads and a calendar or a fun Menu Board, let's determine this week's menu!

Determine your Menu
  • Looking at a week at a time, choose a meal for each day.  Write these on your calendar or Menu Board.
  • Don't forget to include side dishes, breads and dessert (if you choose). 
  • If you have a day that is particular busy, make it a Crock-pot meal.
  • Include a leftover meal if you don't use those up for lunches.
  • Remember if the week gets hectic, switch meals around!
Here is my menu plan for this week:

Sunday:  Mom's Beef Barbecue on buns, leftover sides
Monday:  Grilled Kielbasa, seasoned noodles, green beans
Tuesday:  Henri's Crock-pot Beef Roast with mushrooms served on egg noodles, broccoli, homemade sourdough bread (rising as I write)
Wednesday:  BBQ Chicken Pizza leftovers from freezer (it's just the kids and I for dinner)
Thursday:  Chicken Fried Rice with peas & carrots mixed in
Friday:  Ham slice, macaroni and cheese, peas, cornbread
Saturday:  Easy Teriyaki Chicken with oriental vegetables and pineapple over rice

Go Grocery Shopping:
  • Make your list and stick to it!  All those extras that aren't needed will bust your budget.  It is okay to buy items for stocking up, just make sure you plan on those before going!
Enjoy a week filled with meals that are planned and save you money!

I hope you enjoyed this series on menu planning.  Share your thoughts, tips and this week's menu!  We love hearing from our readers!   

Happy Menu Planning!

Related Posts Plugin for WordPress, Blogger...

Monday, January 3, 2011

Toys: Divide and Conquer!

My husband has been complaining lately that the kids have too many toys and that toys are everywhere.  I don't want to get rid of toys as I know that Anna will play with them as she gets older.  Since I am on "Mission Organization" at our house, I thought I would tackle all the toys.

I went to the store with everyone else on a craze to get re-organized and bought three huge bins. I was smart and got the ones with the wheels!
I put them in the basement all in a row, so that I could easily put toys in them.  I gathered all the toys from upstairs, minus the new Christmas toys and piled them in laundry baskets.  I took the laundry baskets downstairs and started dividing up the toys. 

I made sure to each child had toys to play with in each bin.  Once the laundry baskets were empty, I started tackling the playroom.  This was a chore, but I knew it would be worth it.  First, I took toys off their shelving unit.  I kept only the toys I wanted them to play with for the next month.  All the rest of the toys were divided among the bins.

I continued around the room until I had the room organized and all three bins filled.  Then I tucked away the bins in our storage area. Now the kids have a smaller selection of toys to play with for this month. 

Next month I plan to grab a new bin, empty it into the playroom and fill it with the toys they have been playing with.  Hopefully, this will keep the kids entertained with the toys they have and also make them feel like Christmas at the beginning of each month.

Our playroom isn't as cluttered and I have a happy husband who isn't overwhelmed with toys.  That makes me happy as well!

Have you tried this before?  If so, did it work well? 

In what ways are you organizing your house for the New Year?

Related Posts Plugin for WordPress, Blogger...

Sunday, January 2, 2011

Menu Planning: Setting up a Food Inventory

It's a new year and time to get your budgeting skills a fresh start. In the coming days and weeks, I will share with you how I make the most of our family's money through some simple techniques.

I'm a stay-at-home Mom of 3 kids and I am also married to a Youth Minister.  I must know how to budget or we would be in BIG trouble.  When anyone says that they couldn't possibly afford to stay home with their kids, I remind them what little we live on.  It's possible, but it requires sacrifice and lots of planning.

One of the easiest ways to save money and meet a tight budget is by planning your meals. There are many meal planning services out there. I have done one, but I wasn't impressed with the recipes.  If you plan your meals yourself, you will make meals your family likes and not have wasteful spending. I have some helpful tips to get you started on your way to easy Menu Planning.

Before you think of menu planning and your food budget, you need to take stock of what food items you have in the house. I call this my Food Inventory.

Setting up a Food Inventory
1.  Grab a piece of paper and head to your pantry.  This is a great time to reorganize if you need to.  I don't have a pantry closet, but just two free standing pantries.  I start listing all that I have in my pantry shelf by shelf.  Yes, this is tedious, but it will save you money by not purchasing items you already have in stock.

I am a computer person, so I have my Food Inventory on my stickies on my Mac.  Here is a picture of command central.
Here is a close up of what I list:
I do this for every shelf.
2.  Move to your refrigerator.  List all the essential ingredients you have on hand.  You don't need to list items you always keep in stock such as milk, eggs, butter, ketchup, mayo (unless you need to pick these up).  List the items that you can use up in recipes, such as, green peppers, celery, green onions, carrots, etc.
3.  Now go to your freezer.  List everything you have in your freezer.  I list all the vegetables I have, the quantities of each meat.  Side note:  I use a Food Saver (best thing ever) and buy my meats in bulk.  Therefore I list that I have 5 chicken or 6 ground beef.
4.  If you have a deep freezer, an additional refrigerator or other food storage area, list all your food items in each of those.
5.  I put my list on my stickies so that I can delete weekly or easily add items that I bring home for the store.  If you don't have stickies, you could put your list in a word document. 
6.  Each month or every two months, depending on how well I have kept up with my storage, I go back and update my Food Inventory by going through this process again.

Now you have your first task to complete.  Go take a Food Inventory of everything you have on hand.  Next we will make the most of your cookbooks!

Related Posts Plugin for WordPress, Blogger...
Ebates Coupons and Cash Back