Welcome!
Thanks for visiting! Please leave us a comment as we love your feedback.
See where we are partying at the bottom and on the sidebar.

Thursday, March 10, 2011

Easy Hawaiian Pizza

If you haven't noticed, I have been cooking quite a bit lately.  We are trying to stick to our budget and the Dave Ramsey plan.

My family thinks it is hilarious that I have to do a photo shoot prior to every meal lately (ones that are unique at least).  I forgot to do the photo shoot on this one, so please forgive the after-thought photo.

Many years back I went to a trendy pizza place and had Hawaiian pizza.  I loved it.  I read back through the ingredients on the menu and realized that I could easily make this at home.  If you are looking for a different pizza recipe, here you go!

Hawaiian Pizza

1 can of pineapple chunks
1 refrigerated pizza dough
12 slices of Canadian bacon
Mozzarella cheese
Honey (this is the key ingredient)
Cornmeal (optional)

Spray your pizza stone or baking dish with cooking spray.  Sprinkle cornmeal on stone (optional).  Spread refrigerated pizza dough out on stone.  Spread honey liberally over surface of pizza dough. (I squeeze the container in long strides horizontally and vertically to get a good coverage).  Sprinkle mozzarella cheese over honey and dough to cover (as much as you like).  Place canadian bacon equally over cheese and then top with pineapple chunks.  Bake according to pizza dough instructions. 

Our family enjoys this pizza as it is a change from normal pizza night.  The kids love the pineapple addition. 

Happy Cooking!


Related Posts Plugin for WordPress, Blogger...

Wednesday, March 9, 2011

Crock Pot Beef & Mushrooms


After I had Anna, my friend Henri brought us a meal of Beef & Mushrooms.  It was delicious!  Evan can eat his weight in mushrooms so he was ecstatic!  I asked Henri for the recipe and also for permission to share it with you!  This is a very easy  and yummy recipe.  Henri suggested serving it over rice or mashed potatoes.  The last time I made this, I served it over egg noodles, which was another good option.  The boys of my house love anything served over noodles!
Henri’s Beef & Mushrooms

1.5 lbs of cubed beef stew meat
1 can cream of mushroom soup
1 can sliced mushrooms (it says undrained but I drain mine because I do not like the flavor of the mush. juice)
1 (1 ounce) pkg dry onion soup mix
dash garlic powder, onion powder and pepper


Combine all ingredients in crock pot. Cook on low for 8-10 hrs or high for 4-6 hours.


Serve over rice, mashed potatoes or egg noodles!

Enjoy!

Related Posts Plugin for WordPress, Blogger...

Sunday, March 6, 2011

Crockpot Pork BBQ & Shannon's Potato Salad

I want to share with you two delicious recipes.  These are our family favorites.  Whenever I need to take a meal to someone in need, this is my go to meal.  I hope you enjoy them as much as we do!
 
Jill’s Barbeque Pork

Pork Loin size of your choice
Large crock-pot
Water
Barbeque sauce (I use Sonny’s BBQ from Sam’s)

Pork Loin:  I buy a long length (log) of pork loin from Sam’s.  It can be from $15-20 depending on the size.  I cut it down to smaller portions for our family (some as pork roasts and others as chops).  If you have a big crowd you could make half of the log or even a full portion and get a ton of food.  Don’t confuse the pork loin for pork tenderloin.  Tenderloin is much more expensive and not needed with how tender the crock-pot gets this meat.

Place the portion of pork loin in the crock-pot the night before or early in the morning for that evening’s dinner.  Cover with a ½ cup of BBQ sauce.  Then add water to cover about half of the pork loin.  This will give it added moisture for the cooking process.  If you don’t add water it will require more work to pull apart the pork. 

Set the crock-pot to low for 8-10 hours.  Once the pork has cooked, move pork to a large cutting board.  Empty the crock-pot. You can either chop the pork with a knife or shred with a couple of forks.  It should be very tender and moist.  Place pork back in crock-pot while you finish shredding.  Pour a generous amount of BBQ sauce over all shredded pork.  I would use a whole container of Sonny’s for a full pork loin or half for half a log.  Allow BBQ sauce and pork to warm back up and serve as you like on buns or by itself.  This freezes well in an airtight container.

You will find that fresh tenderloin will be easier to shred than one that has been in the freezer, but either way it is still delicious.  Make sure to thaw your  pork loin before putting it in the crock-pot.

I make this often and typically have people ask me where I bought the BBQ.  I figure that is a good sign of a great recipe.  It is very easy too!


Shannon's Potato Salad

Shannon made this Potato Salad for me right after I had Evan.  It is my favorite potato salad and is the only kind I make anymore.  Everyone who eats it falls in love with its yummy taste and simplicity.  

For all of you who must have measurements, this isn't the recipe for you.  It is best made by taste.  All the measurements would change depending on how much potatoes you use as well.

Ingredients:
Chopped potatoes (Red, Idaho, any really) Skin on or off.
Celery
Bacon (fresh and crisp)
Mayonnaise (I use either Kraft or Hellmans)
Fresh Cracked Black Pepper
Salt to taste

Boil Potatoes in salted water.  Watch closely as they will get mushy fast.  Refrigerate potatoes until cool.  Add bacon, celery, fresh cracked black pepper and mayo.  Store in an airtight container when not being served.  Bacon will usually stay very crisp for 2 to 3 days.  It is still delicious beyond that!


This is the recipe that my friend Henri requests whenever we have a get together or when I make her a meal.  She likes it so much she eats it for dessert.

I hope you enjoy these recipes and that they become family favorites!

Related Posts Plugin for WordPress, Blogger...

Thursday, March 3, 2011

Two Shamrock Patterns!

Look what I created!
A few weeks ago, I scoured the internet for shamrock patterns, but I didn't find exactly what I wanted.  I love the small shamrock that Skip to My Lou has made (seen below).
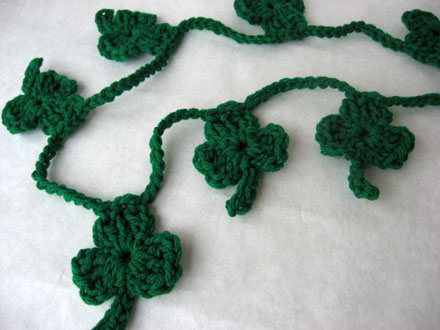
When I made this pattern, the shamrocks were adorable, but a bit small as garland for my mantle.  I wanted something larger, like I did for my heart garland or candy corn garland.  Well, I couldn't find anything, so I had to come up with something on my own!  I even have a new technique (a magic ring) to share with you too!
Here are my shamrocks!
Above is a four leaf shamrock.  Below is a three leaf shamrock.  Both measure about 5 inches wide and about 6 inches in height.
Now for the patterns!
Large Shamrock (4 leaf) pattern
Red Heart Super Saver in Paddy Green
I-9/5.5mm Hook
crochet terms
ch- chain
sc- single crochet
st- stitch
sl st- slip stitch
dc- double crochet
hdc- half double crochet
Make a magic ring with 10 Sc.  Directions can be found here.  This makes a tight ring.  (If this doesn’t interest you then, Chain 3.  Sl st in third chain from the hook.  Make 10 Sc in the loop.  Sl st to first sc.)
Row 1: Ch 1. Sc in same st.  sc in next st.  (2 sc)
Row 2: Ch 1 turn. 2 sc in each sc st. (4 sc)
Row 3: Ch 1 turn, 2 sc in first st. Sc in next 2 sts.  2 sc in last st (6 sc)
Row 4: ch 1 turn, sc in each sc across (6 sc)
Row 5: ch 1 turn, 2 sc in first st, sc in next 4 st, 2 sc in last st (8 sc)
Row 6: ch 1 turn, sc in each st across (8 sc)
Row 7: ch 1 turn, skip 1 st, (sc, hdc, dc) in next st, (dc, hdc, sc) in next st, sl st in next st, ch 1, skip 1 st, (sc, hdc, dc) in next st, (dc, hdc, sc) in next st, sl st in last st. 
Sl st down the side to the beginning circle.  Sc in next 2 sts.
Follow above directions starting at Row 2.  (repeat until you have 4 leaves).
Sl st into next Sc.  Ch 14.  2 Dc in the third chain from the hook. Hdc in the next 4 sts. Make 3 hdc in fifth st. Hdc in the next 6 sts.  Sl st into remaining st on circle.  Fasten off.
Large Shamrock (3 leaf) pattern
Red Heart Super Saver in Paddy Green
I-9/5.5mm Hook
Make a magic ring with 8 Sc.  Directions can be found here.  This makes a really nice tight ring.  (If this doesn’t interest you then, Chain 3.  Sl st in third chain from the hook.  Make 8 Sc in the loop.  Sl st to first sc.)
Row 1: Ch 1. Sc in same st.  sc in next st.  (2 sc)
Row 2: Ch 1 turn. 2 sc in each sc st. (4 sc)
Row 3: Ch 1 turn, 2 sc in first st. Sc in next 2 sts.  2 sc in last st (6 sc)
Row 4: ch 1 turn, sc in each sc across (6 sc)
Row 5: ch 1 turn, 2 sc in first st, sc in next 4 st, 2 sc in last st (8 sc)
Row 6: ch 1 turn, sc in each st across (8 sc)
Row 7: ch 1 turn, skip 1 st, (sc, hdc, dc) in next st, (dc, hdc, sc) in next st, sl st in next st, ch 1, skip 1 st, (sc, hdc, dc) in next st, (dc, hdc, sc) in next st, sl st in last st. 
Sl st down the side to the beginning circle.  Sc in next 2 sts.
Follow above directions starting at Row 2.  (repeat until you have 3 leaves).
Sl st into next Sc.  Ch 14.  2 Dc in the third chain from the hook. Hdc in the next 4 sts. Make 3 hdc in fifth st. Hdc in the next 6 sts.  Sl st into remaining st on circle.  Fasten off.
For garland:
Depending on the size of your mantle, chain 80 to 100.  For a thin chain, sc in every stitch.  For a slightly thicker chain, hdc in the second stitch from the end and in every remaining stitch.  You can also dc in every stitch but this will cause some holes in chain.  Attach your shamrocks from either the top or stitch them through the center, whichever style you prefer.

I hope you enjoy these patterns.  I would love to see your creations if you try out these patterns!
Happy Crocheting!
Related Posts Plugin for WordPress, Blogger...

Tuesday, March 1, 2011

Crocheted Leprechaun Hat

If you can't tell, Shannon and I have been busy crafting and decorating for every holiday.  Starting a blog has enabled us to craft with a purpose for every holiday.  Our kids are loving all these new decorations.  My latest creation is a Crocheted Leprechaun Hat.
I was searching for some St. Patrick's Day crochet items and found the pattern for this cute little guy.  This was super easy to make and is a festive decoration!  For my fellow crocheters, here is where you can find the pattern.

I want to add a green and white bow to give it a special touch.  The original had a welcome sign on it too.  That might be something I add in the future.  If you make this, I would love to see your creation!

Related Posts Plugin for WordPress, Blogger...

Saturday, February 26, 2011

Drew's 2nd Birthday Gifts

My sweet nephew Drew is turning 2 next weekend.  He is here this weekend with my sister and parents.  It is wonderful to see him play with his cousins and see his sweet smile and hear his laughter. He loves cars of any kind.  I wanted to make something special for his birthday that went with his love of cars.

As you know, I think handmade is the best way to go when giving a gift.  You don't have to make it yourself, buying a handmade item is just as nice.  That is why Etsy was created!  When I can,  I like to personally make a gift.  It is that extra special touch.

In addition to being part of this blog, I follow a ton of blogs.  I love all the ideas that come my way and that are shared among all the craft blogs.  Both of these gifts were from tutorials given by two wonderful blogs.

The first gift I made was an Art Notebook.  This is similar to the ones I made for two sweet girls birthdays.  You can see those here. If you would like the full tutorial, you can find it on the Sutton Grace blog, found here. (Thank you to Sutton Grace for having such a thorough and pictured tutorial!)

Again, I made some changes to this notebook from the original tutorial. This time I placed crayons on the side and didn't do the overlapped pocketing.  I found that the crayons fell out easier when they were horizontal (when notebook is opened).  Therefore, I made two vertical pockets.  I liked this better, unfortunately, I didn't measure well enough.  The crayons in the top pocket stick out a bit, but it isn't a huge problem, just another lesson learned.  Maybe by the time I make this on the fourth or fifth time, I will have it just like I want it.  Overall, I think this is another successful art notebook.  I am sure Drew will like it and will like that it has cars all over the fabric.
The crayons are loaded, now I just need to slip in a coloring book and some stickers for the sticker pocket.  I can't wait for Drew to point out the "Fire car" as he calls it!

The next item I made was a Cozy Car Caddy.  Homemade by Jill (not me, but I love her name!) has a fantastic tutorial for this easy to make caddy, found here.  This is a wonderful idea for little boys (or a girl who loves cars as well, I was one of those girls).  I like that it can be folded up, stored in a purse or diaper bag and taken anywhere. What child wouldn't like to drive a few cars on their mini-highway, while they play in the car or waiting for dinner at a restaurant!

Once again, I picked a cute car fabric and added a ribbon and velcro strap for easy closure.  I think this was another successful handmade gift.  The first picture is of the caddy all folded up.  The second picture is the caddy unfolded.  I need to load it with a few cars and Drew will be set to play!

I am giving Drew these gifts this evening.  We are having a mini birthday party for him here.  I love cake and will take any opportunity to enjoy a cake from Sam's Club!  Hopefully, I will get a great picture of him with his new travel gifts.  I will add that later!  These were very easy tutorials, please try them out.  I finished both gifts in about 3 hours. 

I hope that Drew likes them and that he has a fabulous 2nd birthday!  Aunt Jill loves you sweet Drew!

Related Posts Plugin for WordPress, Blogger...

Thursday, February 24, 2011

Baby Isaac's Crocheted Gifts

I finished another baby gift set.  This one is for Baby Isaac.  I let his parents choose the colors and then I tried out another new pattern.

I am so glad that I made myself learn to read patterns about 6 months ago.  If you are new to crocheting, don't be scared of reading patterns.  Break it down step by step.  I have even rewritten them so that I could understand them in "my" language.

Here is the gift set that I made for Baby Isaac.  I made cute little booties, a hat with a big pom pom on top and a toddler size baby blanket.  I always make my baby blankets a bit larger.  I don't know a baby who gives up their favorite blanket at age 1. That usually doesn't happen till much later.  At least a larger blanket will allow the child to enjoy it a bit longer.
Here is a full shot of the baby blanket.  I really like the light blue with the brown.  I used I Love This Yarn from Hobby Lobby.  I truly love this yarn!  It is soft, full and nice to work with.  The regularly 40% off coupon is nice too. 

If I made this blanket again, I think I would make a slightly thicker edge around the entire blanket.
Here is a close up view of the hat and booties.
Now for the best news, I want to share the patterns with you!  They are not my own, but all easily available.  The blanket is called Simple Ripple Baby Afghan from Lion Brand.  You can find the pattern here.  The shoes are called Warm Winter Booties and the pattern can be purchased here.  The hat is called Mini Muffin Hat and you can find the pattern here.  I love the textures and mixing of yarns for this precious little hat.    There you go, three new patterns, two free, one to purchase. 

I hope Little Isaac will like his baby set.  I have at least 2 more baby blanket sets to make.  I just need to decide what pattern I would like to try out next.  If you would like to see some other crocheted blankets I have made, check out this post.

Related Posts Plugin for WordPress, Blogger...

Tuesday, February 22, 2011

Cloche winner for 100 Blog Followers Giveaway!

Thank you to all those who entered and became new followers!  We really appreciate it!

On to the winner....
16. Stacy said...
I follow this blog!
Congratulations Stacy!  Please email us at oursevendwarfs@gmail.com so that Jill can get busy making you a cloche!

More giveaways are coming!  200 is our next goal for email subscribers, blog followers and Facebook fans.  Of course, we would love 100 twitter followers, but we aren't quite there.  Thanks again for all those who entered!

Related Posts Plugin for WordPress, Blogger...
Ebates Coupons and Cash Back