Welcome!
Thanks for visiting! Please leave us a comment as we love your feedback.
See where we are partying at the bottom and on the sidebar.

Friday, May 13, 2011

Grilled Pork Souvlaki

A couple of years ago we took our entire family to the Atlanta Greek Festival.  We had heard great things about this festival and we knew we would have a fun family day.  Well, the festival wasn't all it was cracked up to be.  Other than some rides, there wasn't much for kids.

What I did enjoy was trying some new Greek foods.  I was introduced to Pork Souvlaki.  I was sold immediately.  I went home and searched high and low for recipes.  Don't be intimidated by the name!

After trying a few recipes, this is my combination of what I found to be a delicious marinade.  If you don't eat pork, this would be great for chicken as well.  The lemon juice makes this marinade fantastic for tenderizing meat.  I love this recipe and only want grilled pork this way anymore!  I hope you enjoy this recipe as much as I do!


Grilled Pork (or chicken) Souvlaki

  • Boneless pork loin or tenderloin, sliced for pork steaks or cut into 1-inch cubes for kabobs.
  • 1/3 cup lemon juice (fresh is best, but you can use the bottled kind as well)
  • 1/4 cup olive oil
  • 2 cloves garlic, minced
  • 2 Tbsp chopped fresh parsley (1 Tbsp if using dried parsley)
  • 1 tsp dried oregano
  • 1 tsp salt
  • 1/4 tsp black pepper

Place pork steaks or cubed pork into a zip-lock plastic bag.  In a small bowl, mix together lemon juice, olive oil, garlic, parsley, oregano,  salt and pepper.  Pour marinade into the bag with the meat, press out as much air as possible and seal the bag shut.  Refrigerate for at least 2 hours or overnight.

Drain marinade form the meat and discard it.  Place pork steaks onto the grill and cook appropriately or place pork on skewers, thread marinated pork cubes alternately with onion, green pepper or zucchini.

Preheat grill to medium-high.  Place skewers or pork steaks on the grill and cook, turning once.  Grill until meat is fully cooked.

Enjoy a new favorite marinade!  I hope it becomes a family favorite for you as well!

Related Posts Plugin for WordPress, Blogger...

Thursday, May 12, 2011

Personalized Name Signs

These signs were made as birthday gifts for very special friends of ours.  I based the color and theme on their bedrooms.

1. First I took 22"x9" birch, cabinet grade 3/4" plywood and painted it white.  I painted two coats.
2. I cut the names and symbols, from vinyl, out on my Silhouette. "Jayce" is in Rockwell font.  "Griffin" is in Tan Patty font.  Both symbols are from my Silhouette library.
3. I used the vinyl as the stencil.  I rubbed it to the board, completely and then painted with a very light coat of paint. After the paint was dry, I sanded with my mouse sander to blend in and lightly distress the board.
4. I dusted the board completely and painted it with a satin finish polyurethane.
5. After the polyurethane dried completely, I drilled holes at the top of the boards and added matching ribbon to hang the board with.


Personalized name signs will be available through our etsy shop, if you don't want to make your own.
Related Posts Plugin for WordPress, Blogger...

Wednesday, May 11, 2011

"Teachers Inspire"-A Sign created for our teachers for Teacher Appreciation Week

I racked my brain for over a week, to come up with a simple saying to put on a sign for my daughters' teachers. I wanted something truthful and meaningful.  I thought about many things.  I finally came up with "Teachers Inspire" which is what my daughters' teachers do.  I'd also like to think this is what I did as a teacher.

I really enjoyed making these and was very happy with how they turned out.  There are a lot of steps, but it's worth it. I'm sorry I don't have pictures of the project as I created it.  I'm going to do my best to give you clear directions.  If you have questions, feel free to ask.

1.  I began with birch, cabinet grade 3/4" plywood.  The wood was 10"x24".  I sanded the wood smooth.
2.  I painted a base coat on the wood.  I did the edges as well.  One sign I painted purple.  The other dark green.  These are GraciAnn's teachers' favorite colors.
3.  After the base coat dried, I painted two coats of semi gloss cream paint on top.  I let the paint dry completely between each coat.
4.  When the paint was dry, I applied a stencil of vinyl, I made on my Silhouette, to the board.  "Inspire" is in Copperplate Gothic Bold Font.  It is 3"x9".  "Teachers" is in Cataneo BT font. It is 5"x18".
5. After the stencil was smoothed down, I painted in. I  used very little paint and made sure not to glob it on. I chose to use two different shades of each color.  When the paint was dry, I removed the stencil.
6.  I let the paint dry a little more and used my mouse sander to distress the sign. I removed paint from the edges, some of the words, and the blank spaces.  My goal was to get some of the original base color to peek through. It worked.
7.  After sanding, I wiped the board clear of any dust particles.  I rubbed stain all over the sign.  I let the stain dry completely.
8.  When the stain was dry, I applied polyurethane to the sign. I chose a clear satin finish.
9.  After the polyurethane was completely dry, I drilled holes in the top of the sign, and added wire, for hanging.

This sign will definitely be available in our etsy shop!
Related Posts Plugin for WordPress, Blogger...

Tuesday, May 10, 2011

Teacher Treat Jars

These were the adorable jars I made for Teacher Appreciation Week.  They were so easy!  I took Mason Jars (quart sized) and filled them with M & Ms.  I bought every kind of M & M I could find: dark chocolate, milk chocolate, pretzel, peanut, dark chocolate peanut, and peanut butter.  I have to say those peanut butter ones are scrumptious!  I mixed them all together and funneled them in the jars.  I bought 8 large bags of M & Ms for 4 quart sized jars and I had maybe a bag left (I can't be sure exactly how many since I'd mixed all the bags).  I would say, to be safe, plan on 2 large bags per jar. If there's any left over, it's just a bonus!

Using my Silhouette, I cut "Treats for the Teacher".  I used the Arial font and made the total image 3 inches square.  I cut them on a pretty bright green vinyl.  I affixed it to the jar using transfer tape.  I used a square of fabric cut with pinking sheers for the top of the jar.  I hot glued an orange ribbon around the top.  I tied a sunflower in the ribbon that had a yellow ribbon around it.  I was done!

This was an easy, yet thoughtful gift. Teachers are always giving our kids treats. Now here's a chance for them to have their own treats.  So far, I've never met anyone that didn't like M & Ms either!
Related Posts Plugin for WordPress, Blogger...

Sunday, May 8, 2011

This Week's Great Things

This weekend was a family weekend for us! Family weekends are "Great Things"!  We hope all the Mothers out there had great weekends too.  We both spent Mother's Day away from our Moms, (physically) but with them in so many ways. Mothers are "Great Things" and we certainly appreciate ours.

Our husbands are "Great Things" in our lives too.  Without our husbands, we wouldn't have the privilege of being Mothers ourselves.  This Mother's Day, we celebrate the "Greatest Thing of All": being a mom.  There's just nothing greater in life.

So, this week, the great thing we want you to celebrate is your family.  We are!
Related Posts Plugin for WordPress, Blogger...

And the Winner of the EarthBox is....

Congratulations to 38. D McDaniel said... I joined the RSS feed!
Please contact us at oursevendwarfs@gmail.com so we can send you an EarthBox!

We'll be posting pics of ours to show you how well they're growing and why we think EarthBoxes are "Great Things".

Related Posts Plugin for WordPress, Blogger...

Saturday, May 7, 2011

Our Children's Teachers Are Truly Appreciated

This week was Teachers' Appreciation Week. Our children mean everything to us, so those who spend the days with them, guiding, inspiring, and nurturing them, are wonderful, in our minds.

Jill and I did a lot of the same things for our children's teachers this week.  We also did a few things differently.  We wanted to share our week with gifts.  (If you can find someone to craft share on weeks like this, it makes life much easier and the teachers, get double the benefits!)

Monday: GraciAnn and I made chocolate chip cookies for her teachers. We put them in cellophane bags and added some cute ribbon.  She made each of them cards too.  We started the week out small, but they knew we were thinking of them! Here's an awesome chocolate chip cookie recipe that was shared on HowDoesShe: http://www.howdoesshe.com/perfect-chocolate-chip-cookies
Jill makes these cookies regularly, usually a double batch!  She doesn't put the dough in the refrigerator though as it makes the cookies thick and she likes them flat and gooey!

Tuesday: I (Shannon) made lunch for the teachers at GraciAnn's school.  Lucky for me, it's a small Montessori school so I only cooked for 12.  I made pulled pork, potato salad, three bean salad, baked beans, and brownies.  I also brought in King's Hawaiin Rolls.

Pulled Pork Recipe: First, I preheat the oven to 350 degrees.  Then I heavily salt and pepper a Boston Butt and put it in my Pampered Chef roaster.  I put it in the oven and turn the temperature down to 225 degrees.  I cook the pork for at least 8 hours but up to ten.  It literally falls apart.  I use Sonny's Sweet BBQ sauce on my pulled pork. It is so good.  Jill does the crock pot version.

Potato Salad: I cut up red potatoes (leave the skin on) and boil them in salted water. I am careful not to overcook the potatoes.  They should still be firm.  I drain the potatoes and put them in the refrigerator to let them completely cool.  I chop up celery and put it back in the refrigerator.  I cook bacon, on the roasting rack, in the oven at 350 degrees. The grease gets away from the bacon and it is crisp.  I let it cool and then chop it up.  You can add chopped onions.  I don't always.  I mix all the ingredients with low fat mayo and freshly ground pepper to taste. (This is Jill's favorite potato salad!)

Three Bean Salad: 1 can each of  drained wax beans, green beans, and kidney beans. Add chopped onions and green peppers.  Add 1/4 cup each oil, vinegar, and sugar.  Mix all ingredients together and refrigerate overnight.

Baked Beans: I use Bush's Country Style baked beans. I add a pound of maple bacon that I've cooked in a 350 degree oven, on a roasting pan, until the bacon is completely crispy. I use a small amount of the bacon grease to cook a cup of sweet chopped onions in.  I add a half cup of brown sugar, a little mustard, and a little Worcestershire sauce. I mix all ingredients together and cook the beans, in a 350 degree oven, for an hour.


Brownies:  This is my first secret.... Betty Crocker Triple Chunk brownies.  They are so good.  They are even better with my second secret...The brownie edge pan. Brownie edges are the best and with this pan, every brownie has an edge.  It takes 1 1/2 boxes of the Triple Chunk brownies to properly fill the pan.

Wednesday: GraciAnn brought her teachers 2 bookmarks each (made by Jill), 3 post it note holders (also made by Jill), and a dinner certificate for Texas Roadhouse which is an absolutely fantastic restaurant in our area.  Ryan took the bookmarks and post it note holders on separate days as Jill didn't have them both ready on the same day!


Thursday: GraciAnn brought her teachers jars filled with M&Ms.  I bought every kind of M&M on the shelf and mixed them altogether.  I put them in a mason jar and decorated it with vinyl, cut on my Silhouette.  Yum! (A tutorial will be coming soon!)  Ryan's teachers said these were the perfect gift as everyone could use a jar of chocolate!  Many of the fellow parents made comments that these were super cute and thoughtful!  Shannon did such a nice job!

Friday:  GraciAnn brought her teachers hand painted signs I designed and made.  I love how  they turned out!  Ryan's teacher's loved these as well.  The teachers felt very special receiving these! Shannon is very talented with all her signs!


Teacher Appreciation Week is over.  We will never stop appreciating all the teachers have done for our children. We will continue to send in random gifts and notes to let them know they are always appreciated.

Related Posts Plugin for WordPress, Blogger...

Thursday, May 5, 2011

Post it Note Holders

I have another super easy craft to share with you!  I am kicking myself that I didn't make these sooner!

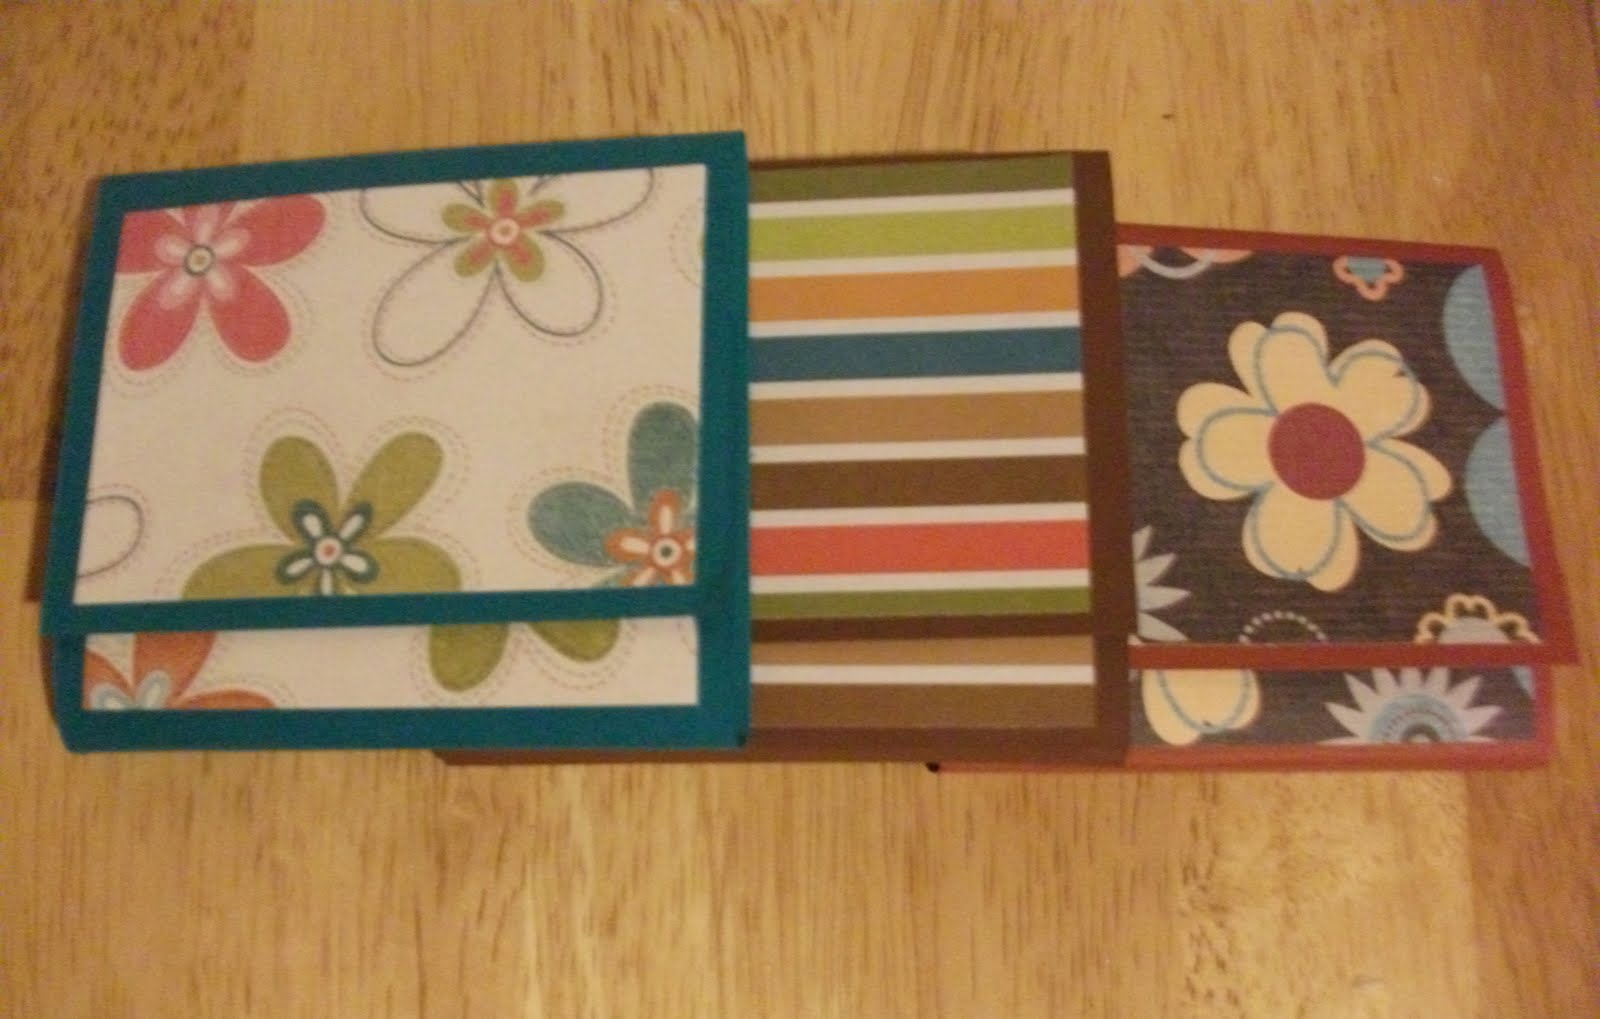
No longer will you have loose papers or ugly notepads in your purse or handbag!  These decorative post it note holders are perfect for jotting down notes, writing a to do list or making your shopping list.  These make a big impression as a gift as well!


My sister passed along this idea to me from what has become a favorite blog to follow.  You can see the full tutorial on Beneath My Heart.  I love that she is a fellow Kentucky gal too!

I made three different designs for each of Ryan's teachers.  This was also another craft share with Shannon so I made four of each design to cover a gift for all the teachers.  I bundled them up and wrapped them in ribbon.  Check them out!


You can make them to fit any need or colors that you like.  The paper is secured down by a velcro dot and the post it notes are glued to the inside paper.  Make sure to check out the tutorial more details.

I was surprised by what little time it took me to make these.  Ryan's teacher's really enjoyed them too!

Related Posts Plugin for WordPress, Blogger...
Ebates Coupons and Cash Back