Welcome!
Thanks for visiting! Please leave us a comment as we love your feedback.
See where we are partying at the bottom and on the sidebar.

Tuesday, November 23, 2010

Kid-friendly Turkey Craft Tutorial

While the kids are off school for the Thanksgiving holiday, it is the perfect time to get crafty with them.  This is an easy craft so you can enlist the help of your children and allow them to personalize it as well.

Supplies needed:
2 Styrofoam balls (one small and one large)
Toothpicks
Brown paint and a sponge brush or Brown spray paint
Popsicle sticks
Red, white and yellow scraps of felt
2 Push pins (any color, mine were yellow)
Various colors of construction paper
Hot glue gun
Glue Stick
Scissors
Instructions:
1.  Take your plain styrofoam balls and prop them up on toothpicks so that you can easily paint them.  I used three to help prop each up.


I used brown acrylic paint and a sponge brush, but if you have brown spray paint it might be easier and faster.  I used quite a bit of brown paint as you have to push the paint in the ball to cover all the crevices.  Allow the balls to fully dry.

2.  While you are waiting for the paint to dry, cut out feathers from your construction paper.  There isn't a pattern for this, just cut a long oval shape.  If you would like the kids to personalize these, they can write what they are thankful for on each feather.  Using your glue stick, take a popsicle stick and glue it  to the back of each feather.

3.  Now cut out two circles from the white felt.  Cut out one triangle from the yellow felt and two long ovals (the gobble gobble) from the red felt.

4.  Once the paint is dry, stick a popsicle stick in the large ball and connect the smaller ball to it.  (This is the neck support).  I used a toothpick at first, but it wasn't enough support.

5.  Using the hot glue gun, glue on the eyes, nose and gobble gobble to the face of the smaller ball. Push in your colored push pin into the white felt circles to create eyes.
6.  Stagger the colors of your feathers and push them into the larger ball.  Make sure the popsicle sticks are facing back.
That's it!  I hope that you and your children will enjoy this craft and maybe make a few for friends.  This would also be a great item for your Thankgiving table.  You could have your kids make one for each of your guests and personalize the feathers to what they are thankful for or like most about that person.  

Have a Happy Thanksgiving spending time with those you love!


Related Posts Plugin for WordPress, Blogger...

Monday, November 22, 2010

Making Subway Art- A Tutorial 2

The journey to the finished project was really quite simple. This is a great starting project for beginning mod podgers!

1. I started with a wood board.  Usually, I get my husband to cut scrap wood for me.  This time I picked up a plaque from Wal Mart for $4.

2. I lightly sanded the board.
3. I stained the edges and a couple of inches all the way around (the rest would be covered with paper).


4. I picked out the perfect paper for the project and cut it to the size of the board.  I suggest cutting it slightly smaller than the board.  It will make it easier to blend it nicely.

5. I spread mod podge on the board generously.  I made sure to be careful to make it smooth.
6.  I placed the paper on top of the mod podge.

7.  I used a roller to smooth the paper out as much as possible.  I then place boards on top of the board to keep the paper as flat as possible.  I let it dry completely (at least thirty minutes).


8.  I removed the boards and spread a coat of mod podge on top of the paper.  Make sure you use enough to make a smooth finish, without using too much.  Too much will make it lumpy. Let it dry completely.  The wet product goes on white.  It dries clear.
9. Once the board is dry, use a belt sander, or a piece of sand paper, to sand the edges and blend the paper into the board. Then, apply stain to the project.  This will also help blend the paper into the board.
10.  While the stain is drying, work on your vinyl lettering. I have a Silhouette.  I chose to do every name in a different font and arranged them in a "free" way.

11.  I cut the vinyl and carefully removed any vinyl I wouldn't use on the sign.
12.  I put transfer tape on top of the vinyl and transferred it to the sign.
13.  Honestly, sometimes it's a challenge to get the vinyl off the transfer tape.  Be patient. The end product is worth it.  I removed the transfer tape and voila...almost finished.
.
14.  I drilled two holes in the top of the board.

15.  I cut a piece of wire to hang the board.
16.  I used a pencil to twist the wire ends around to give it a little design.

17.  I had a completed project I can treasure for years!

Related Posts Plugin for WordPress, Blogger...

Mantle Ideas

Mantles seem like the thing to decorate. I've seen many examples.  I just thought I'd share my Halloween mantle and Thanksgiving mantle.  Look closely.  I'll bet you see some familiar projects!


Related Posts Plugin for WordPress, Blogger...

Sunday, November 21, 2010

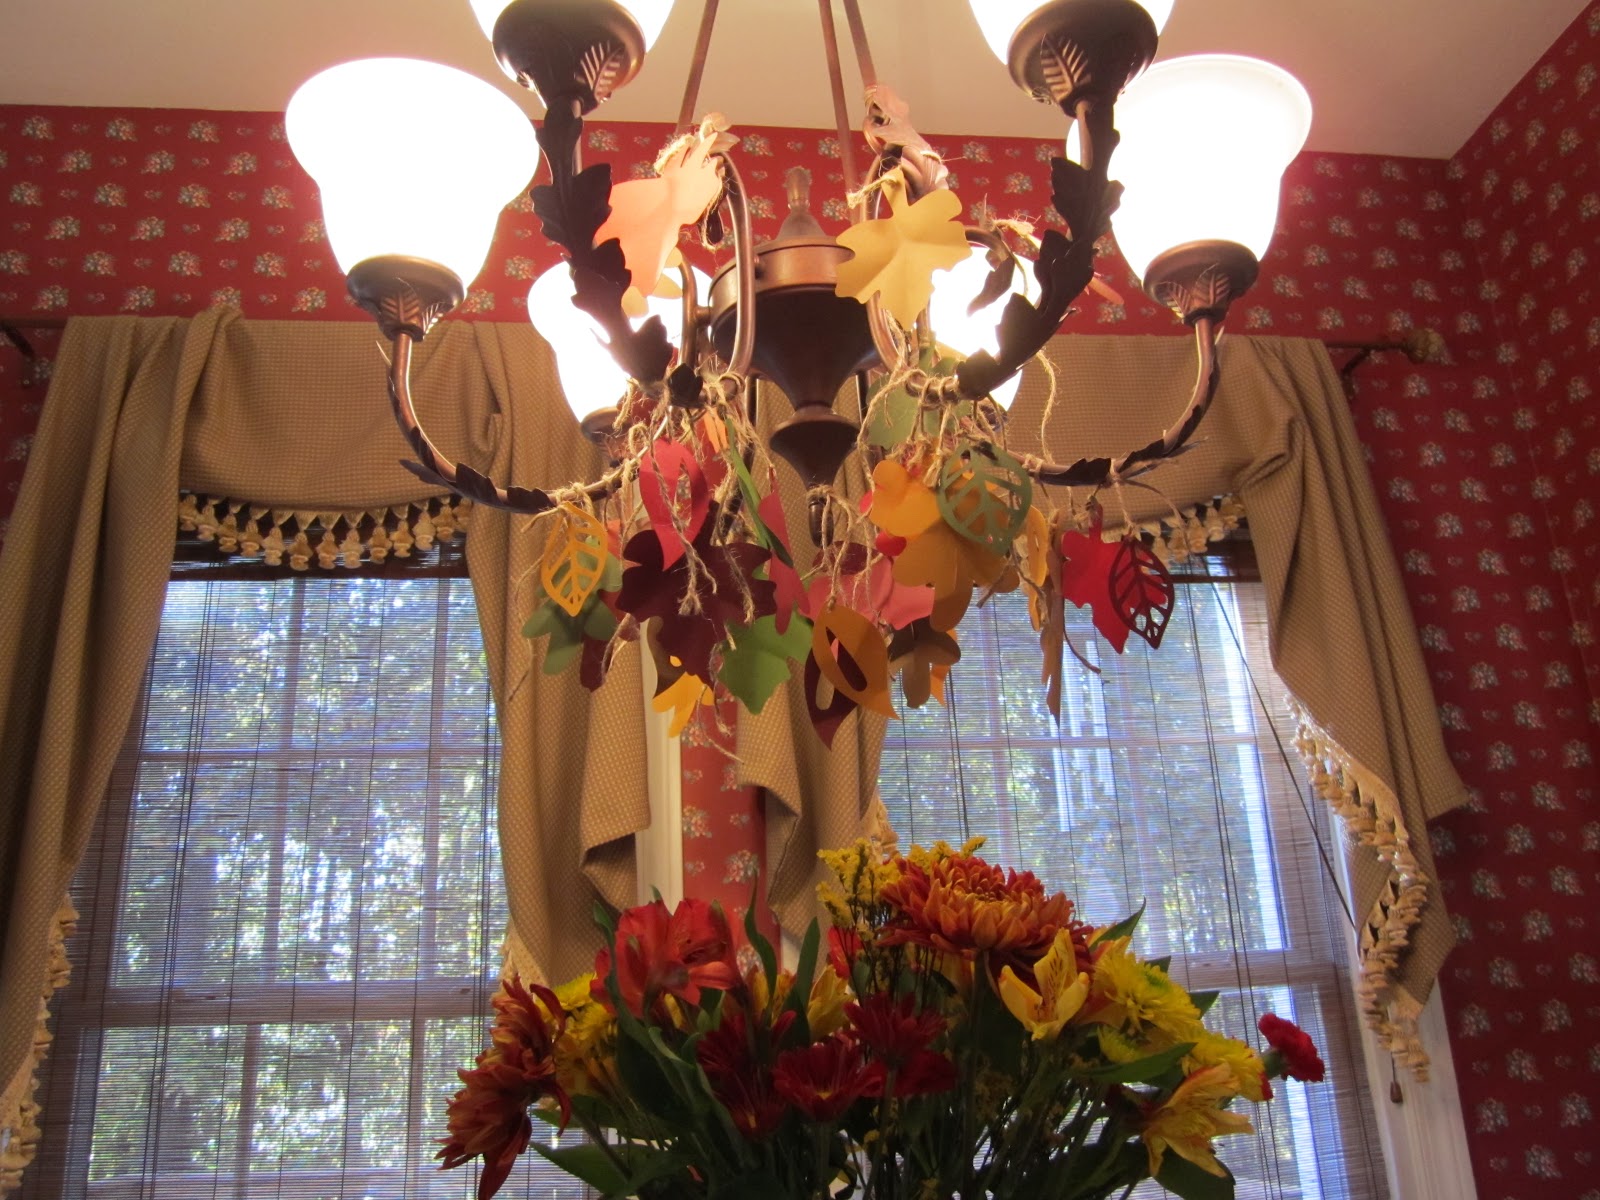
Fall Leaves Chandelier


I love it when a craft project comes together with supplies you already have on hand.  That’s how my fall chandelier came about; I was looking to add some decorations for Thanksgiving that didn’t require a trip to the store!


Supplies:
Scrapbook paper
Twine
Scissors or a cricut or silhouette machine
Twine


Directions:
If you have a cricut machine, go thru your cartridges for any leaf images. I used my gypsy to pull up several different ones. If you have the silhouette, you can download and cut your leaf images. Otherwise, draw some random leaf shapes (Remember, they don’t have to be perfect! I made this project last year with my three year old and it was adorable with her cut out leaves!) and cut out. Hole punch each of your leaves.   Cut out two-inch sections of twine and loop it through the hole in your leaves.  Tie randomly around chandelier.  That’s it! Easy peasey and makes quite a statement! I just may have to do snowflakes next month!


Related Posts Plugin for WordPress, Blogger...

CopyCat Crafting 5

I love Subway art.  You can find different interpretations of what Subway art is. I've decided it's things, randomly arranged, in one place. I spend huge amounts of time choosing fonts and arrangements of things.  Thank goodness there's a wonderful blogger that's done that for us! http://bunchofcraft.blogspot.com/2010/11/thanksgiving-subway-art-printable.html She has it all ready for you to download and print. Voila!  How easy is that.  For $3 (the cost of the frame) I have this beautiful decoration.

Related Posts Plugin for WordPress, Blogger...

Saturday, November 20, 2010

Pumpkin Recipes from Paula Deen

If you know me well, you know that I cook like Paula Deen.  Everything is better with a cup of sugar and a stick of butter, right?  If you enjoy yummy goodness as well, try out these recipes for Thanksgiving!

Pumpkin Gooey Butter Cakes

Recipe courtesy Paula Deen

Cake:
1 (18 1/4-ounce) package yellow cake mix
1 egg
8 tablespoons butter, melted

Filling:
1 (8-ounce) package cream cheese, softened
1 (15-ounce) can pumpkin
3 eggs
1 teaspoon vanilla
8 tablespoons butter, melted
1 (16-ounce) box powdered sugar
1 teaspoon cinnamon
1 teaspoon nutmeg

Preheat oven to 350 degrees F. To make the cake: Combine all of the ingredients and mix well with an electric mixer. Pat the mixture into the bottom of a lightly greased 13 by 9-inch baking pan. Prepare filling. To make the filling: In a large bowl, beat the cream cheese and pumpkin until smooth. Add the eggs, vanilla, and butter, and beat together. Next, add the powdered sugar, cinnamon, nutmeg, and mix well. Spread pumpkin mixture over cake batter and bake for 40 to 50 minutes. Make sure not to over bake as the center should be a little gooey. Serve with fresh whipped cream.


Pumpkin Bars
Recipe courtesy by Paula Deen
Serves:  48 small bars or 24 larger bars
Ingredients
Bars:
  • 4 eggs
  • 1 2/3 cups granulated sugar
  • 1 cup vegetable oil
  • 15-ounce can pumpkin
  • 2 cups sifted all-purpose flour
  • 2 teaspoons baking powder
  • 2 teaspoons ground cinnamon
  • 1 teaspoon salt
  • 1 teaspoon baking soda
Icing:
  • 8-ounce package cream cheese, softened
  • 1/2 cup butter or margarine, softened
  • 2 cups sifted confectioners' sugar
  • 1 teaspoon vanilla extract
Directions
Preheat the oven to 350 degrees F.
Using an electric mixer at medium speed, combine the eggs, sugar, oil and pumpkin until light and fluffy. Stir together the flour, baking powder, cinnamon, salt and baking soda. Add the dry ingredients to the pumpkin mixture and mix at low speed until thoroughly combined and the batter is smooth. Spread the batter into a greased 13 by 10-inch baking pan. Bake for 30 minutes. Let cool completely before frosting. Cut into bars.
To make the icing: Combine the cream cheese and butter in a medium bowl with an electric mixer until smooth. Add the sugar and mix at low speed until combined. Stir in the vanilla and mix again. Spread on cooled pumpkin bars.

 Enjoy!  You may have to do some exercise after eating these goodies!


Related Posts Plugin for WordPress, Blogger...

Crock Pot Pumpkin Recipes

For all my friends who love their crockpot, here are a couple of recipes to try!

Crock Pot Pumpkin Soup

2 cups fresh pumpkin (or 1 (15 oz) can)
4 cups vegetable broth
2 cups water
1 red onion. chopped
2 celery stalks, chopped
2 yams, peeled and chopped
3 chopped garlic cloves
1 inch fresh ginger, peeled and grated
1 T white sugar
2 tsp kosher salt
1 tsp turmeric
1/4 tsp allspice
1/4 tsp nutmeg

GARNISHES:
heavy whipping cream
chopped green onion

If you have fresh pumpkin, use it ... otherwise, open a can of pure
pumpkin and use that. Empty pumpkin into your crockpot, and add the chopped vegetables, spices and sugar. Stir in the vegetable broth and water.

Cover and cook on low for 8 hours. Carefully use an immersible blender (or regular blender) to blend about 3/4 of the soup. Mix it back together.  Serve each bowl with a drizzle of cream and sprinkled with green onion.


Crock Pot Pumpkin Cake

1/2 cup sugar
1/2 cup brown sugar
1/2 cup oil
1 (16 oz) can solid pack pumpkin
2 eggs, beaten
1 1/2 cups sifted flour
1 tsp. pumpkin pie spice
1 tsp. baking soda
1/2 tsp. salt

Combine the first 5 ingredients until well blended.  Add remaining ingredients and stir until just combined. Spoon mixture into well greased crock pot.  Cover and cook on high 3-3 1/2 hours.  Serve warm with whipped cream or vanilla ice cream.


Enjoy!


Related Posts Plugin for WordPress, Blogger...

Friday, November 19, 2010

My Favorite Pumpkin Recipes

These two recipes are my must haves for Thanksgiving every year!  Both are delicious and comforting.  I hope you will give them a try!

Pumpkin Cake Roll 

3 eggs
1 C. granulated sugar
2/3 c pumpkin
1 tsp. Lemon juice
3/4 cup flour
1 tsp. Baking powder
2 tsp. Cinnamon
1/2 tsp. Nutmeg
1/2 tsp. Salt
1 cup chopped nuts

Filling
1 cup powdered sugar
1 3oz. pkgs. of cream cheese
2 T. butter or margarine
1/2 tsp. Vanilla

Beat eggs on high speed of mixer for five minutes; gradually beat in sugar.  Stir in pumpkin and lemon juice.  Stir together flour, baking powder, cinnamon, ginger, nutmeg, and salt.  Fold into pumpkin.  Spread in a greased and floured 15 x 10 x 1 inch pan.  Top with nuts.  Bake at 375 degrees for 15 minutes.  Turn out on a towel.  Sprinkled with powdered sugar.  Starting at the narrow end, roll towel and cake together; cool.  Un-roll.

Filling:  Combine all ingredients.  Beat until smooth.  Spread over cake; roll.  Chill.


Pumpkin Marble Cheesecake

given to me by Beth W.

Crust:
1 1/2  cups graham cracker crumbs
3 T.  Sugar
3 T. Butter, melted
Combine and press into bottom of 9” springform pan.  Bake @ 325 for 5 minutes.

Filling:
3-8 oz. Pkgs of cream cheese, softened
1 cup sugar-divided
2 t. Vanilla
3 eggs
1 cup canned pumpkin
1 t. Cinnamon
1/2 t. Ground nutmeg

Beat cream cheese, ¾ cup sugar and vanilla until well blended.  Add egg one at a time, mixing after each until just blended.  Reserve 1 ½ cups of batter.  To remaining add ¼ cup sugar, pumpkin and spices.  Mix well.  Spoon alternately over crust.  Cut through batter with a knife to create marble effect.  Bake 50-60 minutes until center is almost set.  Run Knife around edge of pan, cool before removing rim.  Refrigerate 4 hours or overnight.
 

Enjoy!

Related Posts Plugin for WordPress, Blogger...
Ebates Coupons and Cash Back