Welcome!
Thanks for visiting! Please leave us a comment as we love your feedback.
See where we are partying at the bottom and on the sidebar.

Saturday, July 9, 2011

A Baby Gift-A Please Knock Door Sign

I have 5, very special people, I'm making baby presents for.  I have 5 separate gifts in mind. This is the first of the gifts. I got this idea from HowDoesShe.  Here's the link to their original project. http://www.howdoesshe.com/please-knock-baby-is-sleeping-sign
Here's one of the five signs I made.

I had five pieces of scrap wood cut into 12"x7" boards. I stained the back, the sides, and the edges of the front of each board.

After the stain dried, I applied a coat of Mod Podge to the entire front of the board.

I cut 5 different pieces of scrapbooking paper to 12"x7" and Mod Podged each to the boards.

I used a scraper to smooth the paper down and get all the bubbles and creases out.
I let the Mod Podge dry for about 30 mins. before applying a heavy layer of Mod Podge to the top of the paper (oops no picture!).  I let it dry for a few hours.

After the Mod Podge dried, I used my sander to distress the boards.  I concentrated on blending the edges.

I used the same stain, I used on the board, to further distress the board. I just rubbed the stain in with a cloth.

I cut vinyl on my Silhouette. "Please" and "Baby is" are Pea Bonnie Script.  "Knock" and "Sleeping" are Pea Lacy Chunky.  The font size will depend on the size of the board you're making. I just made the document, on my Silhouette, a 12x7 and adjusted the words to "fit".

After cutting the vinyl, I peeled the negative away leaving only the print, I wanted on my sign, on the page.

Using a piece of transfer paper, I covered the vinyl and brought it over to the signs. I used my scraper and rubbed the words on to the sign.

I peeled the transfer tape off and this is what I had left.


I drilled holes in the top corners of the sign to add the wire for hanging the sign.

I put the wire through the hole and twisted it.

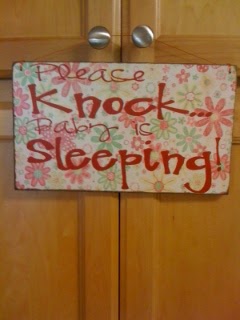
And the signs are finished.

The third sign is a light blue and green background with navy vinyl.

This sign has a great geometric patterned paper.

I like the snazzy stripes of the last sign!

Stay tuned to see what the other gifts will be.  I have a feeling you may have already seen two of them.  Shhh.... I want to keep them a secret until the gifts are revealed to the new mothers.
Related Posts Plugin for WordPress, Blogger...

Friday, July 8, 2011

Baby Sling Tutorial

When I had Evan, I found it increasingly hard to carry him, tend to Ryan and do anything else.  A friend of mine (who also showed me the nursing cover) was carrying her son in a sling.  I loved the idea of the sling as it was much easier to get your child in and out of versus one of those fancier contraptions.

 The only thing I didn't like about the sling was the cost.  When I looked on the internet, most slings were at least $30-50.  That was way out of my price range.  After examining her sling, I knew I could figure out how to make one especially with a bit of google research.

Now that I've had another child, the sling is an essential and I have perfected how I make them.  This is a very simple tutorial and will get you a sling for the cost of 2 yards of fabric and some matching thread!

I made this one for my friend, Henri and her precious baby girl, McCall.  Here she is modeling it for me. Thanks for the picture, Henri!


Baby Sling Tutorial

Supplies Needed:

  • 2 yards of fabric of choice (width should be at least 44 inches)
  • Matching thread
  • Sewing machine
  • Measuring tape and/or measurement gauge
  • Fabric Marking pen (or light pen to mark small measurements)
  • Iron
  • Scissors
1.  Prior to making your sling, you will need to get some measurements from the person you are making it for.  Measure from the right shoulder to the left hip bone (where the baby will sit).  Here is an example of how to measure yourself or a friend from a sling company.

2.  Unfold your fabric and cut it lengthwise.  It will measure 2 yards by 22 inches.  Put one piece aside for future use or another sling.

3.  Fold your fabric lengthwise once.  Then fold it in half widthwise.  Make sure the open sides are facing up and to the right. See picture below.

4.  On the top, open side, measure from the fold to your hip to shoulder measurement.  Henri is a petite little lady so her measurement 22 inches.  You want to add a 1/2 inch to this measurement.  Therefore, this top measurement is 22.5 inches.  Mark this with a pen.

Now measure along the bottom from the fold to the next measurement (keep reading) and mark.  Take the original measurement and adding three inches to it.  In Henri's case that is 25 inches (22 plus 3).  See picture below.

5.  After marking both measurements, you will want to cut from the bottom to the top with a curve.  See picture below.

6.  Unfold your fabric and heat up your iron.  It time to use that dreaded iron and do some finishing details.  Measure a 1/4 of an inch fold using your measuring gauge on the length of your fabric.  Iron this fold down on both sides.

7.  Fold this over again and iron down an additional 1/4 of an inch on both sides.

8.  Sew down the fold on top and bottom.


9.  With the sides sewn and finished, fold the fabric in half widthwise with the right side of the fabric facing up.  Make sure your adjust your stitch width to a tight stitch.  This will increase the strength of the seam. Sew along the curve a 1/4 of inch in.

10.  Turn the sling inside out.  You are going to sew along the curve above the seam you just made.  This will encase the previous seam.  Make sure you sew above the previous raw fabric or it will stick out the bottom of the sling (learn from my oops).  This is double protection from the seams opening up.
11.  Open up the sling and sew down this encased seam to the front or back of the fabric.  This makes a nice finish and you don't have the encased seam sticking out.

That's it.  A simple sew for an awesome sling!  Here is my finished sling.

I hope this tutorial helped you.  If you are new to baby-wearing and need help utilizing a sling.  Here is an excellent guide to the different wearing positions.

This is also an excellent gift to make for a little girl.  It is equally as fun to carry your baby dolls around in a sling.  I am sure I will be making one for my sweet Anna one day.

I hope you or a friend enjoys a new sling!

Happy Crafting!


Related Posts Plugin for WordPress, Blogger...

Wednesday, July 6, 2011

A Delicious Carrot Recipe


Are you looking for a new side dish? Here's a fabulous one.
Preheat your oven to 350 degrees. Spray a baking dish with cooking spray.
First, peel and wash a bunch of carrots. Then cut them up and steam them. Don't over cook them. Just steam them until they're tender. Then mash the carrots. You can do this with a potato masher, a blender, a food processor, or a mixer. You need at least 2 cups of mashed carrots but can easily have more!  Add the following ingredients to the carrots and mix well.

1/2 stick butter
3/4 cup sugar
2 eggs
1 cup milk
1 teaspoon baking powder
3 tablespoons flour
a pinch of salt
1 teaspoon vanilla
1 teaspoon cinnamon

(Do you want to make this healthier?  Substitute apple sauce for all but 1 tablespoon of the butter.  Use agave nectar in place of the sugar or use half the amount of sugar.  I never use the full 3/4 cup.  The carrots are sweet on their own. Use skim milk... just some ideas)


Here are the carrots ready to be cooked. Put them in the preheated oven for an hour.

This carrot souffle is delicious.  I hope you enjoy it!
Related Posts Plugin for WordPress, Blogger...

Tuesday, July 5, 2011

My first Tutu & Tutorial

Well, I did it!  I made my first tutu!  My friend Henri, sent me an easy tutu tutorial video (see below) awhile back, so I thought it would perfect for a birthday gift.  Check it out!

I made this for sweet Antonia's Princess Birthday party.  Here are some pictures of beautiful Antonia in her tutu.  Thanks for the pictures, Karla!


Isn't she just precious?  I hug and squeeze her every time I see her!

I was very happy with how my first tut turned out!  It was very simple to make.

Here is what you will need:
  • 2 rolls of 6 inch by 25" tulle of either one or two colors
  • 3/4 inch Elastic for waist band
  • Scissor or rotary cutter/cutting mat
  • ruler or measuring tape
  • needle and thread or a sewing machine to make it super fast
  • coordinating ribbon to the colors of the tulle
  • roll of paper towels and pins (this is to hold the elastic as you tie on the tulle
Here is the fantastic video I followed to make the tutu:


I did the slip knot technique and I used at least 60 strips for this 4T/5T tutu.  I used every bit of the two rolls of tulle. I like how full the tutu turned out.  Once I put on all the tulle, I tied on a ribbon and made a pretty bow.

I think my first tutu was a success!

Be on the lookout for my next tutu.  I am making a ladybug tutu for my sweet Anna's first birthday!

Happy Crafting!

Related Posts Plugin for WordPress, Blogger...

Saturday, July 2, 2011

Dr. Oz's Green Tea Recipe-A Metabolism Booster

I saw this on Dr. Oz.  I think it's worth a try.  This comes straight from his website:

For a powerful metabolism-boosting drink, try Dr. Oz’s Tangerine Weight-Orade. It contains: green tea, shown to boost metabolism 12% by drinking just one cup; tangerine, with a chemical composition that increases sensitivity to insulin and stimulates genes that help to burn fat; and mint, a calorie-free flavor enhancer.

Tangerine Weight-Orade
In a large pitcher, combine:
  • 8 cups of brewed green tea
  • 1 tangerine, sliced
  • A handful of mint leaves
Stir this delicious concoction up at night so all the flavors fuse together. Drink 1 pitcher daily for maximum metabolism-boosting results.

So, I've been making the tea and really like it. I add a little agave nectar to sweeten it... not much though. I haven't been drinking a pitcher a day but I'm drinking it instead of Diet Coke. I'm sure it's healthier. I hardly ever get a chance to see Dr. Oz but I did see this.  I thought I'd share the info, just incase!
Related Posts Plugin for WordPress, Blogger...

Friday, July 1, 2011

Freezer Paper Stenciled Birthday Shirts

A few weeks ago, I sent this feature on Freezer Paper Stencil T-shirts to my friend over at Sarahndipities.  Sarah just had her fifth child and needed some guest posts while she was recovering.  I was more than happy to help her out and hopefully make some new friends for our blog.  Welcome to any new followers from Sarahndipities.  Our followers should check out her blog as well.  She has super cute crafts and crochet items!

Today, I will be sharing a tutorial for a Freezer Paper Stencil T-shirts.

Two of my children are having birthdays coming up.  Since I learned how to do freezer paper stenciling, I love to make personalized shirts for my kids.  They love showing off their age and/or their name and it is much cheaper than embroidery! Here is a picture of what I will be teaching you to make.


Needed Supplies:
  • A T-shirt
  • Fabric paint
  • Foam paint brushes
  • Freezer paper (found in the plastic wrap/foil aisle of any grocery store)
  • Exacto knife
  • Self-healing cutting mat
  • Iron
  • Pencil to trace number and circle
  • Printed number and circle in your choice of font (I made a circle with the draw feature in Word).
Shannon and I both have a Silhouette and we love it!  Unfortunately, not everyone has a Silhouette, so I want to give you the tutorial for either way.  You can easily cut your letters on freezer paper using the Silhouette as well.  Shannon has done this many times and suggests selecting "Vellum" speed 3, thickness 25.  Make sure to use a mat that has plenty of stickiness left to it.  Rub the freezer paper down well to avoid any bubbles, which could cause the paper to tear.

If you don't have a Silhouette, here is the tutorial for you!

1.  Print off your number and circle or any design that you want to use.  Cut a piece of freezer paper larger than the size of your design.  With the waxy side down, trace your number or design.  

 2.  Here are all my designs ready to be cut out.  If you make the freezer paper too small don't worry, you can add more freezer paper to the shirt so that you don't get paint where it shouldn't go.    Also, don't stress if your tracing isn't perfect.  You can fix that when you cut it out.


3.  Now take your exacto knife and cut out the number and the circle.  Notice that I will need to add more paper to the five as I didn't center my 5 appropriately.


Here are the two designs I was working on.


I won't need the interior of the circle.  I am keeping this though as you never know what you might want to put a 5 on, right?


4.  Heat up your iron to the cotton setting.  Turn off any steam settings. Iron your t-shirt.  Then cut out a large piece of freezer paper that will fit the inside of your t-shirt. You want this piece to cover the entire inside so that you don't have paint bleed through.  Place the freezer paper waxy side up and iron your t-shirt again.  This will help the freezer paper to adhere to the inside.


5. Grab your circle.  Center the circle in the middle of the t-shirt.  Iron it down making sure it is flat and without any bubbles.  Then center the freezer paper with your number and iron it down too.
 I cut another strip of freezer paper as my one side was thin and I didn't want paint to bleed off the edge.

 Here is the shirt ready to add paint.

This is how your circle should look if you gave yourself plenty of space on both sides.  I did it right for the #3 shirt.

6.  Use a foam brush and fabric paint to paint your design.  Make sure not to use too much paint as it might cause the freezer paper to bubble and paint to bleed underneath.  Try to go with the lines of the shirt as well, not against the lines.  White paint is takes more than one coat to show up properly.  Most other colors can get away with one or two light coats. I did three coats for this design.  You can use a hair dryer to speed up the process if you get impatient between coats.  Just make sure that the first coat is completely dry before painting the second coat.
 After first coat of paint.

After second coat of paint.

After third coat of paint.  Notice the number has almost disappeared.

7. Again, allow the paint to fully dry.  Learn from my mistake on a previous project and let the paint dry for at least 24 hours before you machine wash.

8.  Peel off the freezer paper.  If you have any difficulty, use your exacto knife to get under the freezer paper.  You won't hurt the paint that is attached to the shirt.  Here are the finished shirts.

My little man Ryan loved his shirt and wore it proudly the day of his birthday.  He will wear it many more times throughout the year.  You can machine wash and dry without any problems.  Here is Ryan showing off his #5 shirt.  The second picture is of my little man Evan who turned 3 yesterday.  This was perfect timing to share the tutorial with everyone!


Shannon and I have made many gifts and other projects using freezer paper.  If you would like to see more, click here. Freezer paper stencils are fantastic and let you make inexpensive personalized gifts.  If you have any questions, please let me know!

Happy Crafting!

Related Posts Plugin for WordPress, Blogger...
Ebates Coupons and Cash Back