
The other day I made some heart hair clips for my daughter and for an order in my shop. They were so easy to make that I wanted to give you an easy tutorial. These hair clips can be attached to any hat or directly in the hair.
Are you ready for a very easy tutorial?
Showing posts with label glue gun. Show all posts
Showing posts with label glue gun. Show all posts
Saturday, February 11, 2012
Sunday, January 29, 2012
Last Year's Valentine's Day Post is Full of Great Ideas
It's Valentine's Day! I hope you all are having a wonderful one. What does this mean to us? Well, we're almost done with pink, red, and hearts and we'll be moving on to rainbows, leprechauns, and pots of gold.
I LOVE traditions. I have many. I really don't have any Valentine's Day traditions though. Any suggestions?
I definitely try to spend the day letting others know how grateful I am for them. So, let me start with our followers. I am so grateful for you. You give our crafting addictions a purpose.
Speaking of crafting and cooking... I have a few more Valentine's Day things to share with you before we move on to the next holiday.

Do you remember the birthday door mat tutorial I did? http://www.oursevendwarfs.com/2011/01/happy-birthday-welcome-mat-tutorial.html Here's my Valentine's Day version. We're conversation hearts. I used regular acrylic paint on the mat and fabric paint to paint on our names. I just free handed the hearts. Super easy and even cheaper. This is one of those thirty minute crafts. I LOVE quick crafting!

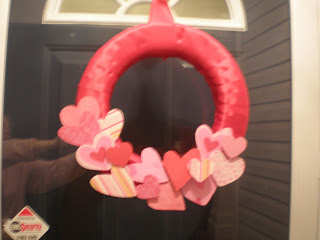
My friend Amy and I saw a great wreath on Oopsey Daisy http://oopsey-daisy.blogspot.com/2011/02/3-dimensional-heart-wreath.html. We were inspired. As always, when we copy craft, we take their thing and do our own thing to it. So, instead of copying the entire wreath with the hearts, we did a partial cover. I'll be honest, there were three reasons we did this. First, we bought two stores out of hearts. Secondly, that would have taken a lot more time. Finally, we really liked the look of the satin ribbon on the wreath so we wanted ot show some of it. This is my wreath above.

This is Amy's wreath. Amy claims to be noncrafty. She's a crafty chick in denial. Her wreath is gorgeous. Also, if I'm going to be completely honest. She made all of my wreath too. The only thing I did was arrange the hearts, hot glue them on, and get a huge blister to prove I used a hot glue gun! Thanks, Amy!

Here's my entry way with the wreath and doormat.

After crafting, I did some cooking. I made these amazing meringue cookies. I got the recipe from http://www.thestoriesofa2z.com/2010/02/meringue-ice-cream-cone-valentines.html she made them into adorable ice cream cones. I decided not to do that. First, my kids don't eat the cones. Secondly, my kids don't eat cake, just icing, and thirdly, meringue cookies, even with M & Ms are pretty low fat. I'm thinking that's a great dessert to make. These are delicious. I used 1T of freshly squeezed lemon juice. The chocolate and lemon combination are surprisingly amazing. I will make this recipe again and again. YUM!

I also made these Martha Stewart cookies. http://www.marthastewart.com/recipe/chocolate-cookie-cutouts-love-bug-cookies The first time I made these cookies was for my daughter's first birthday party. It was ladybug themed and I made the cute ladybug cookies. Well, this cookie base is simply delicious... cocoa and cinnamon...so good. So, I've made them a couple of times since. These aren't decorated yet but pretty soon they'll have Royal Icing and a varitey of sprinkles.

...GraciAnn decorated these! Cute, huh?

Then there's the homemade card I made my husband. I used red felt to make the rosettes. http://www.oursevendwarfs.com/2011/02/valentines-day-celebrated-with-burlap.html Here's a tutorial for the rosettes I did on an earlier project. It's simple, sweet, and special. I like it much better than any of the cards I looked at to buy.
Here's wishing you a lovely day on this Valentine's Day!
Monday, January 23, 2012
A "Love" Sign-A Tutorial
This is something I created last year. I just love it! It's a perfect post for today because today's my youngest daughter's third birthday. Happy birthday, Sweet Mariella!
I needed a craft fix. I wanted to do something that I could finish in a reasonable amount of time (Something I could finish in a night!). I wanted to do something I hadn't seen before. Finally, I wanted another Valentine's Day decoration. I love what I came up with!


I needed a craft fix. I wanted to do something that I could finish in a reasonable amount of time (Something I could finish in a night!). I wanted to do something I hadn't seen before. Finally, I wanted another Valentine's Day decoration. I love what I came up with!

I got a black from at WalMart for $3. It was for 2-4x6" photos. I used a piece of red scrapbooking paper. It says LOVE on it. I got some flowers from a scrapbook store that look like they were made from pages out of a book. I used distressing ink and a blender stamp. I had black fuzzy vinyl and transfer tape. My tools were my paper cutter, a glue gun, and my Silhouette.

First, I cut the scrapbook paper to fit the entire frame.

Then I cut, "Daughters" out of my black fuzzy vinyl. I used the font, "Waterfalls" 170pt. I pulled away the excess vinyl so I was left only with the word I needed.
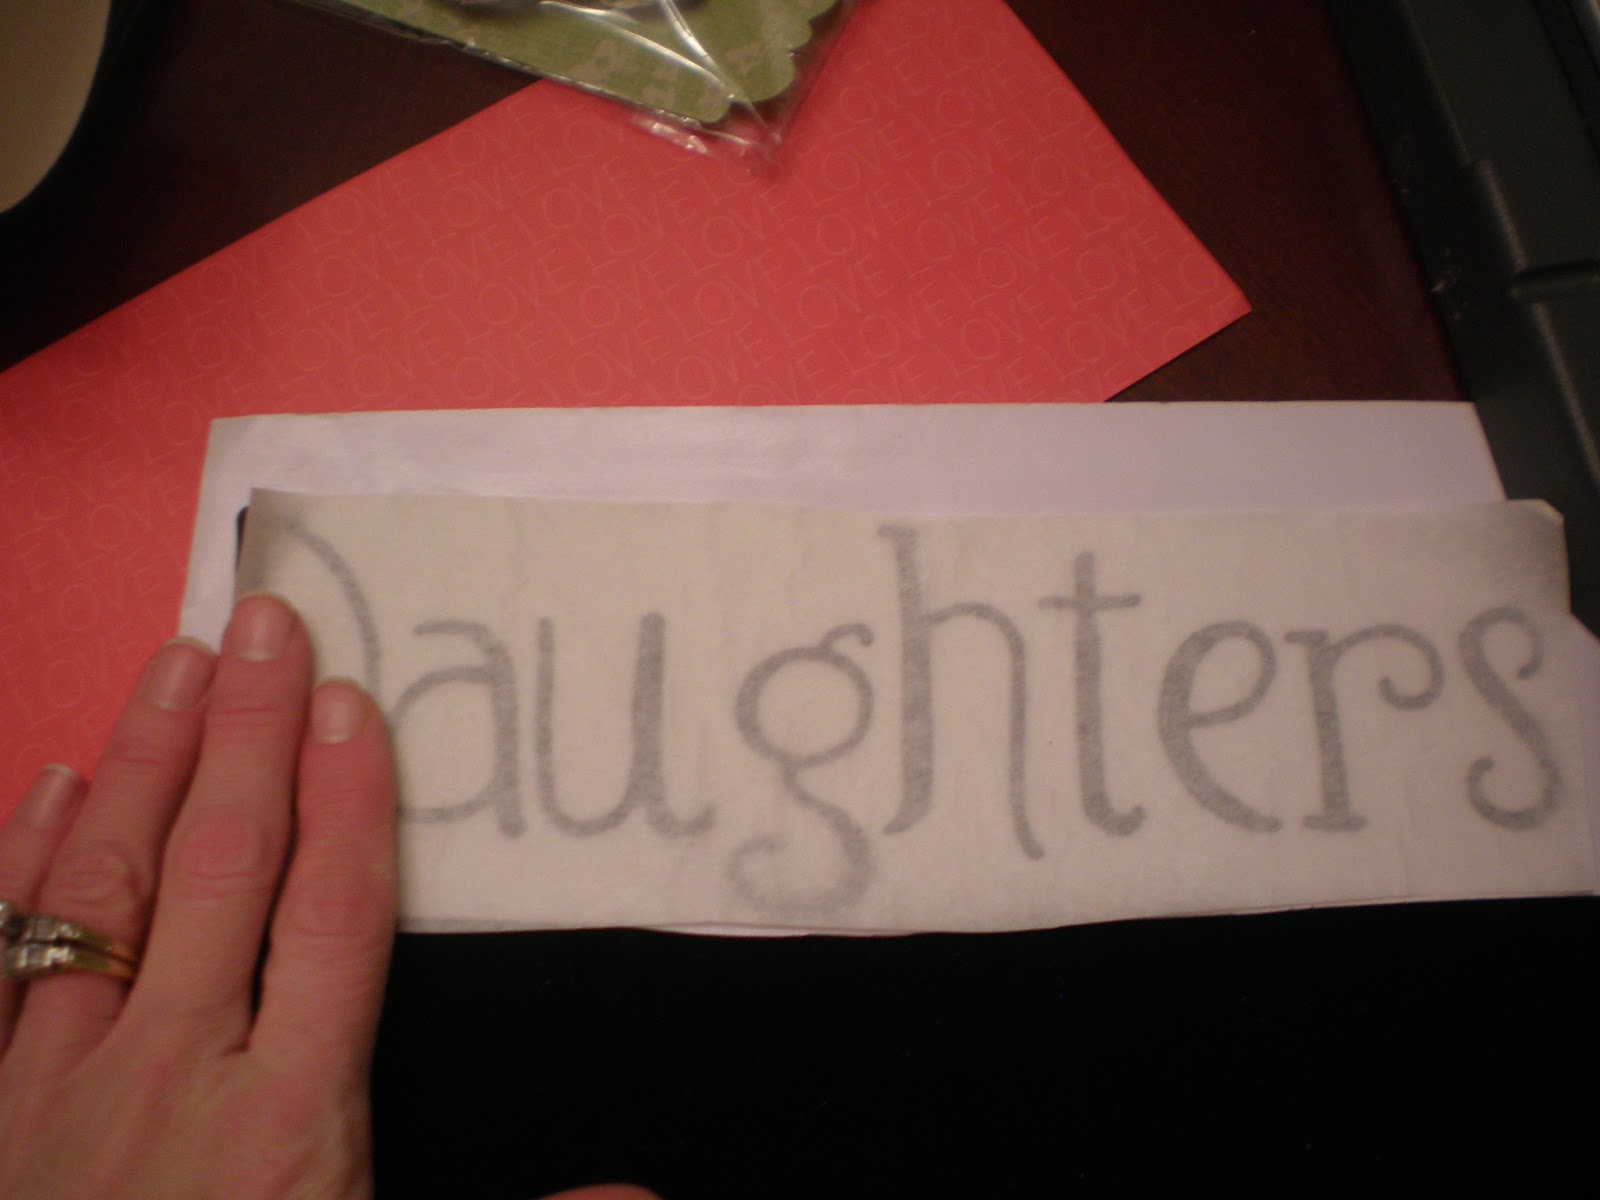
I used transfer tape to lift the vinyl. This does not work as well with fuzzy vinyl.

I placed the transfer tape, in position, on the scrapbook paper and peeled it away. The letters were attached to the scrapbook paper.

Here's a close up of the print on the scrapbook paper.

I went around the edges of the paper with the distress ink. I put the ink on with the blender pad and lightly distressed it.

I put the paper in the frame. I just discarded the mat that was included with the frame. I hot glued 2 flowers directly on the frame.

It's done! My daughters make me think of love so it's all relevant to me! I love it!
Sunday, November 27, 2011
Copy Cat Christmas Crafts: Coffee Filter Tree
Thanksgiving is over so it's time to get going on Christmas decorations. Here's one I made last year.
How cute is this? I made it for $2.50. I used coffee filters I had left over from my coffee filter fall wreath. I used crystals from the bouquet I carried in my friend Mandy's wedding. I used a pack of ribbon roses, I already had. I used the wood cut from the bottom of our Christmas tree as a base. The only thing I bought was the green foam cone which was $2.50. This didn't take long at all to make and is oh so cute!

Check out where I got the idea as well at Crafts by Amanda
Tuesday, November 22, 2011
Easy and Cheap Decorating with Branches - A Tutorial
I am all about making seasonal decorating easy and cheap. I have a Lenox vase that I've had for years and have had no idea what to do with it. It's neutral so very practical. This spring, inspired by my blooming cherry tree, I decided to get some branches and glue cardstock leaves and pink blossoms to them. It looked fabulous! I've decided to make it a habit to seasonally change the vase. It's fall... so guess what... I have leaves, in fall colors, hot glued to branches.
1. First, I gathered branches, from my yard. The best thing about this is they were free!
2. Then, I took 6 different pieces of cardstock in Autumn colors.
 3. I found a variety of leaves in the online Silhouette store and added it to my library.
4. I cut the leaves.
 5. I hot glued them on to the branches.
6. I added the branches to the vase.
 This was an easy, quick project. Now, I realize that my branches are very unrealistic. I know one branch doesn't have 6 different leaves. I just liked the way it looked so I went with it. If you want to be my naturally correct, keep the same kinds of leaves on each separate branch. I am already thinking about the branches for my winter vase! Holly maybe?
1. First, I gathered branches, from my yard. The best thing about this is they were free!
2. Then, I took 6 different pieces of cardstock in Autumn colors.

4. I cut the leaves.

6. I added the branches to the vase.

Tuesday, November 15, 2011
An Easy, Inexpensive, and Festive Thanksgiving Decoration
Once again, I am reposting a perfect Thanksgiving craft. I've got mine on my front porch, welcoming guests.
I was flipping through the Lowe's Creative Ideas catalog for November/December 2010. I found the cutest Pilgrim Planter. http://www.lowescreativeideas.com/idea-library/WAGI_Pilgrim_Planter_1110.aspx I, of course, made some changes to what they did to make it my own. I painted my clay pot, very lightly, with black paint. I used black grosgrain ribbon, instead of black duct tape. They didn't have the gold washers at our Lowes. I took a silver one, scratched it up with sandpaper, and lightly painted it gold. I planted pansies in my pot. I do like their flower arrangement better. It's easy and adorable. It's very versatile. You could get little pots and use them as place holders. You could arrange multiple pots together for a fantastic arrangement. So cute!

I was flipping through the Lowe's Creative Ideas catalog for November/December 2010. I found the cutest Pilgrim Planter. http://www.lowescreativeideas.com/idea-library/WAGI_Pilgrim_Planter_1110.aspx I, of course, made some changes to what they did to make it my own. I painted my clay pot, very lightly, with black paint. I used black grosgrain ribbon, instead of black duct tape. They didn't have the gold washers at our Lowes. I took a silver one, scratched it up with sandpaper, and lightly painted it gold. I planted pansies in my pot. I do like their flower arrangement better. It's easy and adorable. It's very versatile. You could get little pots and use them as place holders. You could arrange multiple pots together for a fantastic arrangement. So cute!

Thursday, November 10, 2011
Thanksgiving Advent Calendar
This is a project we shared last year. It's up again in our house. Some things are too good not to share (or share again)!
Advent calendars are great teaching tools for our children. Santa leaves notes to my daughters, in our Pottery Barn advent calendar. http://www.potterybarnkids.com/products/telluride-advent-calendar-new/ My older daughter really got the concept of "Counting down to Christmas" using this calendar. I've decided it's important to do this with other holidays too. We found an Thanksgiving advent calendar that reminds us to be grateful for the things in our life. Another wonderful lesson for our children. http://jellybeanjunkyard.wordpress.com/2010/10/12/tuesday-tutorial-give-thanks-gratitude-board/ This is adorable, reusable, and not accomplished in two and a half hours like she says. At least not for me. I'm thinking it's more of a four hour project. Of course, maybe I was hung up too much on the font and paper choices. Could be! A couple of hints. I used vinyl for the title and the numbers. It works wonderfully and you get to skip the gluing on step. I recommend putting the numbers on last. I mod podged mine. When you mod podge paper, it tends to warp a bit. Because the vinyl was on, it shriveled in some places. It still turned out well, but would have been better if I applied the vinyl at the end. I also decided to make bows on mine instead of just the ribbon ties. Something that helps, keep all the bows in the same place, is making a template. I just decided where the holes worked best, punched them in the template, and used the template 30 times to punch the holes in all the cards. Since I am not good at eyeballing, it kept everything in the same place and was easy! You could use this idea for every holiday.

Advent calendars are great teaching tools for our children. Santa leaves notes to my daughters, in our Pottery Barn advent calendar. http://www.potterybarnkids.com/products/telluride-advent-calendar-new/ My older daughter really got the concept of "Counting down to Christmas" using this calendar. I've decided it's important to do this with other holidays too. We found an Thanksgiving advent calendar that reminds us to be grateful for the things in our life. Another wonderful lesson for our children. http://jellybeanjunkyard.wordpress.com/2010/10/12/tuesday-tutorial-give-thanks-gratitude-board/ This is adorable, reusable, and not accomplished in two and a half hours like she says. At least not for me. I'm thinking it's more of a four hour project. Of course, maybe I was hung up too much on the font and paper choices. Could be! A couple of hints. I used vinyl for the title and the numbers. It works wonderfully and you get to skip the gluing on step. I recommend putting the numbers on last. I mod podged mine. When you mod podge paper, it tends to warp a bit. Because the vinyl was on, it shriveled in some places. It still turned out well, but would have been better if I applied the vinyl at the end. I also decided to make bows on mine instead of just the ribbon ties. Something that helps, keep all the bows in the same place, is making a template. I just decided where the holes worked best, punched them in the template, and used the template 30 times to punch the holes in all the cards. Since I am not good at eyeballing, it kept everything in the same place and was easy! You could use this idea for every holiday.

Thursday, June 9, 2011
Dressed Up Wipe Cases Tutorial
Over the last year, I have been surrounded by pregnant friends. There is a major baby boom going on, I am sure of it. With all the Moms to be, there was a need to make some gifts. I love making my crocheted baby blankets, but I also like trying out some new items.
In the next few posts, I want to share with you how to make Dressed Up Wipe Cases, Fancy Burp Cloths and Nursing Covers. These are all items I was oblivious to prior to having children and now I wouldn't know what to do without them. Of course, you can do without these, but they sure make life a bit easier and prettier!
Last year, I came across someone with a wipe case that was all dressed up. I immediately thought, "I can do that!" Off I went to test it out. Well, let me tell you the first time was a huge fail. My glue gun left huge clumps of hot glue all over the fabric and case, it was horrible. The next time I took more care so that the case would look great. Let me share with you how to make these cute little gifts. Here is a preview of mine:

Supplies Needed:
 2. Cut two pieces of batting or felt to about 9 by 5 (check that these are the dimensions of your case). It doesn't have to be perfectly cut as long as it covers the top of the case.
 3. Glue down the batting to the case with your glue gun. Squiggles, lines, doesn't matter how you get it to stick. Do this for the top and bottom. Trim any excess it makes it hard for the fabric to adhere to the case otherwise. You just want the exterior to have an added softness.
4. Cut two pieces of fabric to approximately 9 by 5. Once again check to make sure your case has the same dimensions as mine. Perfection isn't needed again as we will trim and cover with ribbon.
5. Position the fabric on one side of your box. Make sure that it is centered to adequately cover all sides. Glue the fabric to the batting. Then apply a strip of glue directly to the edge of the wipe case (every 3 to 4 inches) and press down the fabric. Trim any excess that goes over the closing of the case. Repeat this process all the way around on both top and bottom. Here is what your case will look like afterward.
 6. Now it's time to add some pretty to your case. You can get as creative as you like here with embellishments. I used a 1 inch ribbon on top. Measure out your ribbon to fit the case from side to side. Center it on the case and glue from the middle out. Glue on the edges as well.
 7. I bought a matching ribbon that was 3/8 of an inch (I think) and glued it to the edge of the top and bottom to cover up my fabric edges. Start this at the back of your case and work around. Either fold under your finished ribbon at the seam or use a lighter to seal the edges of the ribbon and glue down.

I didn't have buttons or a flower to add, but I liked just the touch of ribbon. Here is how your case should look when you are finished.

There you have it. A simple gift that makes changing a diaper a bit more enjoyable. I made three for friends and since I was making them, I needed one for myself as well.
I hope you find this tutorial helpful. I would love to hear what embellishments you would add to your cases and see your pictures!

In the next few posts, I want to share with you how to make Dressed Up Wipe Cases, Fancy Burp Cloths and Nursing Covers. These are all items I was oblivious to prior to having children and now I wouldn't know what to do without them. Of course, you can do without these, but they sure make life a bit easier and prettier!
Last year, I came across someone with a wipe case that was all dressed up. I immediately thought, "I can do that!" Off I went to test it out. Well, let me tell you the first time was a huge fail. My glue gun left huge clumps of hot glue all over the fabric and case, it was horrible. The next time I took more care so that the case would look great. Let me share with you how to make these cute little gifts. Here is a preview of mine:

Supplies Needed:
- wipe cases (found in the baby section of any store practically, very inexpensive)
- quilt batting or felt (small amount or leftover from other projects)
- pretty fabric (great way to use up some leftover pieces)
- ribbons, buttons, flowers and in other embellishments
- glue gun
- glue sticks
- scissors


4. Cut two pieces of fabric to approximately 9 by 5. Once again check to make sure your case has the same dimensions as mine. Perfection isn't needed again as we will trim and cover with ribbon.
5. Position the fabric on one side of your box. Make sure that it is centered to adequately cover all sides. Glue the fabric to the batting. Then apply a strip of glue directly to the edge of the wipe case (every 3 to 4 inches) and press down the fabric. Trim any excess that goes over the closing of the case. Repeat this process all the way around on both top and bottom. Here is what your case will look like afterward.


I didn't have buttons or a flower to add, but I liked just the touch of ribbon. Here is how your case should look when you are finished.

There you have it. A simple gift that makes changing a diaper a bit more enjoyable. I made three for friends and since I was making them, I needed one for myself as well.
I hope you find this tutorial helpful. I would love to hear what embellishments you would add to your cases and see your pictures!
Saturday, January 29, 2011
What Can You Make With $1 Frame?
You know how Target has their $1 section? I found a $1 frame. It was plain white. It needed bling. With a little effort, I have something I think is adorable!


I took the frame and hot glued dotted ribbon around each section. I gave the ribbon some extra oomph by making little humps in it. I did this by putting a dot of hot glue on the frame and making a lump in the ribbon before I glued a piece down. I love how it made it look a little ruffled. I finished each mini frame off with a little bow. So cute! I only wish I bought more frames! What a great gift and it was so easy. I LOVE 30 minute craft projects. I don't come across them often.
Tuesday, January 18, 2011
A Valentine's Day Craft I Created. No Copycatting Involved!-A Tutorial
I am proud. This is by no means a perfect project and there are a few things I'd do differently, (no worries, I'll let you know what they are) but I made this without cheating off someone else's creativity. There's hope!


I started with a white canvas, a paintbrush, white, pink, and red acrylic paint.

I squirted the white paint on the acrylic canvas...

and got some help spreading it out evenly.

I lightly dry brushed the canvas with the light pink and red paints. (If I had to do it again, I wouldn't have used pink. I decided to do the accent pieces in red so the red dry brushing alone would have probably looked better.

Here's the prepared canvas. I really like the dimension/texture or whatever you call the hint of color.

I printed words on my computer. I knew I wanted "Love is" but struggled for the last word. I liked magical. But, then I asked my four year old, GraciAnn. With her big blue eyes opened wide, she said, "Love is AMAZING!" Amazing was perfect for our sign! "Love" is in AR DECODE font at 300 pt. "Is Amazing" is Monster Papparazzi font in 100 pt. I cut the words out and positioned them on the canvas. At the end, I didn't like the placement because it made it difficult to decorate the rest of the sign. Next time, I'll think through the entire project before making it permanent.

I took a pencil and scribbled on the back of the words to make it easily to transfer them onto the canvas.

I then traced the outline of the letters, with a sharp pencil.

If you look closely, you can see the letters on the canvas, ready to fill in.

I took a black, glossy, acrylic paint and carefully filled in the words.

Here's what it looks like all painted.

Now, for the embellishments. I made 4 flowers out of red felt (the same felt I used on the amazing wreath) and black burlap. I also needed a needle and thread. I used 9 3" circles for each flower. Five black circles and four red circles per flower. Between this project and the wreath project I am so over cutting circles!

For each flower, I took a black burlap circle as a base. I folded the remaining circles in quarters and sewed them on one at a time at the pointed part of the circle.

I sewed the second one directly across from the first.

I filled in the third...

and fourth ones to complete the base.

Then, I added the red felt circles. I folded them in quarters too. I overlapped two of the black pieces.

I sewed the second one right across from the first.

Fill in with the third....

and fourth circles. This is what it looks like prior to being "fluffed".

Then I kind of unfolded and fluffed the circles and this was my flower.

Here's my finished piece. I took black grosgrain ribbon and hot glued it around the edges to give it a finished look. I also added a bow, from the same ribbon. I was trying to balance everything out. It wasn't easy. I definitely should have planned ahead. That's the benefits of copy crafting. You learn from others' mistakes. Oh well! I really like how it turned out and it was another inexpensive addition to my Valentine's Day crafts!
Subscribe to:
Posts (Atom)


