
Last week was beyond CRAZY! We had the boys birthday/goodbye party on Saturday and I took on WAY too much in the preparations. Will I ever learn? (Not likely!) I can't wait to share the party with you, but it will have to wait till next week.
This week is Teacher Appreciation. Each day I will showcase what my son is taking to spoil his teacher. You can never spoil a teacher enough! They do so much that goes unnoticed. Take the time to give back and show some much needed appreciation!
I have lots of cute items to give Ryan's kindergarten teacher. The room mother had a daily list of things to give the teacher. I am trying to follow the list with some additional crafty gifts!
The first day was the teacher's favorite flower; a yellow rose. Well, I knew she would probably get a few bouquets worth and that they would eventually die off. I wanted to give her something that would last and that she could use as a decoration.
Showing posts with label Crochet Pattern. Show all posts
Showing posts with label Crochet Pattern. Show all posts
Tuesday, May 8, 2012
Friday, April 20, 2012
Owl Tissue Box Cover
A friend of mine asked me to make an owl tissue box cover as a teacher gift for her. I have never made a tissue box cover, but thankfully, I found a free pattern. I wanted to model it off the owl purse that I make.
Tuesday, April 3, 2012
GraciAnn's Doll Clothes
Back in the fall, Shannon's daughter, GraciAnn had a birthday. Shannon had mentioned that GraciAnn was really into doll clothes. Well, I knew I didn't have time to sew some clothes nor did I want the headache and frustration that would cause me. I like to sew, but I want the products that I make to be high quality. Trying something for the first time would not be the quality that I like.
Instead I went the route that I knew I could accomplish. I got on the internet and found a crochet doll dress pattern.
Friday, March 9, 2012
Cat in the Hat Crochet Hat & Bow
In case you didn't know, March 2 was Dr. Seuss's Birthday. Ryan's (my oldest) elementary school was having a day filled with fun activities for the kids to celebrate Dr. Seuss and his birthday.
One of the activities that occurred was a school parade. Any child, teacher, or staff member who dressed as a Dr. Seuss character could walk in the parade. Ryan begged and begged for me to help him dress like The Cat in the Hat. He actually thought I would make him a whole tuxedo like outfit. He was dreaming on that one. I did however crochet him a hat and bow-tie that mimicked The Cat in the Hat's attire.
Wednesday, December 14, 2011
Mittens
I tried something new again and this time it is making mittens. A lady from church asked me to make a pair of mittens. She had a friend who crochets that was making them, but couldn't figure out the pattern. I gladly took on the challenge. If you haven't figured me out yet, I love a challenge.
Monday, September 12, 2011
Halloween Ideas Recap!
It's almost time to start decorating for Fall. We started the blog in November of last year. This didn't give us time to highlight many Halloween items. Let me share a few previous ideas in this recap post. I hope you enjoy! More Halloween ideas will be coming up soon!
Wednesday, April 20, 2011
A Crocheted Bunny Basket
Have you missed me? You might have thought I was gone, but I wasn't! Shannon has been rockin' the sign making and I wanted to give her every opportunity to share all her fantastic signs! The time off let me do some catching up on some crafts that I have wanted to make.
I've had this adorable bunny basket on my list to do for a few months.

 This was an easy basket to whip up. If I had a few more days I would have made a few more as gifts, but time didn't allow that.
If you are interested in making this bunny basket, the pattern can be found here.
I hope everyone is having a great week leading up to a very Happy (or Hoppy) Easter!

I've had this adorable bunny basket on my list to do for a few months.


If you are interested in making this bunny basket, the pattern can be found here.
I hope everyone is having a great week leading up to a very Happy (or Hoppy) Easter!
Monday, March 21, 2011
Learn to Crochet!
As you may know, I love to crochet. I've been crocheting for about 12 years. I've known all the stitches, but just over the last couple of years, I learned to truly read a pattern. Wow, my world has been opened up since then. There are so many cute things you can make by learning to read a pattern. There is so much more to crocheting than the old Granny Square (which is even coming back in popularity)!
I want to help all of you who might have an interest in learning to crochet. Crocheting is different from knitting. Unfortunately, some knitters bad mouth crocheting and vice versa. I don't know why. I prefer to crochet as you get a product much faster and the supplies are less expensive. I know how to knit and I like the look of knitting, but I don't have the patience to spend the extra hours it takes. Knitting uses two long needles, whereas crocheting uses one crochet hook.
Before, you get started, you 'll need supplies (not many though).
Supplies needed:


Here is a list of helpful how to sites:
Lionbrand yarn: video tutorials and illustrated steps
Bernat Yarn: pdf illustrated steps to print
You tube: tons of videos!
Find more by just searching "how to crochet"
Pattern resources:
See the ones I have on the blog here
Lionbrand yarn: tons of free patterns
Crochet Pattern Central
Coats and Clark
Bernat Yarn
Etsy: Crochet Patterns for purchase
Find more by searching, "Crochet patterns"
If you begin to crochet, I highly suggest you start by making some swatches or even a washcloth in a particular stitch. This will help you master the stitch before you combine it with other stitches. There are 5 basic stitches: slip stitch (sl st), single crochet (sc), half double crochet (hdc), double crochet (dc) and triple crochet (tc). These are very simple stitches. Once you have the stitches down you can conquer just about any pattern!
I hope you find this brief overview and resource list helpful! Are there specific items you would like me to give you more information on? Just leave me a comment and I will write up future posts on the topic!
Oh, and check out the next post, it is a giveaway for 5 free patterns! What a wonderful way to start crocheting!
Happy Crocheting!
I want to help all of you who might have an interest in learning to crochet. Crocheting is different from knitting. Unfortunately, some knitters bad mouth crocheting and vice versa. I don't know why. I prefer to crochet as you get a product much faster and the supplies are less expensive. I know how to knit and I like the look of knitting, but I don't have the patience to spend the extra hours it takes. Knitting uses two long needles, whereas crocheting uses one crochet hook.
Before, you get started, you 'll need supplies (not many though).
Supplies needed:
- Crochet Hooks: You can get a set of hooks size D through K for about $13 (or less). See here. These are the most popular hooks that you will need. I typically use the H hook and I hook the most so I have multiple of those as I always keep one with the project I am working on, but you don't need multiples.
- Yarn Needle (for weaving in ends of yarn)
- Scissors

- Yarn of choice (see label on yarn for appropriate hook size). My favorite is "I love this yarn" from Hobby Lobby. It is super soft and easy to work with. Caron Simply Soft is another great choice.
- Stitch marker (either a piece of yarn, paper clip or actual stitch marker) You need this if you are working in the round (like making a hat) to know where a new round starts.

Here is a list of helpful how to sites:
Lionbrand yarn: video tutorials and illustrated steps
Bernat Yarn: pdf illustrated steps to print
You tube: tons of videos!
Find more by just searching "how to crochet"
Pattern resources:
See the ones I have on the blog here
Lionbrand yarn: tons of free patterns
Crochet Pattern Central
Coats and Clark
Bernat Yarn
Etsy: Crochet Patterns for purchase
Find more by searching, "Crochet patterns"
If you begin to crochet, I highly suggest you start by making some swatches or even a washcloth in a particular stitch. This will help you master the stitch before you combine it with other stitches. There are 5 basic stitches: slip stitch (sl st), single crochet (sc), half double crochet (hdc), double crochet (dc) and triple crochet (tc). These are very simple stitches. Once you have the stitches down you can conquer just about any pattern!
I hope you find this brief overview and resource list helpful! Are there specific items you would like me to give you more information on? Just leave me a comment and I will write up future posts on the topic!
Oh, and check out the next post, it is a giveaway for 5 free patterns! What a wonderful way to start crocheting!
Happy Crocheting!
Thursday, March 3, 2011
Two Shamrock Patterns!
Look what I created!
 A few weeks ago, I scoured the internet for shamrock patterns, but I didn't find exactly what I wanted. I love the small shamrock that Skip to My Lou has made (seen below).
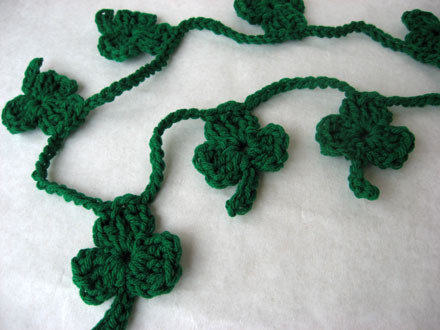


When I made this pattern, the shamrocks were adorable, but a bit small as garland for my mantle. I wanted something larger, like I did for my heart garland or candy corn garland. Well, I couldn't find anything, so I had to come up with something on my own! I even have a new technique (a magic ring) to share with you too!
Here are my shamrocks!
Above is a four leaf shamrock. Below is a three leaf shamrock. Both measure about 5 inches wide and about 6 inches in height.

Now for the patterns!
Large Shamrock (4 leaf) pattern
Red Heart Super Saver in Paddy Green
I-9/5.5mm Hook
crochet terms
ch- chain
sc- single crochet
st- stitch
sl st- slip stitch
dc- double crochet
hdc- half double crochet
Make a magic ring with 10 Sc. Directions can be found here. This makes a tight ring. (If this doesn’t interest you then, Chain 3. Sl st in third chain from the hook. Make 10 Sc in the loop. Sl st to first sc.)
Row 1: Ch 1. Sc in same st. sc in next st. (2 sc)
Row 2: Ch 1 turn. 2 sc in each sc st. (4 sc)
Row 3: Ch 1 turn, 2 sc in first st. Sc in next 2 sts. 2 sc in last st (6 sc)
Row 4: ch 1 turn, sc in each sc across (6 sc)
Row 5: ch 1 turn, 2 sc in first st, sc in next 4 st, 2 sc in last st (8 sc)
Row 6: ch 1 turn, sc in each st across (8 sc)
Row 7: ch 1 turn, skip 1 st, (sc, hdc, dc) in next st, (dc, hdc, sc) in next st, sl st in next st, ch 1, skip 1 st, (sc, hdc, dc) in next st, (dc, hdc, sc) in next st, sl st in last st.
Sl st down the side to the beginning circle. Sc in next 2 sts.
Follow above directions starting at Row 2. (repeat until you have 4 leaves).
Sl st into next Sc. Ch 14. 2 Dc in the third chain from the hook. Hdc in the next 4 sts. Make 3 hdc in fifth st. Hdc in the next 6 sts. Sl st into remaining st on circle. Fasten off.
Large Shamrock (3 leaf) pattern
Red Heart Super Saver in Paddy Green
I-9/5.5mm Hook
Make a magic ring with 8 Sc. Directions can be found here. This makes a really nice tight ring. (If this doesn’t interest you then, Chain 3. Sl st in third chain from the hook. Make 8 Sc in the loop. Sl st to first sc.)
Row 1: Ch 1. Sc in same st. sc in next st. (2 sc)
Row 2: Ch 1 turn. 2 sc in each sc st. (4 sc)
Row 3: Ch 1 turn, 2 sc in first st. Sc in next 2 sts. 2 sc in last st (6 sc)
Row 4: ch 1 turn, sc in each sc across (6 sc)
Row 5: ch 1 turn, 2 sc in first st, sc in next 4 st, 2 sc in last st (8 sc)
Row 6: ch 1 turn, sc in each st across (8 sc)
Row 7: ch 1 turn, skip 1 st, (sc, hdc, dc) in next st, (dc, hdc, sc) in next st, sl st in next st, ch 1, skip 1 st, (sc, hdc, dc) in next st, (dc, hdc, sc) in next st, sl st in last st.
Row 4: ch 1 turn, sc in each sc across (6 sc)
Row 5: ch 1 turn, 2 sc in first st, sc in next 4 st, 2 sc in last st (8 sc)
Row 6: ch 1 turn, sc in each st across (8 sc)
Row 7: ch 1 turn, skip 1 st, (sc, hdc, dc) in next st, (dc, hdc, sc) in next st, sl st in next st, ch 1, skip 1 st, (sc, hdc, dc) in next st, (dc, hdc, sc) in next st, sl st in last st.
Sl st down the side to the beginning circle. Sc in next 2 sts.
Follow above directions starting at Row 2. (repeat until you have 3 leaves).
Sl st into next Sc. Ch 14. 2 Dc in the third chain from the hook. Hdc in the next 4 sts. Make 3 hdc in fifth st. Hdc in the next 6 sts. Sl st into remaining st on circle. Fasten off.
For garland:
Depending on the size of your mantle, chain 80 to 100. For a thin chain, sc in every stitch. For a slightly thicker chain, hdc in the second stitch from the end and in every remaining stitch. You can also dc in every stitch but this will cause some holes in chain. Attach your shamrocks from either the top or stitch them through the center, whichever style you prefer.
I hope you enjoy these patterns. I would love to see your creations if you try out these patterns!
Happy Crocheting!Tuesday, March 1, 2011
Crocheted Leprechaun Hat
If you can't tell, Shannon and I have been busy crafting and decorating for every holiday. Starting a blog has enabled us to craft with a purpose for every holiday. Our kids are loving all these new decorations. My latest creation is a Crocheted Leprechaun Hat.
 I was searching for some St. Patrick's Day crochet items and found the pattern for this cute little guy. This was super easy to make and is a festive decoration! For my fellow crocheters, here is where you can find the pattern.
I want to add a green and white bow to give it a special touch. The original had a welcome sign on it too. That might be something I add in the future. If you make this, I would love to see your creation!

I want to add a green and white bow to give it a special touch. The original had a welcome sign on it too. That might be something I add in the future. If you make this, I would love to see your creation!
Thursday, February 24, 2011
Baby Isaac's Crocheted Gifts
I finished another baby gift set. This one is for Baby Isaac. I let his parents choose the colors and then I tried out another new pattern.
I am so glad that I made myself learn to read patterns about 6 months ago. If you are new to crocheting, don't be scared of reading patterns. Break it down step by step. I have even rewritten them so that I could understand them in "my" language.
Here is the gift set that I made for Baby Isaac. I made cute little booties, a hat with a big pom pom on top and a toddler size baby blanket. I always make my baby blankets a bit larger. I don't know a baby who gives up their favorite blanket at age 1. That usually doesn't happen till much later. At least a larger blanket will allow the child to enjoy it a bit longer.
 Here is a full shot of the baby blanket. I really like the light blue with the brown. I used I Love This Yarn from Hobby Lobby. I truly love this yarn! It is soft, full and nice to work with. The regularly 40% off coupon is nice too.
If I made this blanket again, I think I would make a slightly thicker edge around the entire blanket.

 Now for the best news, I want to share the patterns with you! They are not my own, but all easily available. The blanket is called Simple Ripple Baby Afghan from Lion Brand. You can find the pattern here. The shoes are called Warm Winter Booties and the pattern can be purchased here. The hat is called Mini Muffin Hat and you can find the pattern here. I love the textures and mixing of yarns for this precious little hat. There you go, three new patterns, two free, one to purchase.
I hope Little Isaac will like his baby set. I have at least 2 more baby blanket sets to make. I just need to decide what pattern I would like to try out next. If you would like to see some other crocheted blankets I have made, check out this post.
I am so glad that I made myself learn to read patterns about 6 months ago. If you are new to crocheting, don't be scared of reading patterns. Break it down step by step. I have even rewritten them so that I could understand them in "my" language.
Here is the gift set that I made for Baby Isaac. I made cute little booties, a hat with a big pom pom on top and a toddler size baby blanket. I always make my baby blankets a bit larger. I don't know a baby who gives up their favorite blanket at age 1. That usually doesn't happen till much later. At least a larger blanket will allow the child to enjoy it a bit longer.

If I made this blanket again, I think I would make a slightly thicker edge around the entire blanket.

Here is a close up view of the hat and booties.

I hope Little Isaac will like his baby set. I have at least 2 more baby blanket sets to make. I just need to decide what pattern I would like to try out next. If you would like to see some other crocheted blankets I have made, check out this post.
Saturday, January 22, 2011
Beautiful Yarn Rosette Wreath Tutorial
I have wanted a pretty wreath to hang on my mantle for awhile now. Yarn wreaths seem to be very popular these days. I can do yarn! I also thought some pretty rosettes would be a fantastic addition.
 Let me teach you how to make this beautiful wreath.
Necessary Supplies:
 Tie the yarn of your choice to the foam wreath. Don't worry about the ends, you can cover those as you wrap the yarn.
 Sit in a comfy chair and turn on a show you would like to catch up on. Start wrapping your foam wreath. I wrapped it four or five times and then bunched it tightly together. Repeat this process until your foam wreath is fully covered.
 Mine had a few imperfections, but that is where I placed my rosettes!
Now, I made three rosettes for this wreath. These rosettes were 3-4 inches wide. I attached one by tying it to the wreath. I made sure to bring the yarn up through the rosette on both sides so it would be tight. Then I took the other two rosettes and tilted them up on the first rosette. This made them look more cohesive versus just sitting in a row. I didn't have ribbon to match the rosettes so I took 8 to 10 long pieces of yarn and wrapped them around wreath and tied them together. This gave me something to hang the wreath from.
Here is my finished wreath and a picture of it hanging on my mantle.
 For those of you who would like to make the crochet rosettes, here is the pattern:
I used the Caron Simply Soft and H/8 Hook. If you choose another yarn, use the crochet hook suggested by the yarn manufacturer.
Symbols: ch-chain, Dc-double crochet,
Ch 65. Dc in the 6th ch from the hook.
Ch 3, skip next ch, dc in next ch. Repeat till end of ch.
Ch 3 (counts as first Dc), turn. In first loop, dc, ch 3, 2 Dc and ch 1.
In every remaining loop, 2Dc, ch 3, 2Dc, ch 1 till the end.
Ch 3, turn. *In your larger loop make 7 Dc. Slip stitch into the ch 1.* Repeat from
* to * to end of the row.
Fasten off and leave a 6-8 inch piece of yarn.
On the side without the long piece of yarn, start winding up the rose. Start tightly for the center of the rose. Continue wrapping until you come to the end. Using the long piece of yarn, pull it up through all the layers with your crochet hook. Then bring it back down through the other side. Fasten off. Use remaining yarn to attach to wreath, pin or headband of your choice.
Here is a picture of the rosette. Sorry, I forgot to take a better picture before I put it on the wreath.
 Yeah, I got another item on my to-do list accomplished. Too bad, I still haven't completed that baby blanket. Back on task I go!

Necessary Supplies:
- Yarns of your choice. I used Caron Simply Soft in White and Autumn Red. This is a great shiny and silky yarn. I barely used a fourth of the 6 ounce skeins.
- A small or large foam wreath. I used a small wreath from the dollar store.
- H/8 Crochet hook. *If you don't know how to crochet, you could always make fabric flowers for this wreath. Shannon did a tutorial of a fabric flower here and a burlap felt one here. You have many options.


Now, I made three rosettes for this wreath. These rosettes were 3-4 inches wide. I attached one by tying it to the wreath. I made sure to bring the yarn up through the rosette on both sides so it would be tight. Then I took the other two rosettes and tilted them up on the first rosette. This made them look more cohesive versus just sitting in a row. I didn't have ribbon to match the rosettes so I took 8 to 10 long pieces of yarn and wrapped them around wreath and tied them together. This gave me something to hang the wreath from.
Here is my finished wreath and a picture of it hanging on my mantle.

I used the Caron Simply Soft and H/8 Hook. If you choose another yarn, use the crochet hook suggested by the yarn manufacturer.
Symbols: ch-chain, Dc-double crochet,
Ch 65. Dc in the 6th ch from the hook.
Ch 3, skip next ch, dc in next ch. Repeat till end of ch.
Ch 3 (counts as first Dc), turn. In first loop, dc, ch 3, 2 Dc and ch 1.
In every remaining loop, 2Dc, ch 3, 2Dc, ch 1 till the end.
Ch 3, turn. *In your larger loop make 7 Dc. Slip stitch into the ch 1.* Repeat from
* to * to end of the row.
Fasten off and leave a 6-8 inch piece of yarn.
On the side without the long piece of yarn, start winding up the rose. Start tightly for the center of the rose. Continue wrapping until you come to the end. Using the long piece of yarn, pull it up through all the layers with your crochet hook. Then bring it back down through the other side. Fasten off. Use remaining yarn to attach to wreath, pin or headband of your choice.
Here is a picture of the rosette. Sorry, I forgot to take a better picture before I put it on the wreath.

Thursday, January 20, 2011
Crocheted Snowflake Garland
I have been busy crocheting lately. I have many things to share with you over the next few days! Plus, I procrastinated yet again and I'm scrambling to finish a another baby blanket! I'm trying out another new pattern so it makes it much more fun to do!
I've had a pattern for snowflake garland for awhile and I wanted to make it for my January decorations. It would have been ideal to have it finished right after Christmas. Well, January is almost over and I just finished it! I can check that off my list and get to other things. After all, I have Valentine's Day decorations I want to work on!
This was a quick and easy pattern. The pattern itself says it is for an intermediate crocheter. I don't agree. I thought it was fairly easy. If you know all the stitches, you can complete it fast!

The pattern is provided by Red Heart and can be downloaded here. I added a piece to each end so that I would have something to hang it by. Here are the details of that piece: Chain 15. Hdc in each st. Sl st into third loop of last snowflake. Sl st back into other side of chain. Fasten off. Repeat for other side.
I really like it! I think it is a nice decoration to go with my other winter whites. Valentine's Day is up next. Wait till you see what I am working on for my mantle!
I've had a pattern for snowflake garland for awhile and I wanted to make it for my January decorations. It would have been ideal to have it finished right after Christmas. Well, January is almost over and I just finished it! I can check that off my list and get to other things. After all, I have Valentine's Day decorations I want to work on!
This was a quick and easy pattern. The pattern itself says it is for an intermediate crocheter. I don't agree. I thought it was fairly easy. If you know all the stitches, you can complete it fast!

There should be a beautiful coffee filter wreath hanging from the mirror, but it isn't finished yet. I have issues focusing. I have so many crafts I want to do that I have a few going at a time. Hopefully, the wreath will be finished soon!
 |
| close-up of the snowflakes |
I really like it! I think it is a nice decoration to go with my other winter whites. Valentine's Day is up next. Wait till you see what I am working on for my mantle!
Saturday, January 8, 2011
Crocheted Baby Blankets
I learned to crochet when I was a little girl from my Great Grandmother. As I grew up, I forgot how to crochet. I picked up a book to teach myself about 12 years ago. Since then, I have made over 50 baby blankets!
One of the few handmade items that I remember from my childhood was a crocheted baby blanket. A family friend made it for me before I was born. I loved it so much my parents had to lose(put it at the top back corner of my closet) so that I wouldn't carry it around anymore. Since I was so fond of mine, I try to make special blankets for the new babies of my friends and family.
While I am catching up on shows at night, I like to crochet. It is mindless and I feel like I am still getting something accomplished. The problem is I am a procrastinator and also easily distracted. The blanket I finished today is for a friend due any day now. I thought she wasn't due till February! I had to rush to get it finished, but I also got distracted with looking at other crafts. Maybe my New Year's Resolution should be to focus on one thing at a time and not procrastinate. We will see how that works out (note sarcasm).
Here is the one I just finished (finally!) today for a friend. It is by far my favorite one of all time. I got the pattern from a great book (borrowed from library and then ordered from Amazon) called Undercover: 60 Afghans to knit and crochet. I will probably be making this one much more often. Maybe a large one for myself!
|
|


I made this with my new favorite yarn. It's called, I Love This Yarn. It is super soft and very nice to work with. I can only find it at Hobby Lobby so far and it never goes on sale! Luckily, I can use a 40% off on it! The pictures look somewhat gray, but the color is more of a soft denim. The official name is 96/Stonewash.
Prior to this blanket, I did just a simple pattern that I created. If you want mindless, you've got it! Here it is:
Simple Afghan Pattern (pictured below)
Chain 103.
*Double Crochet in the third chain from the hook.
Double Crochet in every chain till the end of your row.*
Chain three. Turn. Repeat above in *'s till you have 80 rows of double crochet. Add any border of your choosing.
This pattern can be used with any crochet hook size and any type of yarn. Very versatile!
 |
| Pretty Pink Blanket |
 |
| My nephew's blanket, he won't sleep without it! |
 |
| Made this for Shannon's Mariella |
 |
| This was a popular color this year. Made it for two friends and my sweet Anna. |
I have another blanket to work on soon, but before then, I am going to work on some other fun projects. Be on the lookout for those!
Did you or your children love a handmade blanket? Do you make something handmade for baby gifts? I would love to hear about your favorites! Give me some comment love!
Please check our linky parties to see all the places we are linking up to today!
Please check our linky parties to see all the places we are linking up to today!
Tuesday, November 30, 2010
Crocheted Candy Corn
On our trip home to Kentucky, I finally got to make these cute decorative candy corns. These have been on my list of things to make for about two years. One nice thing about blogging about crafts is it makes me commit to making things I've been procrastinating on for years. I think these will look cute amongst my mantle decorations next year.


Now that I finished these, I can end my obsession with candy corn for another year. If you would like to make these, they are super easy. Here is the link to the pattern: Candy Corn pattern If you make them, let me know. I would love to hear about those of you who are equally obsessed with Candy Corn. My second child seems to have the same affliction. He took off a piece of it from my wreath when I was packing things away. I guess the clear sealant didn't stop a 2 year old!
Bye Candy Corn, we look forward to seeing you next year!
Wednesday, November 17, 2010
Crocheted Candy Corn Bunting Pattern
I love all things Candy Corn, if you haven't noticed. A few months back I saw an adorable Felt Candy Corn bunting from The Funky Polkadot Giraffe. I loved it, but didn't want to spend the time cutting, sewing, more cutting and more sewing. Instead, I went back to my elementary days and cut out construction paper and used my glue stick. Here is a picture of my first attempt at a bunting:

I thought this was pretty cute, but as you can see, some of the candy corn turned backwards. I also had two little boys who enjoyed hitting it. The construction paper wouldn't last much longer.
Since I have a renewed passion for crocheting, I thought I would give it a try. I made a simple band for all the candy corn to hang from. If you know how to double crochet and half double crochet, this will be super easy and quick! Here is the updated mantle and a close up:

 I'm really happy with how this turned out. This banner is more likely to withstand two little boys! If you are interested in making your own, here is the pattern:
For those of you who love Candy Corn like I do, I have another candy corn project in the works. Be on the lookout for that soon!

I thought this was pretty cute, but as you can see, some of the candy corn turned backwards. I also had two little boys who enjoyed hitting it. The construction paper wouldn't last much longer.
Since I have a renewed passion for crocheting, I thought I would give it a try. I made a simple band for all the candy corn to hang from. If you know how to double crochet and half double crochet, this will be super easy and quick! Here is the updated mantle and a close up:


Crocheted Candy Corn Bunting
Yarn needed
1- #10 Yellow Peaches & Creme
2- #11 Sunburst Peaches & Creme
1- #1 White Peaches & Creme
H/8 Hook
Chain 353. Less or more depending on the length desired. (I got 9 Candy Corn from this length)
Double crochet in third chain from hook. Double Crochet in every chain till the end.
Row 1-Using Yellow, sl st into the 20th st. Ch 1, make 1 hdc in the next 25 sts.
Row 2-Ch 1, turn, make 1 hdc in every hdc st for a total of 25 sts. Ch 1, turn.
Rows 3-5-Skip the first hdc st, hdc in remaining sts, ch 1, turn.
Row 6-Skip the first hdc st, hdc in remaining sts. Join Orange color and ch 1, turn.
Rows 7-17- Skip the first hdc st, hdc in remaining sts, ch 1, turn.
Row 18- Skip the first hdc st, hdc in remaining sts. Join White color and ch 1, turn.
Rows 19-25- Skip the first hdc st, hdc in remaining sts, ch 1, turn.
Row 26-You should have two hdcs remaining. Hdc in second ch. Finish off.
Weave in all loose yarn pieces into coordinating color.
For those of you who love Candy Corn like I do, I have another candy corn project in the works. Be on the lookout for that soon!
Subscribe to:
Posts (Atom)


