Welcome!
Thanks for visiting! Please leave us a comment as we love your feedback.
See where we are partying at the bottom and on the sidebar.

Tuesday, January 18, 2011

A Valentine's Day Craft I Created. No Copycatting Involved!-A Tutorial

I am proud.  This is by no means a perfect project and there are a few things I'd do differently, (no worries, I'll let you know what they are) but I made this without cheating off someone else's creativity.  There's hope!

I started with a white canvas, a paintbrush, white, pink, and red acrylic paint.

I squirted the white paint on the acrylic canvas...

and got some help spreading it out evenly.

I lightly dry brushed the canvas with the light pink and red paints. (If I had to do it again, I wouldn't have used pink. I decided to do the accent pieces in red so the red dry brushing alone would have probably looked better.

Here's the prepared canvas. I really like the dimension/texture or whatever you call the hint of color.

I printed words on my computer. I knew I wanted "Love is" but struggled for the last word.  I liked magical.  But, then I asked my four year old, GraciAnn.  With her big blue eyes opened wide, she said, "Love is AMAZING!"  Amazing was perfect for our sign! "Love" is in AR DECODE font at 300 pt. "Is Amazing" is Monster Papparazzi font in 100 pt. I cut the words out and positioned them on the canvas.  At the end, I didn't like the placement because it made it difficult to decorate the rest of the sign. Next time, I'll think through the entire project before making it permanent.

I took a pencil and scribbled on the back of the words to make it easily to transfer them onto the canvas.

I then traced the outline of the letters, with a sharp pencil.

If you look closely, you can see the letters on the canvas, ready to fill in.

I took a black, glossy, acrylic paint and carefully filled in the words.

Here's what it looks like all painted.

Now, for the embellishments. I  made 4 flowers out of red felt (the same felt I used on the amazing wreath) and black burlap. I also needed a needle and thread. I used 9 3" circles for each flower. Five black circles and four red circles per flower.  Between this project and the wreath project I am so over cutting circles!

For each flower, I took a black burlap circle as a base.  I folded the remaining circles in quarters and sewed them on one at a time at the pointed part of the circle.

I sewed the second one directly across from the first.

I filled in the third...

and fourth ones to complete the base.

Then, I added the red felt circles.  I folded them in quarters too.  I overlapped two of the black pieces.

I sewed the second one right across from the first.

Fill in with the third....

and fourth circles. This is what it looks like prior to being "fluffed".

Then I kind of unfolded and fluffed the circles and this was my flower.

Here's my finished piece.  I took black grosgrain ribbon and hot glued it around the edges to give it a finished look.  I also added a bow, from the same ribbon.  I was trying to balance everything out.  It wasn't easy.  I definitely should have planned ahead.  That's the benefits of copy crafting.  You learn from others' mistakes.  Oh well!  I really like how it turned out and it was another inexpensive addition to my Valentine's Day crafts!

Related Posts Plugin for WordPress, Blogger...

Fun Crystallized Hearts Tutorial

I recently saw Martha make crystallized snowflakes and thought it would fun to make some hearts for Valentine's Day decorations.

Here are the supplies you will need:

Large glass with wide opening (I used a small wide vase) (about 1 quart)
Popsicle sticks
Yarn or wire
Red Pipe Cleaners
Borax laundry booster (found in laundry detergent aisle)
Water
Measuring cup and measuring spoon
Coffee filter or Paper towel

I had never heard of Borax so I took a picture for those of you like me.

Directions:
1.  Measure 3 to 4 cups of water.  You'll want enough water to cover your heart completely in your glass dish. You don't want your heart to touch the bottom or it will get stuck as the mixture starts solidifying.
2.  Put your dish in microwave and boil the water. 
3.  Measure out 9 tablespoons of Borax and put it in your glass container. 
4. While the water is heating up, grab two pipe cleaners or however many will fit in your glass.  You don't want them to touch at all.
5.  Fold your pipe cleaner in half and separate to make a V.
6.  Bring both ends together and twist a few times.
7.  Mold the heart to your desired shape.
8.  Wrap a piece of yarn or wire through the twisted part as an anchor to your heart.  Make sure it is the color you want as you can't remove it later.
9.  Cut the yarn to a fairly long length (8 to 10 inches).  Tie it to your popsicle stick.
10.  Pour your boiling water into your glass container.  Stir well and allow the Borax to fully dissolve.
11.  Wrap the yarn around your popsicle stick so that it is at a good length in your glass container.  Once again make sure your heart doesn't touch the bottom (lesson I learned).  It should be floating.  It can touch the sides, but it will definitely solidify at the bottom.  I could fit two hearts in my vase.
12.  Cover with a coffee filter or paper towel.  This will keep any dust or other items from falling in. 
13.  Place in an area where it will not be touched, moved or messed with.  It needs to sit overnight.
14.  The next morning you should have a heart that is covered in crystals.  Pull each out and allow to dry on your counter.  You can use the water mixture again if you wish.  Just re-heat the water in the microwave and dissolve any crystal build-up.
15.  Once your heart has dried, hang it from your yarn or wire wherever you like.  You can now cut the wire or yarn to the size you need it.
This would be a fun craft to do with your kids.  You can tell them that magic occurs overnight and creates the crystals. 

You can find pipe cleaners in a variety of colors.  If you purchase white, you can color the crystals by adding food coloring to the water.  Play around with different shapes and colors.  Most of all, have fun crafting!

Related Posts Plugin for WordPress, Blogger...

Sunday, January 16, 2011

Recipes from Mom-A Guest Blog from our loyal follower, Jessica

I honestly never thought of my friend, Jessica, as much of a cook.  She's always running through McDonalds, Wendys, or Taco Bell drive thrus or to Little Caesars to get a $5 fast and ready pizza.  All of the sudden, she's sending me pictures of these amazing dinners she's been making.  An even bigger treat was the day she dropped off a bowl of Mostaccioli, still warm.  Yum!

Now, she's started sending me recipes.  Did she not get the memo?  I'm TRYING to eat healthy which is especially hard with all these temptations.  I'm sure these recipes could be "healthified" with a few substitutions but for those of you that want to go full force, Jessica's sharing the recipes with you!

My taste buds thank you, Jess!


Being a full time teacher and mother of two very wild boys I find it hard to plan out meals and look for them in cookbooks so I turned to my favorite cook for her advice. My favorite cook being my mom. Since I don't live close to my mom (780 miles away) I only get her cooking about 4 times a year. She used to cook the mostaccoli and bring it to all the family gatherings weddings, graduations, and birthdays. My family loves it so much I figured I better get the recipe and start cooking it for them as well. I also have heard her talk about her homemade Chicken Pot Pie so while I was home at Christmas she made it for my family. We loved it so much I came home and within 1 week called her for the recipe. My husband never eats leftovers and he will eat both of these. The last recipe is something that I found at Wal-mart. While picking up my chili seasoning I found these McCormick spices that were pre-packaged and had all the measurements for a given recipe and so I tried it and we love it. Trust me all these recipes are simple to make and very tasty. My kids are picky eaters and they will eat everyone of these meals.
I hope you enjoy these!
Jessica

Mostaccioli
Doesn't this look delicious?  Believe me, it was!

1-jar of spaghetti sauce (I use the large Prego with mushrooms you won't need it all)
1- box of the mostaccioli noodles or you can use penne noodles
1-2 cup bag of mozzarela cheese
Parmesan cheese

1 pack of Johnsonville mild/sweet Italian sausage

Cook noodles as package says. Pre-boil the sausage so that it cooks out the grease. After noodles are cooked put them in a large bowl. Take the sausage out after precooked. Then slice them in pieces. Pour sausage in bowl with noodles and add as much sauce as you desire. Pour in as much parmesan cheese as you wish and mix. You also can add in some mozzarela cheese too. Stir all together in a bowl. Then pour in a baking dish and cover the top with mozzarela cheese. Bake at 350 for about 35 minutes covered with foil and then take off aluminum foil and cook until the cheese is a golden brown.

Chicken Pot Pie
2-Pillsbury Soft Pie Crusts (refrigerated kind they don't say soft on them)
2 cups diced chicken
1-can Veg-All (mixed vegtables corn, green beans, peas, and carrots)
2-Cans Cream of potatoes (you can use 1 can cream of chicken and 1 can cream of potatoe she uses the potato for both for more potatoes in the pie)
salt and pepper for taste
little milk to make it creamier

Mix all the ingredients in a bowl. Put one crust in the pie pan and poke a few wholes in the crust so that air comes through to cook the bottom. Then pour in all the ingredients. Put the other crust on top and wrap the edge with aluminum foil. Cook for 45 minutes on 350 and then take off foil and cook for 15 more minutes. Enjoy!
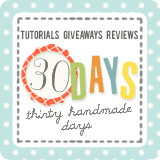

Everything poured in the bottom crust.

The top crust on and ready to bake.


Ready to Eat!

Rosemary Roasted Chicken with Potatoes2 tsp Paprika
1 1/2 tsp crushed rosemary leaves
1 tsp minced garlic
1/2 tsp course black pepper
2 tbsp olive oil
1 tsp salt
3-4 chicken breasts or 6 bone in chicken thighs (whichever you want)
1 1/2 lbs small red potatoes cut into 1 inch cubes

1. Mix oil and all spices in large bowl. Add chicken and potatoes toss and coat well. Arrange chicken and potatoes in single layer foil lined 15 x 10 x 1 inch backing pan sprayed with no stick cooking spray.

2. Roast, uncovered in preheated 425 F oven 30 minutes or until chicken is cooked through and potatoes are tender, turning potatoes occasionally.


This looks pretty healthy and amazing!
Thank you, Jessica!  We are always looking for great meals our kiddos will eat!
Related Posts Plugin for WordPress, Blogger...

Valentine's Day Printables!

We have so many Valentine's Day Printables to share with you!  Blogland is full of printables these days.  Here are some of our favorites!  Click on the words under the printable to go and print it out.  Also, give our fellow bloggers some love by thanking them for the printable in a comment!
This one comes in three different color choices.
This has two options can can be printed as large as 16 x 20!
9 color combinations!  I think you can find our to match your decor!
From one of our favorite subway art creators!
4 different heart shaped colors
10 colors to choose from
This printable has multiple uses!
Pink, red or purple
Related Posts Plugin for WordPress, Blogger...

Friday, January 14, 2011

From Blah To TaDa... with just a little vinyl!

I love all things personalized!
Well, almost all.  I just think it makes otherwise boring things, special.  Here are a few things I personalized, with vinyl.

These were the crates I loaded with gifts for GraciAnn's teachers' Christmas presents.

These are pushcarts, we got from IKEA for the girls.

A little side bling.

...and the front view. We've learned it works best to by two identical items and put their names on them. Mariella, not quite two, recognizes her name and knows it's best to stay away from her sister's!

This is GraciAnn's trashcan for her room.  I purchased it at IKEA too. It has a flap lid and was about $8. 
Before:
This was last night's project.  The bin on the left is a trashcan I picked up at Publix for $2.  The one on the right we use as a hamper. I got it at IKEA for about $3 or $4. These go in the girls' bathroom. 

The hamper front  "After".  The teacher in me wants to provide a print rich environment for my kids, so I wanted to clearly label the hamper with what we put in it: laundry.  I decided to do a plain font.

Side view of laundry hamper.

...and other side.

The finished trashcan.

Side view of finished trashcan.

Other side of trashcan.

Vinyl colors, up close.

I chose 3 different colors of vinyl.  All coordinate well with the bathroom. I used my Silhouette to cut the vinyl out.  I was pretty random about how I stuck the flowers and leaves on. Voila... an hour later, I was finished. So, for less than $10, we have a laundry hamper and a trashcan that match perfectly!  This morning, when GraciAnn saw them, she said, "I love the trashcan and laundry basket you made, Mommy. They are beautiful!"  Well, maybe not beautiful but darn cute in my book!
Related Posts Plugin for WordPress, Blogger...

Sourdough Cinnamon Rolls

For all of you who have enjoyed the Sourdough Starter & Recipe, I have another use of the starter for you.  How about some delicious Sourdough Cinnamon Rolls?


Here is the recipe and instructions:

Sourdough Cinnamon Rolls

Using your 1 cup of sourdough starter, make the dough per the directions for making sourdough bread.  Allow it to rise and then continue with this recipe.  Here is a picture of the dough that has risen:

Prepare the Cinnamon Filling.  Mix well.
1 cup sugar
4 tablespoons Cinnamon
8 tablespoons melted butter 

Turn dough onto floured surface and roll into a rectangle. Spread cinnamon filling over dough till covered. 
Roll up the dough.
 Cut into pieces about 1 1/2 to 2 1/2 inches and place into 1-2 greased 9x13 pans. (depends on how thick you cut them.) Place in pans side by side but not touching.
As you can see, I should have rolled my dough tighter.  There are some big cinnamon filling areas.

Place in a warm spot to rise with a towel over it or plastic wrap. Let rise overnight or for at least 2-3 hours.  The rolls should double in size. Bake for 20-25 minutes in a 375-degree oven. As soon as rolls come out of oven brush tops with butter. 
Prepare icing:
2 cups powdered sugar
1 tsp. vanilla
Milk to desired thickness

Mix sugar, vanilla and liquid to form a thick syrup. Can thin by placing in the microwave.  (The next time I make this I will probably attempt a cream cheese frosting and compare how I like it.  Who doesn't love cream cheese frosting!) Drizzle over rolls. 
 Put one (to start with at least) on your plate and enjoy!

I made these these the morning of our big snow here in Atlanta.  It made being snowed in that much more enjoyable!

I would love to hear from those of you who have attempted the starter and bread!  I think it is very simple and easy if you have the patience.  After you feed your starter again, try this recipe out!  My next use of my starter will be pizza dough.  I'll let you know what my family thinks!

Enjoy!


Related Posts Plugin for WordPress, Blogger...
Ebates Coupons and Cash Back