Welcome!
Thanks for visiting! Please leave us a comment as we love your feedback.
See where we are partying at the bottom and on the sidebar.

Thursday, June 16, 2011

A Family Tree

For Mother's Day, I wanted to create a special gift for my mom. I decided to make her a family tree.
I found it difficult to design a family tree for our small family.  I wanted to incorporate my parents, my brother, my husband, and my children.  I decided to make 3 branches (the center coming off of the trunk for my parents, the left branch for me, and the right branch for my brother). 

Once I had a plan, I started painting.  I painted a board solid green first. The green was only meant to peek through when I distressed the board. Then, I painted the board off white.  When that was done, I painted blue and green for a sky and grass.  To give it texture, I dry brushed. It still left more paint than I wanted so I went back with a damp brush and removed some paint. I really liked the  background.

I then made a tree pattern from paper.  I traced the tree on the board.

I then painted the tree in brown. This is the first coat.  I painted three.

After the board dried, I distressed the board with the mouse sander.

I then rubbed stain into the board to further distress the board.

The background is ready for the leaves to be added.

Using my Silhouette, I cut a lot of leaves in many sizes. I then used distressing ink around each leaf to define each leaf.

I wrote the families' names and birthdates on each leaf.  I also wrote our marriage dates. I then arranged the leaves and mod podged them on to the tree trunk.

Here's Mariella's leaf. Because we are a small family, most of the leaves were not written on.

After the bottom layer of Mod Podge dried, I Mod Podged the entire board and let it dry.


After the Mod Podge was completely dry, I coated the entire board in Polyurethane. 
When the first coat dried, I did a second coat.

After the Polyurethane dried, I drilled holes in the top of the board.

I then thread a wire through the holes and curled the end of the wire around a pencil to hold it in place.

Here's the finished product.
Related Posts Plugin for WordPress, Blogger...

Wednesday, June 15, 2011

Summer Spinach Salad

I am very excited to share with you my all time favorite salad recipe.  It is simple, delicious and a crowd pleaser.  Surprisingly, it doesn't have butter in it, which is quite the accomplishment for me.  It does have sugar though, but that makes it more delicious.


I have been making this salad for a few years now and I love it.  I take it to picnics, parties, get togethers and bunco.  The best thing about taking this somewhere is I always leave with a clean bowl.  It is always gobbled up.  There is nothing worse than taking a dish somewhere and leaving with the majority of it.  That is not the case with this salad.  I hope you will enjoy it like I do, especially how simple it is to make.

Before I get to the recipe, I want to share some tips with you so that this is super easy for you to make.

First, in a large measuring cup (2-3 cup size), measure out 1 cup of chopped pecans (you could use walnuts as well, but I prefer pecans.  It is the Southerner in me!).  Add 2 tablespoons white sugar and 2-3 tablespoons (or more if needed) water.  Stir well.  Microwave for 1 to 2 minutes.  Then pour the pecans out on a dish to cool.  You can even put it in the refrigerator to speed up the process.  Your pecans are now candied and required very little time, effort or clean up.


Second, when cutting up strawberries (mushrooms, eggs or anything needing uniformity), use an egg slicer.  It will create perfect, uniform slices and save you a ton of time.


See how pretty the strawberries look and you didn't risk cutting your fingers either!

Thirdly, I use a pourable dressing bottle to make the dressing for this.  Any salad will start to get soggy if you dress it too early.  Anytime I take this salad somewhere, I take the dressing with me in this container.  I can shake it up real quick and pour it over the salad.  Then it is perfect and ready to be devoured.


Lastly,  I like to serve this salad in a large glass bowl or trifle.  It has bright colors and is beautiful.  Seeing it from all angles enhances the need to eat it.  I also like to layer this salad so that all the toppings are spread throughout.  This also means some mandarin oranges and strawberries last for everyone as my children often sneak off with some from the top.


Summer Spinach Salad

1 carton of strawberries sliced
1 large can of mandarin oranges
1 large bag of fresh baby spinach
1 cup of chopped pecans
2 TBSP sugar

Cook pecans and sugar over low heat until melted, then cool.  I sometimes just put this mixture in the microwave when I am in a hurry.

Layer spinach strawberries, mandarin oranges and pecans in large bowl.  Do two layers if possible or toss items altogether.

Dressing:
1/4 cup vegetable oil
2 TBSP sugar
2 TBSP white vinegar

Double dressing for larger salads.  The above pictured salad had a doubled dressing.


Enjoy!


Related Posts Plugin for WordPress, Blogger...

Tuesday, June 14, 2011

Fathers' Day Gifts

Last year I made some wonderful Fathers' Day gifts, for my husband.  Unfortunately, I can't share this year's plans until after Fathers' Day!


Alphamom.com had wonderful free printables. Here's the link http://alphamom.com/family-fun/holidays/diy-fathers-day-gift-superhero-craft/ It's a chance for you to incorporate the Dad's favorite things into a really neat Father's Day care package.  I encourage you to check it out. I'd love to find another site that has something similar. It was a "Super" gift!


I made a freezer paper stencilled shirt for John. I traced the girls handprints and stencilled them on.  It says, "World's Best Dad, Hands Down!" He wears it so he must like it!


I got this idea from HowDoesShe. Here's the link: http://www.howdoesshe.com/my-favorite-things-with-2x4s

This is a canvas.  I painted the background tan with purple streaks.  I traced the girls' hands on scrapbook paper, cut them out, and Mod Podged them on the canvas. Using my Silhouette, I cut out the vinyl, "No matter how big we get we will always reach for you!" and the girls' names to go by their hands.  I then hot glued two different ribbons around the edge of the canvas to frame it. It's adorable!

I also made a photo collage.  Honestly, Walgreens was running a special for a free one and a friend told me about it so I was in!  All I needed was a frame I got for around $5 at Wal Mart.

None of these gifts were expensive.  All of these gifts were so meaningful to my husband. I hope he likes the things I've got up my sleeve this year! If you've got a great idea, please share with us. It's not too late.
Related Posts Plugin for WordPress, Blogger...

Monday, June 13, 2011

Great Things-Lowes and Home Depot's Children's Building Workshops

Jill and I discovered the free kids' workshops offered at Lowes and Home Depot every month.

Mariella is with her grandparents and her finished product: A Goofy Golf Game from Lowes.

GraciAnn's building the Goofy Golf game with her Grandpa.


GraciAnn built a Gingerbread house at Lowes a couple of years ago.


Lowes workshops are called Build and Grow and they are offered twice a month. Each participant receieves a kit, goggles, an apron, and a patch that matches the project they made. Lowe's clinic is at 10 am.  It is strongly recommended that you sign up ahead of time and print the waiver to bring in to the store when you go.  They have a limited number of projects. Here's the website that will give you more information. http://www.lowesbuildandgrow.com/

John and GraciAnn working on a project at Lowes.

Home Depot's Kids' workshops are held on the first Saturday of each month. They give each participant a wooden project to build. They provide the tools and a place for the kids to work. Their recommended age for the children is between 5 and 12.  They have been very welcoming to us with our 4 year old (she started with these projects at two and a half) and graciously give our two year old a project to do too.  They give the kids aprons, awards, and pins that represent the project they built. The workshops begin at 9am and ends at noon (or when materials are gone). Here's their website where you can get even more information:   http://ext.homedepot.com/community/blog/free-home-depot-kids-workshop-first-saturday-month/


John and GraciAnn working on a project at Home Depot.

Lowes and Home Depot have done a wonderful job, coming up with a variety of great projects, and welcoming the community to participate.  These workshops provide an opportunity for children to practice reading directions, work with tools, create fun projects, and most importantly, spend quality time with their families. If you have not taken advantage of these workshops, we encourage you to. They are GREAT THINGS!

Related Posts Plugin for WordPress, Blogger...

Sunday, June 12, 2011

The Winners of the Little Me Tea Giveaway Are....

If you didn't enter the contest, or you weren't a winner, please look at Little Me Tea's website http://www.littlemetea.com/ (or click on the button in our sidebar) to see all the benefits of this fabulous drink.  The owner of the company, Melinda Hicks, is so well educated and passionate about helping others find great health. Don't think this drink is just for children.  Yes, it is marketed as a drink for kids but the benefits, for everyone, are tremendous.

Now... for the winners.... six of you get to try Little Me Tea for free!  If you didn't win, I STRONGLY recommend trying the drink.  It's delicious and better yet, HEALTHY. Congratulations to:


73
73. Mary said...

I like OSD on FB.

35


62
62. Natalie said...
I now follow your blog. :D

26. Jen Fobart said...

I am most impressed by LMT's low sugar content and that it's certified organic. (And the fact that it's made by a local company in Lawrenceville, even though that's not on the chart!)


4


11

11. Kendall said...
I am not sure what you want for the benefits, but I saw this: Nature. Inside that little green leaf is a host of antioxidants, vitamins and minerals. And because tea is made with water, it's also hydrating. Personally I like that it is low in sugar because my mom, dad and myself are diabetic. I know that my children have a high chance of being diabetic.


Winners, please email us with your addresses and we'll pass the information to Little Me Tea!
Related Posts Plugin for WordPress, Blogger...

Saturday, June 11, 2011

Nursing Cover Tutorial

Before I had my first child, I knew I wanted to try to breastfeed him.  I was not aware how uncomfortable I would feel if I was out in public and needed to do so.  A blanket can help hide what you are doing, but it can be hot and babies learn to pull at it and destroy your sense of modesty.

Right after I had Ryan, a friend of mine who just had a baby as well came over and she got out her nursing cover when it was time for her to feed her son.  I asked her what she was using and where I could get one.  She told me she got it online and that it was about $40.  I was deflated.  I could not swing spending $40 on a nursing cover when I just quit my job to stay home with Ryan.  I asked my friend if I could look at her nursing cover.  After closer inspection, I found that nursing covers are very simple and would be easy to make.

Even if you use fancy fabric, it shouldn't cost more then $10 to make.  The first one I made cost less than $4 with some inexpensive fabric. Below is my handsome little man Evan being a good sport and modeling one I made.


Let me share with you how easy it is to make a nursing cover for yourself or as a gift.

Supplies Needed:
  • 1 yard of fabric (the lighter weight the better to be breathable, just make sure it isn't see through)
  • 1/2 yard of terry cloth for inside corners (optional, but nice to wipe up any spit up)
  • 1 foot of boning (like what is used in corsets) see below
  • Two D-clips.  (These usually come in a four pack).
  • scissors
  • iron
  • sewing machine
  • matching thread
1.  Unfold your yard of fabric.  Cut a 3 inch strip of fabric off the bottom of your fabric lengthwise.  This will be your strap and strap holder.

2.  Fold your 3 inch strip in half with the right side of the fabric inside.  Iron it down to give it a crisp edge.
3.  Sew along the edge of three side of this strap, leave one of the small ends open.

4.  Now cut off a 4 to 5 inch piece from the end that is not sew up.  This will become the portion that you will add the D-rings to.  See picture (ignore fabric below it).

5.  Take the both strap pieces and work them inside out so that the right side of the fabric is showing.

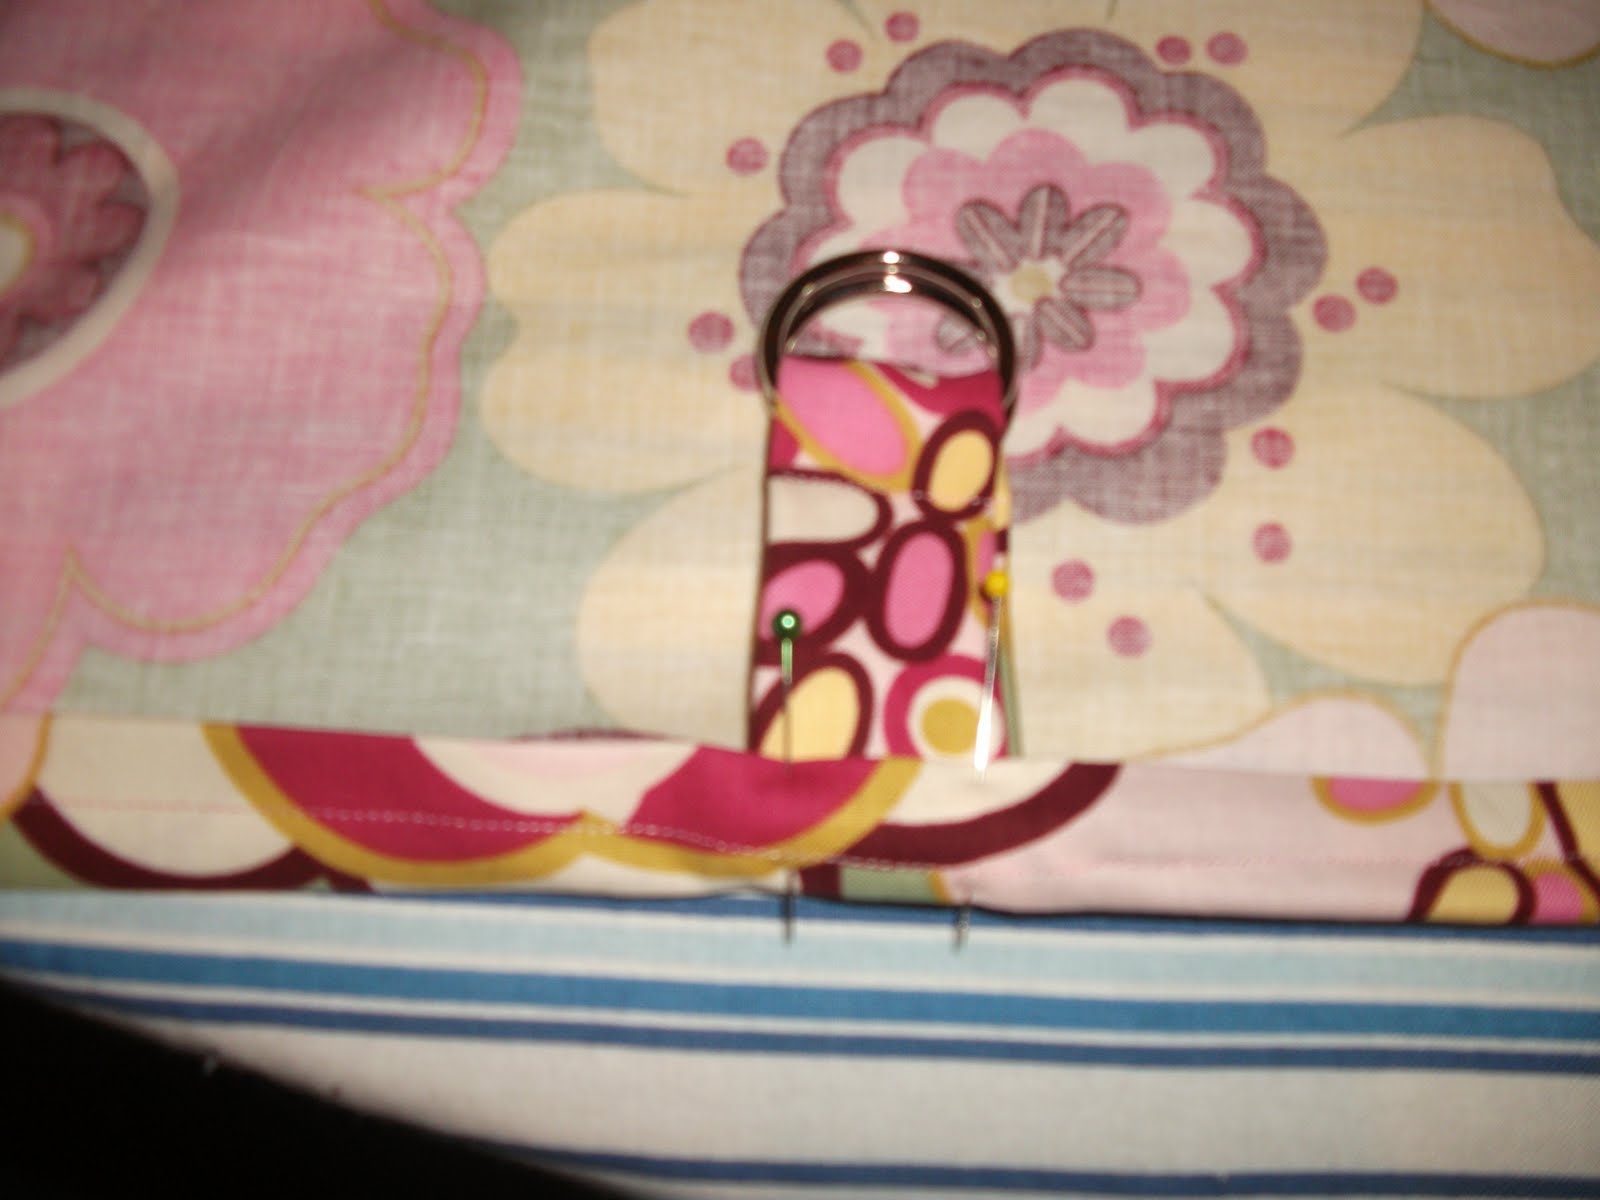
6.  String two D-rings onto the small piece and fold over.

7.  Sew a line directly below the D-rings so they don't move when the nursing cover is being used.

8.  Put both of these straps to the side for now.

9.  Take your remaining big piece of fabric and fold the two shorter sides and one longer side in a 1/4 of an inch and press with the iron.  Then fold it in another 1/4 of an inch and press with the iron again.  This will give a clean edge to the inside.


10.  Cut a 4 to 5 inch square out of the terry cloth.  The larger you make the square the larger your corner pockets will be.  Then fold over each square.  Check to make sure they fit well in the corners you just pressed down.  If they do, place them inside the corner, with the finished folded edge overlapping the terry cloth. (see below).


11.  Pin the terry cloth to the fabric edges and sew up the each of the folded edges to include the terry cloth triangles.

12.  Now to finish up the remaining long edge.  Fold over this edge a 1/4 of an inch or larger depending on the width of your boning.  Press with the iron.  Fold it another 1/4 of an inch and press with the iron again, then unfold this portion back.

13.  Place the boning under this folded edge in the center of the fabric, with the curve facing down. (This will allow the curve to face in toward the person when finished).  Pin the boning to the fabric.  Sew the portion where the boning is to attach the boning to the fabric.

14.  Fold over the fabric another 1/4 of an inch (you previously ironed it to this point).  Place your rough edge of your strap to the side of the boning and pin down.

15.  Place the small strap with the D-rings on the other side of the boning and pin down.

16.  Sew the length of the fabric to secure the final edge.  Make sure that both straps are securely sew into the edge.

17.  Fold over both straps and sew again so they are facing up when the nursing cover is worn.


It may seem like a ton of steps, but a nursing cover is very easy to make.  I wanted to be thorough and not leave out anything for even the most novice of seamstress.  The terry cloth corners are a nice touch to the nursing covers as you can use it as a pocket to tuck a tissue or bra pad.  Plus, it is nice to have something close to wipe the baby's mouth.  

I'm sorry I don't have a better picture, my model was asleep and I forgot to take another picture before I gave it as a present.

In a few days, I will have one more easy sew baby gift to share with you, but I need to make it first so that I have pictures for the step-by-step tutorial.  If you've ever wanted to make a baby sling, you won't want to miss that tutorial.

Related Posts Plugin for WordPress, Blogger...
Ebates Coupons and Cash Back